Download

1 / 71
710 likes | 852 Vues
Exporting Data and Creating Financial Reports with Excel and Crystal . By Peter Schmidt. Set up an ODBC connection. Setup ODBC. Select menu:. Start Settings Control Panel. Setup ODBC. Select folder:. Administrative Tools (double click). Setup ODBC. Select Program:.

E N D
Exporting Data and Creating Financial Reports with Excel and Crystal By Peter Schmidt
Setup ODBC Select menu: • Start • Settings • Control Panel
Setup ODBC Select folder: • Administrative Tools (double click)
Setup ODBC Select Program: • Data Sources (ODBC) (double click)
Setup ODBC Select : • System DSN • Add
Setup ODBC From here on, the steps for SQL Server are different than Informix.
Setup ODBC For SQL Server The following steps are just for SQL Server databases.
Setup ODBC For SQL Server Select : • Select SQL Server driver • Click Finish
Name (any name you want) • Description (optional) • Your SQL Server server-name • Next > Setup ODBC For SQL Server Enter :
With SQL Server authentication using a login ID and password… • Connect to obtain default settings • Login ID & password – Next > Setup ODBC For SQL Server Enter :
Change the default database to: (Pick your desired database) • Leave everything else unchanged • Next Setup ODBC For SQL Server Enter :
Setup ODBC For SQL Server • Leave everything else unchanged • Finish
Setup ODBC For SQL Server • Test Data Source • Click OK on test results • Click OK on Test Data Source
Setup ODBC For SQL Server • Should see your new System DSN (DSN = data set name) • Click – OK – to finish
Setup ODBC For Informix The following steps are just for Informix databases.
Setup ODBC For Informix Select : • Select a driver • Finish
Setup ODBC For Informix • Name (any name you want) • Description (optional) • OK Enter :
Informix server name (instance name) • Server Host Name (box name) • tcp/ip service name, default is 1575 • Protocol – onsoctcp • Database – son_db • Click – Apply & Test Connection • Click OK - OK Setup ODBC For Informix Enter :
Select options: • Data • Get External Data • New Database Query
Microsoft Query should automatically start. If this windows pops up, you can use it to create your SQL or just “close” it. Note the Microsoft Query window that is displayed.
Copy and paste in a pre-written SQL statement. Click the SQL button to copy and paste in a pre-written SQL statement. Click OK when ready.
Sql used for this demo SELECT mbillaty, tkfirst, tklast, mmatter, clname1, mdesc1, mloc, mhper, mhdobidb, mhdocodc, mhcrdc FROM son_db.dbo.matths, son_db.dbo.timekeep ttk, son_db.dbo.matter, son_db.dbo.client, son_db.dbo.periodt WHERE mhmatter = matter.mmatter and mclient = client.clnum and mbillaty = tkinit and mhper = pe and pebedt between '01/01/2004' and '12/31/2004'
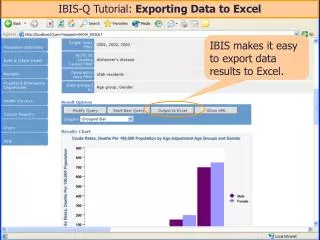
Send the data to your spreadsheet. Click on the “Return Data” button.
Place your data on your spreadsheet (usually in it’s own ‘tab’)
Your data is placed into your spreadsheet. If desired, rename the ‘tab’ to ‘data’.
If desired, copy to a new ‘tab’ and create a page heading and some better column headings.
Start a Pivot Table. • Data • PivotTable and PivotChart Report
Microsoft Excel List or database • Pivot Table • Next >
Indicate the data to be included in the pivot table. Be sure to include the column headings with the data.
Indicate where to place the new pivot table. You can place it on a new or the existing worksheet.
Build your new pivot table. Build your pivot table by dropping and dragging fields from the list onto the template.
Create a “PivotChart” (graph) • PivotTable • PivotChart
If desired, convert to a “pie” chart. • Right-click the chart • Select “Chart Type”
File • Printer Setup • Orientation - Landscape For additional width, change to Landscape printing.
Database • Database Expert • Create New Connection • ODBC (RDO) Configure your DB connection
Supply your password (or select “Trusted Connection”) Click “Finish”
Pick the tables you want to use in your query. Click on “>” to put tables into the “Selected” column
Click on the “Links” tab and configure your table joins. See next page for a list of joins needed for this demo.