Download
1 / 109
1.09k likes | 1.27k Vues
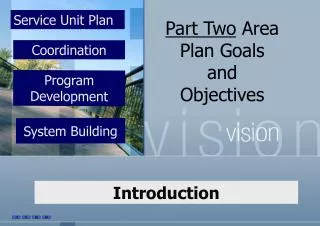
February 18, 2014. Building SYSTEMS (part ONE of two). Presented by AIA-Pittsburgh’s Young Architects’ Forum (YAF) and Exam resources are available at AIA-PGH YAF ARE Review http://yafpghare.wordpress.com /. Agenda. 5:30 Introduction / Division Overview 5:45 Graphic Vignette Review

E N D
February 18, 2014 Building SYSTEMS(part ONE of two)
Presented by AIA-Pittsburgh’s Young Architects’ Forum (YAF) and Exam resources are available at AIA-PGH YAF ARE Review http://yafpghare.wordpress.com/
Agenda • 5:30 Introduction / Division Overview • 5:45 Graphic Vignette Review • 6:00 Multiple Choice Content Review … Electrical • 6:45 Break (if desired) • 7:00 Multiple Choice Content Review … Lighting • 7:45Questions?
Division Statement Evaluate, select, and integrate mechanical, electrical, and specialty systems in building design and construction. Exam Structure • 95 Multiple-Choice Questions (2 hours) • Break (15 minutes) • 1 Graphic Vignette (1 hour) • Mechanical and Electrical Plan
Test Day… • Introductory Tutorial 0:15 • Multiple-Choice Questions 2:00 • Scheduled (Mandatory) Break 0:15 • Introductory Tutorial 0:15 • Graphic Vignette 1:00 • Exit Questionnaire 0:15 • TOTAL APPOINTMENT TIME 4:00
Suggested Sequence • Construction Documents and Services • Programming Planning and Practice • Site Planning and Design • Structural Systems • Building Systems • Building Design and Construction Systems • Schematic Design
Content Areas • CODES & REGULATIONS (5-8% of scored items) • “…building codes, specialty codes, zoning, and other regulatory requirements…” • ENVIRONMENTAL ISSUES (10-15% of scored items) • “…sustainable design principles…” • PLUMBING(10-15% of scored items) • Principles • Materials and Technology • HVAC(18-23% of scored items) • Principles • Materials and Technology • ELECTRICAL(10-15% of scored items) • Principles • Materials and Technology • LIGHTING(18-23% of scored items) • Principles • Materials and Technology • SPECIALTIES(14-19% of scored items) • Principles • Materials and Technology
By the numbers… • 95 questions… • 2 hour testing time… …1 minute, 15 seconds per question • By content areas… Codes/ Regulations….…………..……………..…4 - 8 questions Environmental Issues..……………..……..…..10 - 15 questions Plumbing……………………………………….....10 - 15 questions HVAC…………………….…………………….……17 – 22 questions Electrical ……………………………………….....10 - 15 questions Lighting..……………….…………………….……17 – 22 questions Specialties………………………………………...13 – 18 questions
GRAPHIC VIGNETTE MECHANICAL & ELECTRICAL PLANDevelop a reflected ceiling plan that integrates ceiling, lighting, mechanical, and structural systems and incorporates life safety considerations. PROGRAM A reflected ceiling plan for an architect’s office is to be prepared. The space is in a multistory building and is enclosed by leasable office space on one side, a corridor on another, and two exterior walls. The client wants flexibility for furniture placement, efficient lighting levels, and a comfortable environment.
Mechanical and Electrical Layout The Problem Complete the partially completed reflected ceiling plan on the work screen by: • providing a grid for acoustical tile, • locating lighting fixtures to achieve specified light intensity, and • developing a schematic HVAC plan complete with fire dampers and air diffusers, ductwork, and return-air grilles to meet specified air distribution requirements. It is recommended that the ceiling layout be completed before ducts are added. Your solution must be contained within the perimeter walls of the overall space. The completed plan should reflect effective coordination and integration of structural, mechanical, and electrical units within the ceiling grid and should provide for maximum flexibility for furniture layouts at the most economical cost.
Program Requirements Comply with the following requirements to develop the reflected ceiling plan: Suspended Ceiling System 1. Provide a 2 ft X 4 ft grid with lay-in acoustical tiles in all spaces. 2. All ceiling heights are 9 ft above the finished floor. 3. Typical walls terminate 6 inches above the finished ceiling; bearing walls and fire-rated walls extend to the bottom of the floor deck above. Lighting System -- should be efficient and should minimize overlighting and underlighting. 1. For all spaces, use only recessed fluorescent fixtures to provide uniform light distribution with a light level of approximately 50 footcandles measured at desk level (3 ft above the finished floor). 2. In addition to the fluorescent fixtures required above, provide recessed accent light fixtures. • Locate the accent light fixtures along the west wall of the Architect’s Office so that the direct light level on the wall at a height of 5 ft above the floor is 80 footcandles. • Space the accent light fixtures so that the light level between the fixtures at 5 ft above the floor is 80 footcandles. • The accent light fixtures should not be considered in determining the uniform light distribution levels. • The recessed fluorescent fixtures should not be considered in determining the accent light levels.
Program Requirements, cont. HVAC System The space is served by the supply and return risers within the shaft indicated on the floor plan. The HVAC system should provide for uniform air distribution with an economical duct layout conforming to the following restrictions: 1. Provide a minimum of one supply diffuser and one return-air grillein each space. An acceptable air distribution pattern includes one supply diffuser and one return-air grille for every 144 ft of floor area (or portion thereof ) in each space. 2. Connect each supply diffuser to the rigid supply duct system with flexible duct. Do not exceed 10 ft for flexible duct lengths. 3. Return-air grilles are open to the ceiling space, which serves as a return-air plenum. Connect the plenum to the return riser with rigid duct. 4. Protect duct openings in fire-rated walls with fire dampers. 5. Flexible ducts fit through joist webs. 6. Rigid ducts fit under beams, in spaces between joists, and in a zone that extends 2 ft on either side of beams and bearing walls in plan view. Rigid ducts do not fit through joists or between the bottom of joists and the ceiling.
General Tips… Clear your head. Remember – it’s not AutoCAD… … or design studio. Practice makes perfect… … but don’t over-practice!! Take your time. Follow all of the instructions!! Don’t second-guess yourself.
GRAPHIC VIGNETTE Everybody read this! If you have 2' between the long sides of 2x4s, you're doing it wrong. If you're using circles for anything but accents, you're wasting your time.
GRAPHIC VIGNETTE Frequently Asked Questions: Q. Does it matter which way the damper points? This appears to be a minor issue at most. The long leg of the symbol must be parallel to the wall…either in the center of the wall or at the face of the wall. Q. How do I center the grid precisely? You don’t. Just get it as close as you can. The snap setting will not permit exact centering. Q. What if I have ceiling tile slivers? Doesn't matter. This is a ME vignette, not a pretty ceiling tile vignette. Center the lights. Q. What is the ideal distance from the wall for lights? That depends on the type of light and the lighting chart that goes with it. Q. Can ducts be placed above lights? Yes. Duct sizes and the plenum depth are not specified. If it mattered, NCARB would have to say so. Q. I can’t get the lights to fit the room to provide the ideal requirement. Should I over or under light the room? Decide which based on the use of the room. Q. What is the ideal distance between supply diffusers and return grilles? A minimum of 4’ is recommended, but the farther apart the better. Q. Should supply diffusers be placed on the window side of the room? A. There is no evidence that this matters to NCARB.
GRAPHIC VIGNETTE Frequently Asked Questions: (continued) Q. Can a flex duct supply more than one diffuser? No. This is clearly defined in the program. Q. The program specifies 1 set per 144 s.f. or portion thereof. If a room has 145 s.f., should I place one or two sets of supply/return? Do I just round up or down? A. 2 sets should be provided as a strict interpretation of the requirement but…the 3.1 sample passing solution had a room at 145 s.f. with only one set. The program also said to be efficient. An additional set for 1 s.f. is not efficient. Catch 22. If you are over the required area, add the extra set to be safe. Q. How many accent lights do I need? A. That depends on the lighting chart. Determine how far from the light you can get the required lighting level. Draw sketch circles that size. Place them along the appropriate wall so that their intersections occur at the face of the wall. Then place the accent lights at the center of each circle. The goal is to cover as much of the wall as possible. Note if you change the distance between the lights, you change the distance from the wall as well because the intersection point of the sketch circles will change.
GRAPHIC VIGNETTE Common Mistakes: 1. Inadequate separation between supply & return. Should be at least 4ft apart. 2. Return grilles not supported on 3 sides by the grid. They’ll fall out. Do not assume the software is smart enough to place grid on the 4th side of a 2x2 light. 3. Incorrect light spacing. Read the lighting charts carefully. The current NCARB passing solution (2009) shows incorrect light spacing in the Architect’s Office. 4. Connect the flex duct to the center of diffusers, not the edge. 5. Grid overlapping ceiling elements. 6. Rigid duct crossing joists when not within 2’ of a beam or bearing wall. 7. More than one rigid duct for each riser. Adding an extra damper wastes money. Accent Lights:
GRAPHIC VIGNETTE Strategy (checklist): Read program carefully. Jot down pertinent notes. Draw grid in first room. Draw lighting fixture at ideal intervals. Do not worry about centering yet, just get the distances correct. For example, if your lights are to be 4’ apart just start 2’ off the wall and place the fixtures at 4’ intervals. Stop when you are 4’ or less from the wall. Lights shall be no closer than 1’ from the wall and no further than 4’ from wall. Ideally, lights should be 3’ from walls due to bounced light from fixture combining with direct light on work surface at perimeter of room to meet desired illumination levels. (Assuming a 2’ spread of light). Use the “move group” tool and shift the grid and lights so that they are centered on the room. If the layout does not appear acceptable, move the grid off to the side and either rotate it and try again or if another fixture is available to use try placing them in the same manner as above. Continue for all rooms. Verify that spaces with different fixtures have the correct fixtures, and if rooms are NOT to have the grid then a grid is not provided. A grid can still be used to layout these spaces if the module is a 2 or 4’ module but make sure you delete it afterwards. If the spacing is other than a multiple of 2’ then draw sketch circles and place them side by side filling the room. Then place the fixtures in the center of the circles. Click on the grid in the first room and read the square footage on the screen below. Determine the number of diffusers and returns based upon the program requirements. Spread diffusers out for optimum air flow. Do not place in front of door or against walls. In front of windows is a good location. Place returns at least 4’ away from diffusers at opposite sides of room. Do not place return against wall. Support registers/diffusers on 3 sides. Repeat for all rooms.
GRAPHIC VIGNETTE Strategy (checklist): continued Place fire dampers at supply and return risers. Short leg points in the direction of airflow. Draw short length of duct from center of return riser to outside edge of fire damper to plenum air space. Determine where rigid duct can be run perpendicular to joists and draw rigid duct out of riser and, following the program rules, over to a point between two joists that is perpendicular to the center of a line drawn between the two outermost diffusers to be connected to this run of duct. If necessary, branch a second run of rigid duct to pick up another string of diffusers in the same manner. Draw duct portion perpendicular to joists in allowable area maintaining half the allowable distance from the wall/beam/allowable zone. Ducts have a thickness and representative line indicates center of duct so if you draw your duct the specified distance the duct will actually be out of the allowable zone. Draw rigid duct between joists to a point perpendicular to the furthest diffuser for that run of duct. Do not turn rigid duct back towards risers, use additional branch of duct parallel to first branch if necessary to pick up more diffusers. Connect the diffuser to the rigid duct with flex duct no more than 10’, connected to the center of the diffuser. Flex duct can run perpendicular to joists and can run on top of lights. Does this imply that rigid duct can not run over lights? Repeat for all diffusers for that branch of duct. Repeat with second branch of duct if necessary. Try to keep all diffusers from a room on the same main branch. If rigid return duct is called for, provide in the manner described for the supply duct. Verify all rooms are properly lit, adequately ventilated, and all ductwork is continuous.
Suggested Resources • “References Available During the Test” document • Mechanical and Electrical Equipment for Buildings • Heating, Cooling, Lighting (Lechner) • Dustin Goffron’s “Helpful Links for the ARE 4.0” • http://www.dustingoffron.com/ARE/ • Alkikat’s Study Guide • Jenny’s Notes (AREndurance) • www.arendurance.files.wordpress.com • YouTube’s “WikiEngineering” channel • MEEB’s Student Companion Site • http://bcs.wiley.com/he-bcs/Books?action=contents&itemId=0471465917&bcsId=2879 • CED Engineering.com’s “Design Options for HVAC Distribution Systems” • http://www.cedengineering.com/upload/Design%20Options%20for%20HVAC%20Distribution%20Systems.pdf
Suggested Resources • ARE Building Systems Study Guide and Practice Exam(The Amber Book) By Michael Ermann • Professor Norman Dorf’s ARE Solutions
Content Areas Electrical Lighting
Study Resources:Building Systems Exam resources are available at AIA-PGH YAF ARE Review http://yafpghare.wordpress.com/ Study Guides NCARB Exam Guide “References Available During the Test”
Study Resources:Building Systems Exam resources are available at AIA-PGH YAF ARE Review http://yafpghare.wordpress.com/ Study Guides AlkikatBuilding System Notes + Diagrams Jenny’sAREndurance Study Guide ArchiTangent’s ARE Prep: Building Systems
Study Resources:Building Systems Exam resources are available at AIA-PGH YAF ARE Review http://yafpghare.wordpress.com/ Jenny’s AREndurance Study Guide DISCLAIMER
Content Areas Electrical Lighting
Electrical Basic Electrical Physics VOLTAGE ( V ): measured in volts, the amount of force or potential in a circuit CURRENT ( I ): measured in amps, it’s the amount of flow through a circuit RESISTANCE ( R ): measured in ohms, the amount that slows down the current
Electrical Basic Electrical Physics – Water Analogy Potential Water Height, pressure, or pressure difference ( feet or psi ) Flow ( gallons per minute ) Resistance to Flow ( inches per 100 ft. ) Electricity Voltage V ( volts ) Current Current I ( amps ) Resistance Resistance R ( ohms )
Electrical Basic Electrical Physics – VOLTAGE ( V ) in volts “ Water Pressure “
Electrical Basic Electrical Physics – CURRENT ( I ) in amps “ Water Flow“
Electrical Basic Electrical Physics – RESISTANCE ( R ) in ohms “ Resistance to Flow“
Electrical Basic Electrical Physics – CIRCUIT CURRENT VOLTAGE ( battery ) RESISTANCE ( light bulb ) CURRENT
Electrical Ohm’s Law V and I are directly proportional to each other > the greater the voltage, the greater the current I and R are inversely proportional to each other > the greater the resistance, the smaller the current VOLTAGE ( V ) V = I x R CURRENT ( I ) I = V / R RESISTANCE ( R ) R = V / I
Electrical Ohm’s Law Example Given a 120 volt outlet and a hair dryer with a resistance of 8 ohms, the current flow through the hair dryer when it is turned on is _____ amps. 15 amps 6.7 amps 1.5 amps 0.67 amps CURRENT ( I ) I = V / R I = 120 v / 8 ohms I = 15 amps
Electrical Resistance SERIES Resistance: Resistors situated in one path PARALLEL Resistance: Resistors situated in multiple paths
Electrical Resistance SERIES Resistance: Resistors situated in one path In a Series … Effective Total Resistance = Sum of All Resistances Rs = R1 + R2 + R3
Electrical Resistance PARALLEL Resistance: Resistors situated in multiple paths In Parallel … Effective Total Resistance = Inverse of Sum of Inverse Resistances 1/Rp = 1/R1 + 1/R2 + 1/R3 OR Rp= 1 1/R1+ 1/R2 + 1/R3
Electrical Resistance Resistors situated in Series AND Parallel
Electrical Transmission of Electricity Direct Current ( DC ) Current flows in ONE direction, with constant voltage Example: Batteries DC Power Equation: Power ( watts ) = Voltage x Current P = V x I Example: A 12 volt battery connected to a 4 ohm resistor … the current is ____ ? I = V / R = 12 v / 4 Ω = 3 amps P = V x I = 12 v x 3 amps = 36 watts
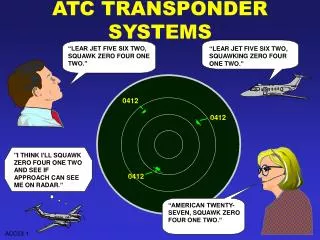
Electrical Transmission of Electricity Alternating Current ( AC ) Electricity has nearly zero inertia and therefore the direction of flow can be reversed very rapidly by reversing the voltage. Single-Phase Three-Phase
Electrical Transmission of Electricity Single-Phase AC Power Equation P = V x I x PF ( PF = Power Factor in decimal form ) Three-Phase AC Power Equation P = V x I x PF x √ 3 ( PF = Power Factor in decimal form ) Example: A three-phase motor draws a current of 7 amps at 240 volts and the power factor is 0.8… the power is ____ ? P = V x I x PF x √ 3 = 240 v x 7 amps x 0.8 x 1.73 = 2,325 watts
Electrical Equipment Motor vs Generator Motor > converts electrical energy into mechanical energy Running a current through a wire loop creates a magnetic field. This is the basic principle behind electric motors and solenoids. Generator > converts mechanical energy into electrical energy Rotating a wire loop between two magnetic poles will generate a current. This is the basic principle behind generating electricity.
Electrical Equipment Motor Types Four types in general use: 1. DC motor – small scale applications, elevators for smooth continuous acceleration 2. Single phase AC motors – typically 3/4HP or less such as exhaust fans, pumps, etc. 3. 3-phase induction motors – larger motors, constant rpm such as air handlers, power factors from 0.7 to 0.9 4. Universal motors – DC or AC, variable speed, such as hand drills, mixers, similar appliances
Electrical Equipment Transformer Transformers > change the voltage of AC Circuit Consist of an iron core on which two separate coils of wire are wound, called the primary and a secondary “windings” “Step-Up” Transformer … changes to a higher voltage “Step-Down” Transformer … changes to a lower voltage Waste energy is HEAT, which must be dissipated. Transformer sizes are defined in volt-amps ( VA ), or kilovolt-amps ( KVA )
Electrical Equipment Transformer Voltages Typical commercial system voltages: 480Y/277V-3ph-4w and 208Y/120V-3ph-4w Typical residential system voltage: 120/240V1ph-3w Older buildings sometimes had two services: 120/240V-1ph-3w 240V-3ph-3w delta for motor loads
Electrical Equipment Transformer Voltages … Which One to Choose? – What is available from the power company? – What is the building square footage? – Building use? (industrial, office, retail, warehouse, multi-tenant, high-rise) – Standard distribution equipment sizes and how they affect architecture (NEC workspace clearances, multiple doors to main electrical room, doors with panic hardware opening outward from the room) – What makes sense for the major equipment? – Also … higher voltage = lower current = smaller wire higher voltage = better tolerance for voltage drop higher voltage = more load per circuit = fewer circuits used