Adding Content To Your Faculty Page
Adding Content To Your Faculty Page. Login Create your Faculty Page. 1. Go to the UHA website (uha-ky.org) and select login from the bottom left hand corner. 2. Login: USERNAME: First initial + lastname PSWRD: username + UHA EX: jkendall jkendallUHA.

Adding Content To Your Faculty Page
E N D
Presentation Transcript
Adding Content To Your Faculty Page • Login • Create your Faculty Page
1. Go to the UHA website (uha-ky.org) and select login from the bottom left hand corner • 2. Login: • USERNAME: First initial + lastname • PSWRD: username + UHA • EX: jkendalljkendallUHA
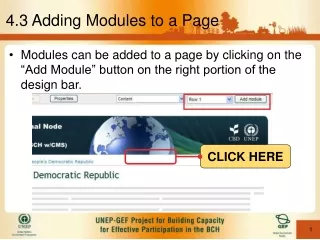
You will see this screen. Don’t worry, you won’t use most of these functions. Select: Faculty PagesAdd New
1. Enter your class/subject and your name in the area indicated. This is the title of your new page. 2. NOTE: At any time you can click preview to see what your changes will appear like to users. Please do so now. It will open the preview in a new tab.
This is what you will see. The rest of this class/maintaining your page will be filling in the blank space. Click back to the original tab and select: Save Draft. (It is to the left of the preview button)
-Note how the & changed to & -This is how WordPress (the website software) does things. It is okay, and you will see it a lot. Just try to ignore it. If you want to make sure the page is still good, go ahead and select preview again. I do this A LOT, and I recommend you do too.
Add hyperlink: i.e. how you make text blue to take you to another page/website. Add ET learn more block: i.e. click here for more information. Add author bio: I.e. a picture to the left with text to the right. Add ET tabs: i.e. a tabbed box to have more content in a smaller area. Add ET button: i.e. a hyperlink button. Add ET box: i.e. a box with text in it We will go over each of these in turn.
From your toolbar, press this button and you will get the following window. • Type whatever you want here. It will be your title/header. • Type whatever you want here. It will be your content/ body. • When you are done, Select: “OK”
You will get this screen. I entered HEADER and BODY on the test screen for purposes of this demonstration. It will say whatever you put in there. • This looks horribly confusing. It is if you don’t know html code (I don’t). To see how it will actually look, select preview.
The preview button shows you how it really looks. Much better, huh? • The ET learn more button is the one that has a dropdown. Press the arrow to open or close the box for more information.
WARNING: Before you add anything else to your page, make sure your cursor isn’t in the middle of all the formidable looking html code. Place your cursor on the edit screen wherever you want the new object to go. Make sure there is at least one empty space above and one below the cursor before adding anything else. It will mess everything up. Watch this demonstration.
From your toolbar, press this button and you will get the following window. The type dropdown menu adds an icon inside the box to distinguish the type of content in the box. You can change this up and see what it does. Same principle as the ET learn more button. Type whatever in the content box and it will be in the box on the site.
This is the scary code area view. The red is from the ET learn more button earlier. The new box is below it.
This is how it looks in preview mode with the ET learn more collapsed. The only real difference is the absence of a header and no drop down box. The content is the same. This is from earlier but with the box collapsed. This is the ET Box we just made.
From your toolbar, press this button and you will get a window similar to the others. There are more options to play with, but if you leave the defaults alone and add two more tabs (via the + add one more tab button in the lower left hand corner), you will get the following in preview (plus the two that you already created). Before we continue, I need to cover how to add media (word documents, pdfs, pictures, etc) to the website so you can link (i.e. hyperlink) to it on your page.
Let’s say that Mrs. Hendricks wanted to issue a homework assignment via her Faculty Page that involved the student’s viewing Fine Art and writing a story about it. She would need to post the assignment directions, as well as the picture. To go about it she could use any of the content types we have gone over (ET whatever) for the directions, but wants to have the picture on her site to make sure everyone sees the same thing. She can approach this two ways, both of which involve uploading the picture to the UHA website, and then linking the media to her page. I will show you how to upload the picture (or word document, flyer, or other media) to the UHA website, then two ways to add it to your page.
Media Uploads: For posting calendars, flyers, lists, pictures, homework assignments, whatever. You can use these directly in your page or make hyperlinks to them later. Make sure you saved your draft Faculty Page (the button is to the left of the preview button). From the blue menu on the left, select: MediaAdd New. You will get the following screen • 3. Press “Select Files” and find the content you want to upload from your computer.
It will open a screen like this. You can change The title, alt. description, caption, and description if you would like. • I always highlight and copy (ctrl + c) the file URL since I know I am going to use it in just a minute. Press: “Save all changes” to store the document on the website.
1. Go back to the faculty page you created by selecting “Faculty Pages: from the blue links on the left, and selecting edit.2. Add your ET content, and fill in the appropriate text. I did a mock up on her site, as follows. You will see the following: • Note that the html code contains exactly what she typed in, plus scary stuff in brackets and slashes that we don’t need to worry about.
4. To link to her image, she highlights the relevant material (the first image result returned for “Fine Art”. • 5. Then she presses this button in the toolbar , and it opens the following window . She already copied the URL when she uploaded the picture, so all she has to do is paste (ctrl+V) it in here. (You can always return to the media page and recopy the hyperlink) Then she types in whatever title she wants and presses “Add Link”.
Notice how the html code has the hyperlink blue we are all extremely familiar with?
This is how it looks when she hits preview, and how it will look to anyone that visits her faculty page.
Another way to add an image to your page is easier, but the result can be confusing to the page viewer. 1. Select Upload/Insert from the “edit page” screen. Upload it from your computer, or find it in the gallery if you already uploaded it via “MediaAdd New”. It will look like the following page. It is pretty, but the picture is not linked to any content. I would recommend using this way to put a class picture/picture of yourself on the front of your page.
It is pretty, but the picture is not linked to any content. I would recommend using this tool to put a class picture/picture of yourself on the top of your page.
Now that you know how to add media and find URL’s, you can add lots of content to your Faculty Page without cluttering it up. This also allows us to use the other toolbar buttons, as follows. Use this button to create this, as follows:
Use this button to create this, as follows: I would not recommend using this one as it takes some work to get it to look right.
I know this is a lot to take in at one time, but with a little practice your Faculty Page can add a lot to your communication with students, parents, and prospective parents. I am more than willing to work with each of you individually to make your page how you want it, within the limits of what is possible using WordPress.