Download
1 / 5
50 likes | 178 Vues
How to Make a Native American Rattle Craft By Kathleen Bunn , eHow Contributor http://www.ehow.com/how_4480117_make-native-american-rattle-craft.html

E N D
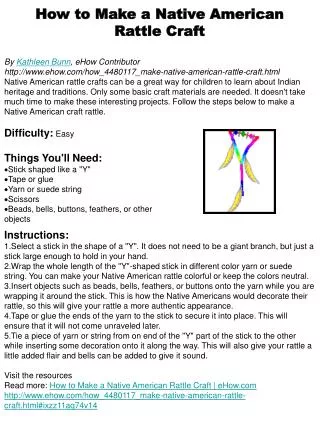
How to Make a Native American Rattle Craft By Kathleen Bunn, eHow Contributor http://www.ehow.com/how_4480117_make-native-american-rattle-craft.html Native American rattle crafts can be a great way for children to learn about Indian heritage and traditions. Only some basic craft materials are needed. It doesn't take much time to make these interesting projects. Follow the steps below to make a Native American craft rattle. Difficulty: Easy • Instructions: • Select a stick in the shape of a "Y". It does not need to be a giant branch, but just a stick large enough to hold in your hand. • Wrap the whole length of the "Y"-shaped stick in different color yarn or suede string. You can make your Native American rattle colorful or keep the colors neutral. • Insert objects such as beads, bells, feathers, or buttons onto the yarn while you are wrapping it around the stick. This is how the Native Americans would decorate their rattle, so this will give your rattle a more authentic appearance. • Tape or glue the ends of the yarn to the stick to secure it into place. This will ensure that it will not come unraveled later. • Tie a piece of yarn or string from on end of the "Y" part of the stick to the other while inserting some decoration onto it along the way. This will also give your rattle a little added flair and bells can be added to give it sound. • Visit the resources • Read more: How to Make a Native American Rattle Craft | eHow.comhttp://www.ehow.com/how_4480117_make-native-american-rattle-craft.html#ixzz11aq74v14
How to Make a Tree Pop-Up Card By Buzzle.com Intelligent Life on the Web http://www.buzzle.com/articles/crafts-for-kids.html Young or old, everybody likes the pop-up cards. But how to make pop card? Making these cards at home is very easy. The following steps will give you detailed directions for it.. What's This? Difficulty:Easy • Instructions: • Firstly fold 2 pieces of paper in half. One piece will be used to make the outer cover and the other will be used inside the card. • Make 4 short, parallel cuts only along the fold line of the inner card. Make the cuts in pairs, and maintain some distance between the two pairs. • Slowly fold over the flaps which were made due to the cuts. Open these folds and then open the card. • Push these flaps up, these flaps will serve as tree trunks. • Now close the card so that the flaps remain inside the card. • Cut two tree shapes from a green chart paper, make sure that the tree shapes are small enough to fit inside the card, when it is closed. • Gently stick the trees to the trunks with help of glue. • Close the card, let the glue dry for sometime. • Now we will make use of the other folded piece of paper, which we had set aside in the beginning. • Stick this paper onto the outside card, on the top corner, make sure you do not stick it where the trees are. • Decorate the card with glitter. Instead of trees, you can stick something simple like stars or balls. • Read more: Crafts for kids
How to Make a pencil case By Buzzle.com Intelligent Life on the Web http://www.buzzle.com/articles/simple-kids-crafts.html A pencil case is an useful thing for each child. Instead of buying one, why not teach your kids to make one themselves! They'll love to carry a self made pencil case. Here's how. Difficulty: Easy 1. The longer side is the height of the pencil holder. 2. Now fold it in the center, i.e at 4.5 inches. So, you have 3 sides open. You have to pack two sides out of these, the height and base. Top will be open. 3. Punch holes at equal distance on base and height. Do not punch holes for 2 inches at top. 4. Tie the plastic string to first hole of the base, put a knot and start lacing into each hole till you reach the topmost hole. 5. Again put a knot and secure tightly. 6. Cut off the remaining string. 7. Now you have the top part open, which needs to be converted into a flap. There are two pieces at the top, cut off one to have a single piece, which will be the flap. 8. Now stick velcro to this flap. 9. Stick other part of velcro to the pencil case. 10. Fold the flap downwards and you have a closed pencil case ready. 11. Take colored foam stickers and decorate the foam surface. 12. Put in your pencils, eraser, pans and get ready to use it. Read more: Simple crafts for kids
How to Make a Homemade Drum By an eHow Contributor http://www.ehow.com/how_2043785_make-homemade-drum.html What's This? If you have a little music maker in the house that loves to make noise but isn't quite ready for a full-sized drum set, you may want to make your own homemade drum. This can be a fun craft to involve children whether it is an activity done at home, church or school. Here are the steps to make your own homemade drum. Difficulty:Easy • Instructions: • Find a canister to make your drum. This can be a large recycled coffee can or an empty oatmeal canister. • Decorate the type of cylinder you choose with paint, or glue on construction paper or pictures cut from a magazine. • Choose from several different materials to make your topper. • Decide what to use as drum sticks. You may use inexpensive wooden chopsticks, or make your own drum sticks by using two unsharpened pencils. Cover the pencils by wrapping them in heavy yarn from the eraser down. Tie into a knot, glue the edges and let dry. • Let your little drummer make some noise! • Read more: How to Make a Homemade Drum | eHow.comhttp://www.ehow.com/how_2043785_make-homemade-drum.html#ixzz11awkqu9y