DIY Assembly Instructions for Multi-Sized Shelving Unit
This user-friendly guide provides step-by-step instructions for assembling a versatile shelving unit measuring 18” x 11.25” x 0.75” and 12” x 11.25” x 0.75”. The assembly process involves securing various parts using #6 x 1-1/4” Fine Bugle Head Phillips Drywall Screws. Follow the five steps to achieve a sturdy and functional shelf structure. The instructions also include placement for dowels and button plugs. Suitable for any room to maximize storage space effectively.

DIY Assembly Instructions for Multi-Sized Shelving Unit
E N D
Presentation Transcript
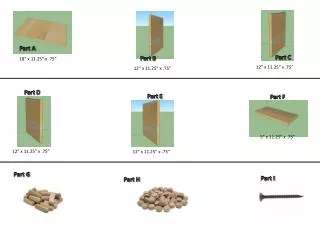
Part A Part C Part B 18” x 11.25” x .75” 12” x 11.25” x .75” 12” x 11.25” x .75” Part D Part E Part F 5” x 11.25” x .75” 12” x 11.25” x .75” 12” x 11.25” x .75” Part G Part I Part H
Step 1 Screw Parts B and E into Part A using the #6 x 1-1/4 in. Fine BugleHead Phillips Drywall Screws (Part I x4) Step 2 Screw Parts C and D into Part A using the #6 x 1-1/4 in. Fine BugleHead Phillips Drywall Screws (Part I x4) Step 3 Screw Parts C and D into Part A using the #6 x 1-1/4 in. Fine BugleHead Phillips Drywall Screws (Part I x4)
Step 4 Place 4 dowels (Part G) under each shelf (Part F) Step 5 Place shelves (Part F) in your selected areas and the button plugs (Part H) in the empty holes.
Packaging 20” Tall 6” Tall