Download

1 / 20
210 likes | 242 Vues
Learn the fundamentals of Microsoft Access 2000, including defining terms, navigating the interface, creating queries, forms, reports, and compacting databases. Understand database concepts and terminology. Explore RDBMS functions and database management skills. Step-by-step instructions for starting, opening, and using Access for efficient data organization and manipulation.

E N D
An INTRODUCTION to MICROSOFT ACESS 2000 By Dr. Ennis-Cole
Objectives: • Define the terms field, record, table, relational data base, primary key and foreign key • Start and Exit Access • Open an existing database • Identify the components of the Access and Database windows
Objectives: • Open, navigate, and print a table • Create, run, and print a query • Create and print a form • Use the Access Help system • Create, Preview, and print a report • Compact a database
Database Concepts: • Data is a valuable resource to any business • It can be names, addresses, phone numbers, dates, SSN, etc. • Organizing, Storing, Maintaining, Retrieving, and Sorting - critical activities • Data should be organized to facilitate the abovementioned
Database Terminology: • A field is a single characteristic of a person, place, object, event or idea. • A table is a collection of fields. • Field value - Specific data of a field • Refer to Fig 1-1
Database Terminology: • A collection of related tables • A common field connects the records in separate tables ; it appears in both the tables • A Primary key is a field, or a collection of fields, whose values uniquely identify each record • When the primary key is included in a second table, it’s called as a Foreign key
Relational Database Management Systems (RDBMS) • To manage databases, companies purchase programs called RDBMS • Create and modify databases • Organized data as a collection of tables • Built-in Query Language & Report Generator • Security, Control & Data Recovery Facilities
RDBMS Functions: • Creation of database structures containing fields, tables, and table relationships: • Add new records • Change field values in existing records • Delete records • Use a built-in query language
RDBMS Functions: • Generate reports • Protects database entries • Manipulate massive amounts of data • Each database can be up to 2GB size! • Each database can contain up to 32,768 objects! • Refer to Figure 1-3
Starting & Opening an Existing Database: • Click Start, Programs • Point to Microsoft Access • Click Microsoft Access to start • Select Open an existing file button • Click OK • Click Look in list arrow • Select the database and click Open
The Access Window: • The Access window appears when you start • The Database window appears when you open a database • The database window is similar to other window applications: • Objects bar: tables, queries, forms & reports • Groups bar: permits the organization of different database objects into groups
Opening an Access Table: • In the Objects bar, click the type of object you want to open • If necessary, scroll the object list box • Click the object name, Click the Open button • Datasheet view shows the table’s contents • Record selector aka row selector highlights the entire column or row for manipulation • Refer to Figs. 1-7, 1-8 & 1-9
Navigating an Access Datasheet • The Current record symbol = currently selected record • Move the pointer over the data on the screen and click the field values • The navigation buttons provide another way to move vertically through the records • Click the Next Record, Last Record, Previous Record and First Record buttons to navigate • Refer to Fig 1-9
Creating and Printing a Query • A Query is a question about data stored • Design your own queries or use the Query Wizard • To use the QW: • Start Access, Open an existing file, click OK • Click the Look in list arrow, click Open • Click any option and click Queries • Click Create query by using wizard • Refer to Fig 1-11
Sorting Query Results • Click to position the insertion point anywhere in the column field • Click the Sort Ascending button • Click the Print button • Click the Close button • Click Yes, Restore buttons to save the query design changes & restore the database window
Creating and Printing a Form • A form is an object used to maintain, view, and print records. The Form Wizard is an Access tool that asks a series of questions and then creates a form. The quickest way to create a form - AutoForm Wizard • Click Forms, New button • Click AutoForm:Columnar to select wizard
Getting Help: • Office Assistant is an interactive guide • Click Access Help button • Type your question, click Search button • Choose a topic from the list • When finished, close the Office Assistant • Refer to Fig 1-14 to get help on reports
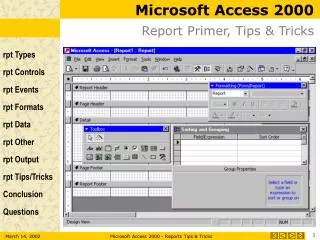
Creating, Previewing, and Printing a Report • A Report is a formatted printout containing information from one or more tables. • Click Reports, New • Click AutoReport: Columnar • Click the Customer list • Click OK and click maximize button • Click File, Print and select type 1 in the Pages option button • Click OK, Close after printing
Compacting a Database • The database size increases whenever you open and work in it. Compacting rearranges the database to make its size smaller. • Make sure the database file is open • Click Tools, Options • Click the General tab in the options dialog box, Check Compact on Close, Click OK • Backup and Restore the database
Printing and Exiting: • Click Print button • The table prints on two pages • Click the Close button