DNA Extraction
Amber Baranowski abaranowski@sjcoe.net. DNA Extraction . Jewelry Collection. Background on DNA Extraction Extract Genomic DNA from Cheek Cells Prepare DNA Necklaces. Introduction . DNA profiling Cloning Disease diagnosis DNA sequencing

DNA Extraction
E N D
Presentation Transcript
Amber Baranowski abaranowski@sjcoe.net DNA Extraction Jewelry Collection
Background on DNA Extraction • Extract Genomic DNA from Cheek Cells • Prepare DNA Necklaces Introduction
DNA profiling • Cloning • Disease diagnosis • DNA sequencing • Genetically modified organisms (GMO) -agriculture, pharmaceutical • Environmental testing, biodefense Relevance of DNA Isolation
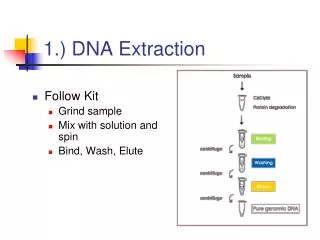
• Use a simple water mouthwash to collect cheek cells • • Add Lysis buffer to cells to break open cell and nuclear membranes and release nuclear contents • • Digest sample with protease to degrade proteins • • Precipitate DNA with cold alcohol in high salt Protocol Highlights: Genomic DNA Extraction
For best results, make sure students spend the recommended amount of time collecting mouth cells. Some users may find collecting mouthwash in a 15 ml tube difficult. As an alternative, instructors may wish to use a small drinking cup to dispense and collect mouth wash. Ample Cell Collection is Criticalfor Success
Obtain 15 ml tube containing 3 ml water from your instructor. Label the tube with your initials. Gently chew the insides of your cheeks for 30 seconds. It is NOT helpful to draw blood! Take the water from the 15 ml tube into your mouth, and swish the water around vigorously for 30 seconds. Carefully expel the liquid back into the 15 ml tube. Laboratory Protocol
Slowlyadd 10 ml of cold alcohol, holding the tube at a 45° angle. This will take repeated additions using the disposable transfer pipet. • Let stand undisturbed for 5 minutes at room temperature. What do you see? • Cap your tube, and very gently tilt tube on its side then turn upright about 10 times until both the water and alcohol phases have mixed and the DNA comes out of solution.
Cell Collection • Gently chewing the inside of the mouth combined with a water mouth wash is used to dislodge epithelial cells lining the mouth Ample cell collection is critical for success.
What is Lysis Buffer?• 50 mMTris-HCI, pH 8.0• 1% SDSTris buffer to maintain the pH of the solution at a level where DNA is stable1% SDS to break open the cell and nuclear membranes, allowing the DNA to be released into the solution (SDS also denatures and unfolds proteins, making them more susceptible to protease cleavage).
Protease is added to destroy nuclear proteins that bind DNA and cytoplasmic enzymes that breakdown and destroy DNA. • Protease treatment increases the amount of intact DNA that is extracted. Why Add Protease?
The protease solution already contains salt • • Na+ ions of NaCI bind to the phosphate groups of DNA molecules, neutralizing the electric charge of the DNA molecules. • • The addition of NaCI allows the DNA molecules to come together instead of repelling each other, thus making it easier for DNA to precipitate out of solution when alcohol is added. Adding Salt
• DNA does not dissolve in alcohol. • • The addition of cold alcohol makes the DNA clump together and precipitate out of solution. • Precipitated DNA molecules appear as long pieces of fluffy, stringy, web-like strands. • Microscopic oxygen bubbles “aggregate” , or “fuse” together, as the DNA precipitates. • The larger, visible air bubbles “lift” the DNA out of solution, from the aqueous into the organic phase. . Adding Ice Cold Alcohol?
Using a disposable plastic transfer pipet, carefully transfer the fluffy DNA strandsyou extracted into the small glass vial. Transfer as much of your DNA and as little alcohol as possible. The vial should be filled no higher than 2 mm from the top of the neck of the vial. Preserving DNA Sample: DNA Necklace Preparation
Place the silver cap onto the top of the glass vial and press down firmly for 30 seconds. Allow the glue to dry for an additional 10–15 seconds, and then check for a complete seal. After the glue has dried, tie the waxed cord. Preserving DNA Sample: DNA Necklace Preparation
DNA in the • glass vial can last • for years. Add more alcohol into the vial if some evaporation occurs