1 / 0

Handy Store Fixtures Gondola Dolly Assembly Instructions

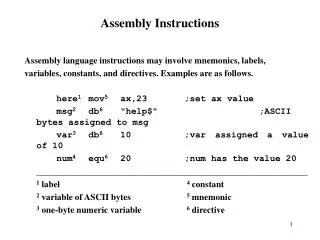
Handy Store Fixtures Gondola Dolly Assembly Instructions. Materials Parts List:. Gondola Dolly Frame Gondola Uprights End Shoe Center Shoe Back Panel Stop Cap Spacers Front Toe Back Panel Top Cap Base Shelf Levelers Castors with Nuts & Bolts. Assembly Instructions.

lazar
Télécharger la présentation

Handy Store Fixtures Gondola Dolly Assembly Instructions

An Image/Link below is provided (as is) to download presentation Download Policy: Content on the Website is provided to you AS IS for your information and personal use and may not be sold / licensed / shared on other websites without getting consent from its author. Content is provided to you AS IS for your information and personal use only. Download presentation by click this link. While downloading, if for some reason you are not able to download a presentation, the publisher may have deleted the file from their server. During download, if you can't get a presentation, the file might be deleted by the publisher.

E N D

Presentation Transcript


  1. Handy Store Fixtures Gondola Dolly Assembly Instructions

  2. Materials Parts List: Gondola Dolly Frame Gondola Uprights End Shoe Center Shoe Back Panel Stop Cap Spacers Front Toe Back Panel Top Cap Base Shelf Levelers Castors with Nuts & Bolts
  3. Assembly Instructions A) Remove Levelers (#11) that are inserted into End Shoe (#3) and Center Shoes (#4).
  4. Assembly Instructions B) Screw 4 Castors (#12) into Gondola Dolly Frame (#1).
  5. Assembly Instructions C) Attach Shoes to Gondola Dolly Frame (#1). Bolt down to the Frame, bolts go down thru End Shoe into Frame (#1). Use nut to tighten. (See Figure 1)
  6. Assembly Instructions D) Insert Back Panel Stop Cap (#5).
  7. Assembly Instructions E) Insert Spacers (#6).
  8. Assembly Instructions F) From above, slide Front Toes (#7) into End & Center Shoe (#3) & (#4).
  9. Assembly Instructions G) Slide Back Panel (#8) from top into one Upright (#2), then bend and slide into the other Upright (#2). *NOTE: If ¼” Back Panel is more than one piece, place Plastic Divider Bar (not shown) between Back Panels (#8).
  10. Assembly Instructions H) Screw Top Cap (#9) into Uprights (#2). (Screws shipped in Uprights.)
  11. Assembly Instructions I) Hook in Base Shelf (#10) properly.
  12. Assembly Instructions J) Shelves will hook into Uprights (#2) as shown.
More Related