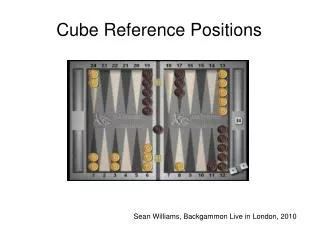
Cube Reference Positions
Cube Reference Positions. Sean Williams, Backgammon Live in London, 2010. Contents. Why Cube Reference Positions? The Blitz (Mostly Woolsey); Anchor Games (Woolsey); Priming Games (Cohn-Geier); 1 Man Back Verses 2 Men Back; Made 5-points; Further Reading and References.

Cube Reference Positions
E N D
Presentation Transcript
Cube Reference Positions Sean Williams, Backgammon Live in London, 2010
Contents • Why Cube Reference Positions? • The Blitz (Mostly Woolsey); • Anchor Games (Woolsey); • Priming Games (Cohn-Geier); • 1 Man Back Verses 2 Men Back; • Made 5-points; • Further Reading and References
Why Cube Reference Positions? • Most positions in backgammon are not directly calculable; • Our intuitions can be very wrong in many situations (if we have an intuition at all); • Backgammon is a subtle game where small changes to a position can have a big effect; • Reference positions ground our thinking and give us the foundations for improving our game.
Key Factors in Blitz Cube Decisions • Number of Attackers Home Board Points; • Number of Checkers On the Bar; • Number of Checkers 'In the Zone'; • Distribution of attacking checkers; • Opponent's blots; • Attacker's back checkers; • Defender's Home Board.
The Blitz • Common Positions; • Borderline References.
64R 55P Dance Cube Action? Double/Take (0.845)
64S 55P Dance Cube Action? Double/Pass (1.021)
52S 55P Dance Cube Action? Double/Pass (1.135)
51S 55P Dance Cube Action? No Double/Take (0.501)
43S 44K Dance Cube Action? Double/Pass (1.018)
41S 44K Dance Cube Action? Double/Take (0.905)
33 Structure, 9 in Zone, 1 on Bar Cube Action? Double/Pass (1.03)
55 Structure, 10 in Zone, 1 on Bar Cube Action? Double/Pass (1.03)
4 Point Board, 8 in Zone, 1 on Bar Cube Action? Double/Pass (1.01)
2 Point Board, 10 in Zone, 2 on Bar Cube Action? Double/Pass (1.12)
Key Factors in Anchor Games Cube Decisions • Which anchor the defender holds; • The race; • The defenders defensive position; • Landing spots for the attacker; • Attacker's spares.
Standard 5-point holding game, 20 pip race lead Double/Take (0.721)
5-point holding game, no spares, 20 pip race lead No Double/Take (0.638)
5-point holding game, made bar, 20 pip race lead Double/Take (0.957)
5-point holding game, made bar, 30 pip race lead Double/Pass (1.121)
Standard 4-point holding game, 20 pip race lead Double/Take (0.747)
4-point holding game, full prime, 4 pip race lead No Double/Take (0.685)
Standard 3-point game, 20 pip race lead Double/Take (0.885)
3-point game, made bar, 10 pip race lead Double/Pass (1.021)
3-point game, 15 pip race deficit, opp 4-point board Double/Pass (1.126)
3-point game, 10 pip race deficit, opp 5-point board Double/Take (0.924)
Standard 2-point game, 20 pip race lead Double/Pass (1.135)
2-point game, 20 pip race lead, no 8-point Double/Take (0.986)
2-point game, 20 pip race lead, no 3-point Double/Take (0.943)
2-point game, 30 pip race lead, checker on ace Double/Take (0.989)
2-point game, 30 pip race lead, checker on ace, all rolls play Double/Pass (1.191)
2-point game, 36 pip race lead, 2 checkers on ace Double/Take (0.964)
Standard ace-point game, 30 pip race lead Double/Pass (1.452)
Ace-point game, 10 pip race lead, no 2 or 3-point Double/Pass (1.063)
Key Factors in Priming Games • Length of Prime; • Time to escape; • Number of checkers behind the prime; • Position of the checkers behind the prime.
1 checker at the edge of a 5-prime, spare pip count of 6 Bare Double/Take (0.130)
1 checker at the edge of a 5-prime, spare pip count of 7 Double/Take (0.168)
1 checker at the edge of a 5-prime, spare pip count of 7 (61) No Double/Beaver (-0.096)
1 checker at the edge of a 5-prime, spare pip count of 9 Borderline Redouble (0.363)
1 checker at the edge of a 5-prime, spare pip count of 20 Redouble/Pass (1.007)
2 checkers at the edge of a 5-prime, 2 on bar, spare pip count of 18 Double/Take (0.929)
2 checkers at the edge of a 5-prime, 2 on bar, spare pip count of 12 Borderline No Redouble (0.477)
Key Factors in 1 Man Back Vs 2 Men Back • Number of Attackers Home Board Points; • Number of Defenders Home Board Points; • The Race; • Relative Structures; • Blitzing/Priming Potential.
1 Man Back, 20 pip race lead, made 5-point Borderline No Double (0.811)
1 Man Back, 20 pip race lead, made 5-point and 9-point Double/Pass (1.012)
1 Man Back, 20 pip race lead, made 5 and 9-point, opp has 5-point Borderline No Double (0.712)
Made 5-points Position A No Double/Take (0.724)
Made 5-points Position B Double/Take (0.904)