Tableau - Waterfall Charts
This presentation educates you about Tableau - Waterfall Charts and Creating a Waterfall Chart in step by step with example charts.<br><br>For more topics stay tuned with Learnbay.

Tableau - Waterfall Charts
E N D
Presentation Transcript
Tableau - Waterfall Charts Tableau Swipe
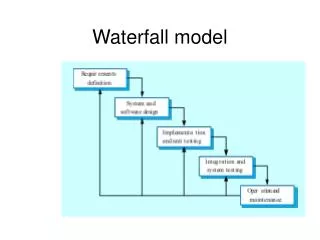
Tableau - Waterfall Charts Waterfall charts effectively display the cumulative effect of sequential positive and negative values. It shows where a value starts, ends and how it gets there incrementally. So, we are able to see both the size of changes and difference in values between consecutive data points. Tableau needs one Dimension and one Measure to create a Waterfall chart.
Creating a Waterfall Chart Using the Sample-superstore, plan to find the variation of Sales for each Sub-Category of Products. To achieve this objective, following are the steps. Step 1 − Drag the Dimension Sub-Category to the Columns shelf and the Measure Sales to the Rows shelf. Sort the data in an ascending order of sales value. For this, use the sort option appearing in the middle of the vertical axis when you hover the mouse over it. The following chart appears on completing this step.
Step 2 − Next, right-click on the SUM (Sales) value and select the running total from the table calculation option. Change the chart type to Gantt Bar. The following chart appears.
Step 3 − Create a calculated field named -sales and mention the following formula for its value.
Step 4 − Drag the newly created calculated field (- sales) to the size shelf under Marks Card. The chart above now changes to produce the following chart which is a Waterfall chart.
Waterfall Chart with Color Next, give different color shades to the bars in the chart by dragging the Sales measure to the Color shelf under the Marks Card. You get the following waterfall chart with color.
Topics for next Post Artificial Intelligence - Overview Programming Without and With AI Artificial Intelligence - Intelligent Systems Stay Tuned with