Using WordPress to create your blog
Using WordPress to create your blog. MARK 430. Introduction to wordpress. About WordPress. The free service that we will use from WordPress is often used as blogging software – very little knowledge of html required to use it Can also be used as a content management system for websites

Using WordPress to create your blog
E N D
Presentation Transcript
Using WordPress to create your blog MARK 430
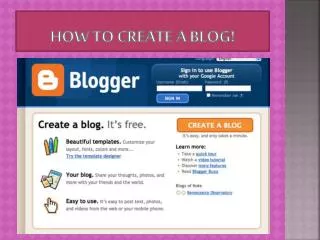
About WordPress • The free service that we will use from WordPress is often used as blogging software – very little knowledge of html required to use it • Can also be used as a content management system for websites • We will use the hosted version from wordpress.com • If you were doing this “for real” you would download the software from wordpress.org to the server where your web site is hosted • Most major ISPs will offer WordPress as part of standard virtual server packages • This software has more flexibility than the hosted version that we will use • You can use your own domain name (but you will not be doing that for this project)
Signing up for WordPress • The free service that we will use from WordPress • Go to wordpress.com • simple steps • Name your blog • Choose a theme • Explore the Dashboard
*Name your blog This will also be its URL – keep it professional. *You may need a few tries to get the URL you want *You will be sent an activation email to the address you specified When it arrives, activate your account
Once you are at the Dashboard you can manage your website / blog. We will look at these options in detail Explore these buttons – they give you all the options to manage your website / blog Posts Appearance Users Tools Settings
Select and install your Theme • Explore and select a theme that fits a professional blog related to online marketing. Most themes are free. • When you have decided on the theme you want, make sure that you have Installedit
Select Settings, then GeneralChange your options – weblog title and tagline (explain what your blog is about)
*Create a posting Save while you are writing your post (recommended) Publish when you are ready to go public with your post You can also add photos or embed a YouTube or other video
View your public blog page When you have created your posting, add subject tags
Make text into a clickable linkEmbed a video from YouTubeAdd imagesUSE WIDGETS TO ADD ADDITIONAL CONTENT
Making text into a clickable link Step 1: Write the text in the usual way
Making text into a clickable link Step 2: Highlight the phrase you want to make into a link. Make it as descriptive as possible so people know what to expect when they click. Step 3: Click the link icon on the toolbar and a dialog box will appear
Making text into a clickable link Step 4: Copy and paste the URL into the dialog box Step 5: If you want the page to open in a new window, you can select the option from the drop down box Step 7: Click “Insert” and that’s it! Step 6: Whatever you write in this box will appear when someone mouses over the link on your page
Embedding a video from YouTube etc Step 1: Click the Add Media button
Embedding a video from YouTube etc Step 2: Select the From URL tab Step 3: Enter the URL for your YouTube Video (NOT the embed code) Step 4: Click Insert into Post. Step 5: When you return to your posting, click Preview to see if the video appears correctly
Adding images to your pages First resize your images (use a tool like pixlr.com or the image editor of your choice), then in WordPress: • Open the page you want to Edit • Click on the Add Media button (camera icon) • Upload the image • Add the Alternate Text (from your plan) • Use the align controls to position the image on the page • In the Size options select Full Size • Click Insert into Post See illustration on next slide
Pulling in other content Microblog content you will create Video content you can pull in if you wish For example: Third-party content you can pull in if you wish For example: YOUR WORDPRESS BLOG PAGE
Adding widgets to pull other content into your blog page • Go to the Appearance tag • Select Widgets • From here you can select the other content to include in the sidebar of your blog page eg. • Twitter (your own twitter feed) • Flickr (your own or 3rd party) • You must pull in your Twitter updates, and can include other feeds if you wish
Spend some time exploring the other settings available from the Dashboard and learn more about how to use WordPress • WordPress Support
When your blog is set up… • Send the link to the URL of your blog to me at: barbara.thomas@viu.ca So I can mark it…