Custom Assessments in Data Warehouse
160 likes | 258 Vues
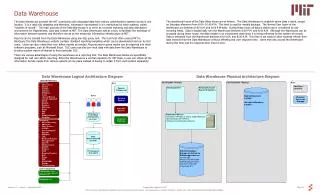
Custom Assessments in Data Warehouse. Spring 2013. Assign the Event. Check Students to assign the event to Click: Add Event. Creating an Event. Select PM Custom Assessment Select the Subject Create an Assessment Name Enter a Mastery Score Enter a Maximum Score Click: Create Assess .

Custom Assessments in Data Warehouse
E N D
Presentation Transcript
Custom Assessments in Data Warehouse Spring 2013
Assign the Event • Check Students to assign the event to • Click: Add Event
Creating an Event • Select PM Custom Assessment • Select the Subject • Create an Assessment Name • Enter a Mastery Score • Enter a Maximum Score • Click: Create Assess
Target Score • Enter a Target Score
Multiple Events…. No • If you only want one event of this title click: No • Set the date for this one event • Click: Save
Multiple Events…. Yes • If you want multiple events of this title click: Yes • Enter the Number of Assessments you want • Choose the option (Custom Dates, Every Week, or Every 2 Weeks) • You can back date these assessments by setting the first event’s date • Click: Save
Add Event • A calendar will appear to the left of the assessment name (if you click the calendar it will list the dates you are going to set for this assessment for the students you selected). • You haven’t assigned this event yet • Click: Add Event and the event will now be assigned
Add Event • A calendar will appear to the left of the assessment name (if you click the calendar it will list the dates you are going to set for this assessment for the students you selected). • You haven’t assigned this event yet • Click: Add Event and the event will now be assigned
Add Event • Your assessment calendar will appear • Click the house at the top left
To Add Additional Events… • Check Students to assign the event to • Click: Add Event
To Add Additional Events… • Go to Event #1 • Enter Target
To Add Additional Events… • Go to Event #1 • Enter Target • Click: Create Multiple Assessment (Yes or No) • Set the dates • Click: Add Event The new events will be titled Event #6-11 once you click Add Event.
Important Reminders • The events on your yellow page are similar to eSembler (Gradebook). Don’t click the RED X to delete an event if you have scores attached to it. It will delete the event for everyone and all the scores entered will disappear. • To rename an event you can click the event word and make and changes. Then click update.
Entering Scores • My RtI • Enter Custom Assessment Data • Select your event from the drop down menu • Enter students scores • Click: Update the Scores *You can enter scores for students shaded in green or white. There is no need to go back and reassign an event to another student just because they are not shaded I green.
Linking a Graph to a PMP • Click on the student’s last name • View Graph by: Assessment • Select the assessments one by one from the drop down menu • Select the correct PMP to link to • Click: Link to PMP
Linking a Graph to a PMP • The graph will now appear on the student’s PMP • If you made a mistake and need to unlink this graph you can click unlink