Utilizing Digital Courtroom Presentation Resources: A Step-by-Step Guide
Learn how to maximize the use of presentation resources in a digital courtroom setting, including a document camera, touch screen annotator, laptop video hookup, and audio/video playback equipment. This tutorial provides detailed instructions on using each resource effectively for court presentations.

Utilizing Digital Courtroom Presentation Resources: A Step-by-Step Guide
E N D
Presentation Transcript
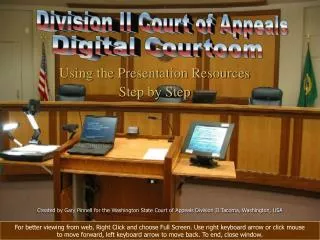
Division II Court of Appeals Digital Courtoom Using the Presentation Resources Step by Step Created by Gary Pinnell for the Washington State Court of Appeals Division II Tacoma, Washington, USA For better viewing from web, Right Click and choose Full Screen. Use right keyboard arrow or click mouse to move forward, left keyboard arrow to move back. To end, close window.
4 1 2 3 Available Resources This short tutorial will cover the following presentation resources: 1. Document Camera 2. Touch Screen Annotator 3. Laptop Computer Video Hookup* 4. Audio/Video playback** *Requires advance notice and training for best results. Laptop not provided. **Requires advance notice for setup.
Documents are usually portrait oriented Maps or graphs are usually landscape oriented. Document Camera Positioning the Document Place the document to be displayed face-up on the glass or in the document guide if present, oriented the way you would view it. Note: objects other than paper can be displayed as well.
4 1 5 3 2 Document Camera Controls Control Buttons 1. Int/Ext – Stands for Internal/External which toggles video input from document camera to external source, such as a laptop computer; 2. Freeze – Toggles freeze mode, which freezes image on screen, allowing transition of documents. Press again to unfreeze; 3. Zoom/Focus – used to increase/decrease the size and sharpness of the image on screen; 4. Scroll – Up, down, left and right buttons used to position the image on screen. (not available in Full mode); 5. Full/Scroll – Toggles from Scroll mode where document can be positioned with the scroll buttons to Full mode, a rapid, one-touch zoom out to show entire image.
Touch Screen Annotator Drawing on the screen You can make annotations right on your image by dragging your finger across the screen, allowing you to create lines and circles. You can also tap the screen to place an arrow at that location.
1 2 3 Touch Screen Annotator Controls Frequently Used Controls • Clear last: To clear your last annotation, tap in theupper right corner of the screen. Continue tapping to clear previous annotations. (Kind of like “undo”); • Clear all: To clear all annotations from screen immediately, tap once in the lower right corner of screen; • Change color: To change color being used, repeatedly tap in the lower left corner of screen to cycle through available colors. Selected color will appear on the right while selecting.
Laptop Computer Video Hookup Connecting the Cable Use the video cable provided at the podium to plug into your laptop’s video-out port. This enables the laptop screen image to display to the large projector screen. Ideal for PowerPoint presentations. Video Cable Video-out on computer Top side is wider than bottom on video cable and laptop video-out port, thus making it virtually impossible to hook up incorrectly.
1. Setting Document Camera Video Input Mode Press the pink Int/Ext button in the lower left-hand corner by the power button to toggle the input source on document camera from internal to external. Video Input/Output Settings In order for your laptop to display on the big screen, two (2) things need to happen. 1) Video input on document camera must be set to external; and 2) Video output mode on laptop must be set to external. 2. Setting Video Output on Laptop The key combination varies among laptop brands, but usually it is done by holding down the function key (Fn) and pressing the F5 or F7 function key. When you repeatedly press the key combination, there are three (3) modes to choose from: A. CRT only (Display only to external monitor) B. LCD only (Display only to internal laptop monitor) C. CRT/LCD (Display to both external and internal monitor) - Preferred
Audio/Video Playback* Audio Playback* If notified ahead of time, the court can have a cassette player available for audio playback. The bailiff will operate the playback. Make sure the tape is ready to go at the desired starting location. Video Playback* If notified ahead of time, the court can have a VCR player available for VHS tape playback. The bailiff will operate the playback. Make sure the tape is ready to go at the desired starting location. If your material is on a DVD instead of a VHS tape, you can possibly play it from your laptop.** *Requires advance notice for setup. **Requires advance notice and training for best results. Laptop not provided.
Why do I have to Notify the Courtto Use the Presentation Resources? Notifying the Court is very important for three reasons: 1. Reserve Resources Ensures the equipment requested will be available and in good working order on that date; 2. Setup / Test out / Train Training is required when using a laptop computer at the Court for the first time. This will test compatibility with our equipment. If you’ve used a computer with your presentation before, and are doing so again, you still need to notify the Court each time. Training is not necessary for using the document camera because of its ease of use, but it is certainly not discouraged; 3. Assistance Readily On-Hand Notification enables the Court computer support person to plan accordingly to be present in the courtroom at the time of the case to provide assistance if needed for a smooth, trouble-free setup.
How do I Notify the Courtto Use the Presentation Resources? You only need notify the Court if you plan on using your laptop computer with the projection equipment or want to play an audio/video tape. Using just the document camera does not require notification. Use methods 1 and either 2 and/or 3 below: • Setting Letter In the setting letter you receive and return, please check the box that indicates you would like to use your laptop computer with our projection equipment and also do either step 2 or 3 below; • Call Call the Court at (253) 593-2970 at least one (1) week ahead and ask for the computer support person to arrange training if this is your first time using the projection equipment with your laptop computer or if you plan to play an audio/video tape; • Resource Request Form from Web Site Go to the Resource Request Formandfill out the required information and click submit. The computer support person will contact you for more information and to arrange training if needed.
Thank you for viewing the Show • To see more of the courtroom, visit the Digital Courtroomhome page and take the Virtual Tour. • To request playback of audio/video material or to use your laptop computer on the big screen, please click here. • Please take a moment to fill out a short survey to let us know if this show was helpful and how we can improve it. Click here for survey. Created by Gary Pinnell for the Washington State Court of Appeals Division II Tacoma, Washington, USA