Android Layouts
Android Layouts. Lecture 3 Zablon Ochomo zochomo@icontrace.com. Android Layouts. Android layout is the architecture for the user interface in an Activity. It defines the layout structure and holds all the elements that appear to the user. You can declare your layout in two ways:

Android Layouts
E N D
Presentation Transcript
Android Layouts Lecture 3 ZablonOchomo zochomo@icontrace.com
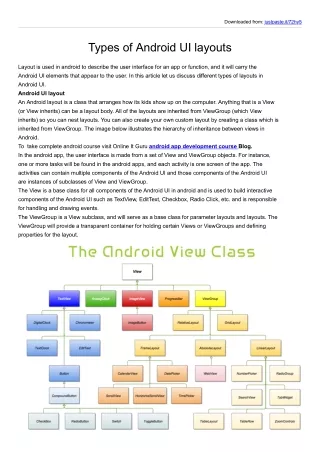
Android Layouts Android layout is the architecture for the user interface in an Activity. It defines the layout structure and holds all the elements that appear to the user. You can declare your layout in two ways: • Declare UI elements in XML. Android provides a straightforward XML vocabulary that corresponds to the View classes and subclasses, such as those for widgets and layouts. • Instantiate layout elements at runtime. Your application can create View and ViewGroup objects (and manipulate their properties) programmatically.
Android Layout • The advantage to declaring your UI in XML is that it enables you to better separate the presentation of your application from the code that controls its behavior. Your UI descriptions are external to your application code, which means that you can modify or adapt it without having to modify your source code and recompile. For example, you can create XML layouts for different screen orientations, different device screen sizes, and different languages. Additionally, declaring the layout in XML makes it easier to visualize the structure of your UI, so it's easier to debug problems
#Class Exercise# • Create an android app that has main screen with two buttons: call and sms. • When call button is clicked, it takes you to a screen with phone number label, phone number input and dial button. • When sms button is clicked, it takes you to a screen with phone number label, phone input text, message label, message input text and send button.
Exercise guidelines • Create the three layouts XML files: phone.xml, call_layout.xml and text.xml • You can use your own names as long as they are legal android layout names. • phone.xml is for the main screen, call_layout.xml is for call screen and text.xml is for SMS screen.
phone.xml • <?xml version="1.0" encoding="utf-8"?> • <LinearLayoutxmlns:android="http://schemas.android.com/apk/res/android" • android:orientation="vertical" • android:layout_width="fill_parent" • android:layout_height="fill_parent" • > • <Button android:id="@+id/call" • android:layout_width="wrap_content" • android:layout_height="wrap_content" • android:text="Call"/> • <Button android:id="@+id/text" • android:layout_width="wrap_content" • android:layout_height="wrap_content" • android:text="Text"/> • </LinearLayout>
call_layout.xml • <?xml version="1.0" encoding="utf-8"?> • <LinearLayoutxmlns:android="http://schemas.android.com/apk/res/android" • android:orientation="vertical" • android:layout_width="fill_parent" • android:layout_height="fill_parent" • > • <TextView • android:layout_width="fill_parent" • android:layout_height="wrap_content" • android:text="Phone Number: " • /> • <EditTextandroid:id="@+id/phone_no" • android:layout_width="fill_parent" • android:layout_height="wrap_content" • android:text="" • android:editable="true" • android:textColor="#ff0000" • /> • <TextView • android:layout_width="fill_parent" • android:layout_height="wrap_content" • android:text="Message: " • /> • <EditTextandroid:id="@+id/msg" • android:layout_width="fill_parent" • android:layout_height="wrap_content" • android:text="" • android:editable="true" • android:textColor="#ff0000" • /> • <Button android:id="@+id/sendsms" • android:layout_width="wrap_content" • android:layout_height="wrap_content" • android:text="Send"/> • </LinearLayout>
text.xml • <?xml version="1.0" encoding="utf-8"?> • <LinearLayoutxmlns:android="http://schemas.android.com/apk/res/android" • android:orientation="vertical" • android:layout_width="fill_parent" • android:layout_height="fill_parent" • > • <TextView • android:layout_width="fill_parent" • android:layout_height="wrap_content" • android:text="Phone Number: " • /> • <EditTextandroid:id="@+id/phone_no" • android:layout_width="fill_parent" • android:layout_height="wrap_content" • android:text="" • android:editable="true" • android:textColor="#ff0000" • /> • <Button android:id="@+id/dial" • android:layout_width="wrap_content" • android:layout_height="wrap_content" • android:text="Dial"/> • </LinearLayout>
Manifest file .. So far! • <?xml version="1.0" encoding="utf-8"?> • <manifest xmlns:android="http://schemas.android.com/apk/res/android" • package="cisy.lab2" • android:versionCode="1" • android:versionName="1.0"> • <application android:label="@string/app_name" > • <activity android:name="Lab2Activity" • android:label="@string/app_name"> • <intent-filter> • <action android:name="android.intent.action.MAIN" /> • <category android:name="android.intent.category.LAUNCHER" /> • </intent-filter> • </activity> • </application> • </manifest>
Lab2Activity.java • package cisy.lab2; • import android.app.Activity; • import android.os.Bundle; • public class Lab2Activity extends Activity • { • /** Called when the activity is first created. */ • @Override • public void onCreate(Bundle savedInstanceState) • { • super.onCreate(savedInstanceState); • setContentView(R.layout.text); • } • } ### change line 11 with other layouts to test them