Classroom Digital Camera
Classroom Digital Camera. Quick User Guide for Students Sanyo VPC-S880. The Basics. Zoom. LCD Monitor. Menu & Mode. Power. 4 Way Control. Shutter Button. Set/Display. Flash. USB Connector. Battery & Memory Card.

Classroom Digital Camera
E N D
Presentation Transcript
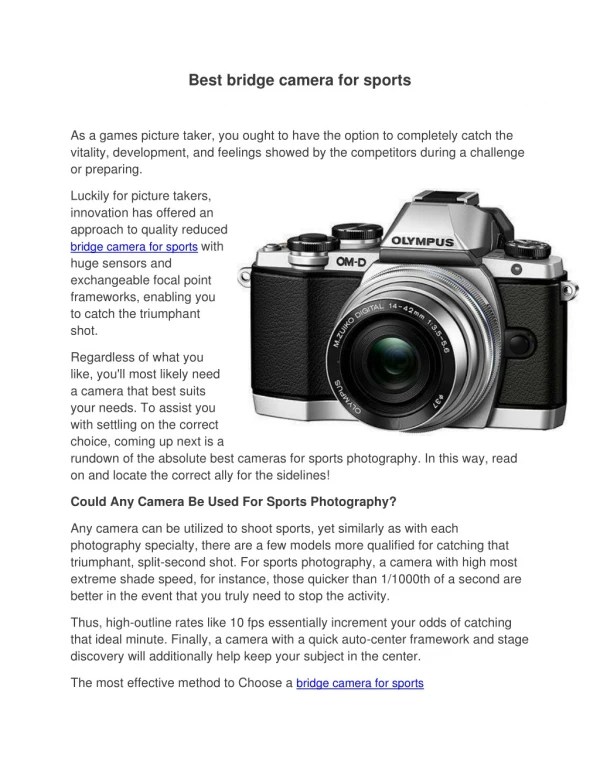
Classroom Digital Camera Quick User Guide for Students Sanyo VPC-S880
The Basics Zoom LCD Monitor Menu & Mode Power 4 Way Control Shutter Button Set/Display Flash USB Connector Battery & Memory Card The labels on these images are referred to throughout this document. Please take a moment and familiarize yourself with the parts of the camera. Lens
Getting Started • To change the batteriesOR To insert the memory card (allows more storage for saving pictures): • Carefully open the door on the bottom of the camera • Pay close attention to the direction you are inserting both the batteries and/or the memory card • For taking pictures, be sure that the memory card is not in the lock position
Point and Shoot • Turn on the camera (press the Power button 1 time) • Choose your mode • Press the mode button to choose: Capture (still pictures), Video, or Playback • Frame your picture using the following features: • Zoom (zoom in or out with the zoom button) • 4 Way Control Settings • Up button: focus • Right button: flash • Left button: backlight/exposure • Hold the shutter button until the picture takes • The picture will briefly preview on the LCD display • To review pictures press the Mode button until the playback mode is displayed and use the right button to scroll through the taken pictures
Make Your Pictures BetterAdvanced Settings Press the Set/Display Button to use the following features: • Set Button Features: • Scene: There are several scenes you can choose from to make your picture better including portrait, landscape, sports, and text to name a few • Take several different pictures using all of these features to test the differences • Panorama • You can take a series of shots and put them together on the computer with this feature • Anti-Shake • This helps to minimize hand shaking in the picture taking (I would recommend it with this camera since it is easy to come out with fuzzy pictures)
More Advanced Features Press the Menu Button and scroll through the menu options for these highlighted features: Note: The default settings typically have the best balance of quality and storage capacity. The higher the quality of the picture, the less storage capacity you will have. • Menu Button Features: • Size: Setting ranging from 8M (the most pixels) to 0.3M (the least pixels) • Quality: Fine, Normal, Economy • Color: Normal, Vivid, Sepia, B/W • Sharpness: Hard, Normal, Soft Only the more popular options are highlighted here, there are other options under Menu that you may choose to experiment with.
Transferring Files to the Computer(No special software required for this process!) • Connect one end of the USB cable to your computer and the other to the camera • On the camera: • Turn on the camera • If the USB screen does not display automatically press the Set/Display Button • Press Set on the camera • On the computer: • On the computer double-click the My Computer Icon • Double-click Removable Disk • Double-click the DCIM folder • Double-click to open the 100SANPH folder • Copy and paste the pictures from the folder to the location you would like the pictures to be saved • Delete the pictures in Removable Disk folder
Troubleshooting • Camera will not turn on • Batteries are not loaded correctly, check battery position • Batteries are dead, replace batteries • Camera will not take pictures • Be sure you are pressing the Shutter Button all the way down • Be sure that the memory (internal or external) is not full • The flash is charging, wait until the status LED stops blinking • Make sure the memory card is not locked (see Slide 3) • Camera will not focus • The lens is dirty, gently clean the lens • The distance to the subject is too small, get further away • Files cannot be deleted • Be sure both the file and the memory card are not write protected or locked • Cannot download images • Be sure you have enough disk space on the computer to download new images • Be sure the camera is on (if it will not turn on see the tip and solutions above)
Sources • Photo of camera http://www.pacificgeek.com/productimages/xl/VPC-S880P-R-3.jpg • Manual drawings taken from Sanyo Instruction Manual pages: EN-11, EN-12, EN-15, EN-34 • Laser Dogs www.ihasahotdog.com • Camera Man http://dailybloglist.com/fail/wp-content/uploads/picture-taking-fail.jpg • Toy Camera http://figgardenbookstore.com/images/camera.jpg • Troubleshooting Cat http://4.bp.blogspot.com/_FzLB7mNEfYw/SL0sKUyzy2I/AAAAAAAACSQ/NTxcGUHufEQ/s320/funny-pictures-cat-is-troubleshooting-your-troubles.jpg