Visual Basic Programming
Visual Basic Programming. Introduction VB is one of the High level language VB has evolved from the BASIC language. BASIC stands for B eginners A ll-purpose S ymbolic I nstruction C ode.

Visual Basic Programming
E N D
Presentation Transcript
Visual Basic Programming Introduction • VB is one of the High level language • VB has evolved from the BASIC language. BASIC stands for Beginners All-purpose Symbolic Instruction Code. • BASIC language is one of the CUI (Character User Interface) tool. In a CUI, you interact with the computer application (program) by keying in commands. • But VB is one of the GUI (Graphical User Interface) tool. GUI s are easy to learn and use you do not have to remember any command or syntax, most of the commands can be executed using the mouse. • In VB, you can use a Form and Controls to create a user interface. • Form : is the main building block in a VB application. It is a base window on which you can design the user interface. • Controls: are objects that are placed on the Form object to allow the user to interact with the application. Each control has its own purpose and characteristics. These characteristics are called properties. • Events : The user may click the mouse on various controls, or press a key or key combination on the user interface. These are known as Events • Event-Driven Programming:The application developer must decide how the application must react to each of the user’s actions. This is called Event-Driven Programming
MENUS The menu bar contains the commands you need to work with visual Basic. There are totally 13 menus in VB. 1.File 2.Edit 3.View 4.Project 5.Format 6.Debug 7.Run 8.Query 9.Diagram 10.Tools 11.Add-ins 12.Windows 13.Help The FORM WINDOW The Form Designer is the main window in the middle of the screen, and in it you Design and edit the application’s user interface. It displays two windows for each Form: The Form itself (the element of the visible user interface) A Code window (the code behind the elements of the Forms) THE PROJECT EXPLORER The window titled Project is the Project Explorer, which displays the components of the project. It is organized in folders and it looks like Windows Explorer. It has ‘Object’, ‘Code’, ‘Toggle Folder’ The PROPERTIES WINDOW It contains the property setting for the selected control. Properties are attributes of an object, such as its size, caption, and color. You can adjust the appearance of the controls on the Form with point-and-click appearance. The FORM LAYOUT WINDOW It is in the lower-right corner of the VB IDE, used to determine the initial positions of the Forms in your application. It is useful in applications that use multiple forms.
The IMMEDIATE WINDOW It is a debugging aid. While an application is running, you can stop it and use the Immediate Window to examine or change the values of the application’s variable and to execute. You can also use variable in the Immediate Window. If you enter the following lines: A=1888 B=999 Print a/b You will see the result 1.889888 The TOOLBOX It contains the icons of the controls you can place on a Form to create the application’s user interface. By default, the Toolbox contains the Pointer icon and the icons of 21 ActiveX controls. To place a control on a Form, you first select it with the mouse and then move the mouse over the form. When the mouse is over the form, the cursor turns into a cross, and you can draw the control on the Form. 1.Pointer 2. Label 3. Text Box 4.Command Button 5. Horizontal Scrollbar 6. Vertical Scrollbar 7. Check Box 8.Option Button 9.Frame 10.Combo Box 11. List Box 12. Timer 13.Drive List Box 14. Directory List Box 15. File List Box 16.Shape 17. Line 18. Image 19. Data 20.OLE 21. Picture Box
COMMON PROPERTIES The following properties apply to most objects. NAME This property sets the name of the controls. BACKCOLOR This property sets the background color on which text is displayed or graphics are drawn. FORECOLOR This property sets the fore color (i.e. Text color) FONT This property sets the font, font style, effects (strike out & underline) and size of the font used for the text on the control. CAPTION This property sets the text that is displayed in many controls, for example Label control, string displayed next to the Checkbox and option button controls. VISIBLE This property sets the controls to make visible/invisible during the execution of the program. (Default: True) WIDTH, HEIGHT These properties set the control’s dimensions. LEFT, TOP These properties set the co-ordinates of the control’s upper-left corner.
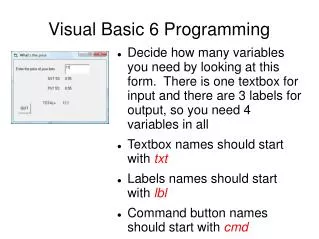
LABEL This control displays text on a Form that the user can’t edit. Labels commonly identify other controls. Properties: * Name * Back Color * Caption * ToolTipText * Visible * Font * Fore color TEXT BOX Sometimes called an ‘edit field’ or ‘edit control’ used for displaying and entering text and is the most common controls used in form designing. COMMAND BUTTON It is also known as push Button, is one of the most commonly used controls in VB. It represents an action that is carried out when the user clicks the button. It is used to begin, interrupt, or end a particular process. Ex: Design a VB form to find area of circle.
Program Private Sub Addition_Click() c = Val(a) + Val(b) End Sub Private Sub Division_Click() c = Val(a) / Val(b) End Sub Private Sub Multiplication_Click() c = Val(a) * Val(b) End Sub Private Sub Subtraction_Click() c = Val(a) - Val(b) End Sub Program: Private Sub Command1_Click() Text2.Text = 3.14 * Val(Text1.Text) * Val(Text1.Text) End Sub Ex: 2 Design a VB form to perform simple Arithmetic operations
OPTION BUTTON It is a round radio button that provides a set of choices from which a user can select only one choice. Value: This property returns or sets the state of the OptionButton Value: True False This property returns True when an OptionButton is selected. And it returns False when it is not selected. Ex: Design a VB form to find simple and compound interest.
Program Private Sub Result_Click() If Option1.Value = True Then Text4.Text = Val(p) * Val(n) * Val(r) / 100 End If If Option2.Value = True Then Text4.Text = Val(p) * (1 + (Val(r) / 100)) ^ Val(n) - Val(p) End If End Sub FRAME Frame Control acts as a container for other controls, typically option buttons or Check boxes CHECK BOX It allows the user to select one or more options from a list of independent options. When you select the Checkbox control, it is checked and the square is filled with a check mark. Value property : This property is used to specify the state of a Check Box. If a Check Box is deselected it returns False or 0, if the check box is selected it returns True or 1 0 – Unchecked 1 – Checked
Program: Private Sub Check1_Click() If Check1.Value = 1 Then Label1.Font.Strikethrough = True ElseIf Check1.Value = 0 Then Label1.Font.Strikethrough = False End If End Sub Private Sub Check2_Click() If Check2.Value = 1 Then Label1.Font.Underline = True ElseIf Check2.Value = 0 Then Label1.Font.Underline = False End If End Sub Example:
Private Sub Check3_Click() If Check3.Value = 0 Then Label3.Font.Bold = False ElseIf Check3.Value = 1 Then Label1.Font.Bold = True End If End Sub Private Sub Check4_Click() If Check4.Value = 1 Then Label1.Font.Italic = True ElseIf Check4.Value = 0 Then Label1.Font.Italic = False End If End Sub
LIST BOX List Box control present a set of choices that are displayed vertically in a single column. Scrollbar will automatically appear on the control if the items exceed the value that can be displayed. List property To add items in the list at design time we use this property. To add items in design time click ‘List’ and then add items. Press CTRL + ENTER after adding each item METHODS Adding items to a List We can add items to the List at design or at run time. 1.Design time : Refer ‘list’ property. 2.Run time : The ‘AddItem’ method is used to add items to a list at run time. Syntax: Object.AddItem item, index Where, item is a string that represents the text to add to the list.
Example:1 List1.Additem “India” Example:2 For I = 1 to 10 A(i) = inputBox (“Enter the value”) List1.AddItem a(i) Next i Removing items from a list The ‘removeItem’ method is used to remove an item from a list. Syntax Object.RemoveItem index Clear This clear method removes al the items from the controls. Syntax: List1.clear ListCount This is the method is used to count the total number of items.
Ex: Design a VB form to find maximum and minimum elements from set of N numbers also print its position Program Dim A(10) As Integer Dim I, N, J,Min,Max,minpos,maxpos As Integer Private Sub Input_Click() N = InputBox("ENTER HOW MANY NUMBERS") For I = 1 To N A(I) = InputBox("ENTER THE NUMBER") List1.AddItem A(I) Next I End Sub
Private Sub Result_Click() Max = A(1) maxpos = 1 Min = A(1) minpos = 1 For I = 1 To N If A(I) > Max Then Max = A(I) maxpos = I End If If A(I) < Min Then Min = A(I) minpos = I End If Next I Text1.Text = Max Text2.Text = maxpos Text3.Text = Min Text4.Text = minpos End Sub