Download
1 / 5
60 likes | 235 Vues
Rework Procedure for Wash Motor Pulley Change Model : Rosa & Rosa Plus. Part Details & Tools required. . Current Motor Pulley - Metal Fan + Aluminum Pulley. Modified Motor Pulley - Plastic Fan + Aluminum Pulley. Rework Procedure. Step 1 - How to disassemble base :.

E N D
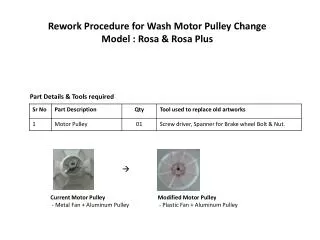
Rework Procedure for Wash Motor Pulley ChangeModel : Rosa & Rosa Plus Part Details & Tools required Current Motor Pulley - Metal Fan + Aluminum Pulley Modified Motor Pulley - Plastic Fan + Aluminum Pulley
Rework Procedure Step 1 - How to disassemble base : Unscrew the back cover screws- (Fig-01), and remove it from machine. Loosen the Nut & bolt of Brake wheel used for fixing Brake wheel to Spin tub shaft- (Fig-02). Turn the machine upside down and unscrew the screws of base- (Fig-03) Remove the base from the body of machine NOTE : Keep all screws, bolts & nuts carefully. Same will be used to assemble the machine after Pulley change. Back cover screw Loosen this Nut & Bolt Unscrew the screws to remove base (Fig-01) (Fig-02) (Fig-03)
Rework Procedure Step 2 – Rework of Motor pulley : Loosen the Nut and Bolt of Motor pulley fitted in machine- (Fig-04) Lift the Motor Pulley and remove it from Motor shaft. Remove the three screws from Motor Pulley to remove the Metal Fan from Aluminum Pulley (Fig-05) Take Plastic Fan (New) and put metal washer (New) on old Al. Pulley. Pl s note to match the cut on metal washer with the longer rib on fan - (Fig – 06) Fix the three screws as shown –(Fig-06). Nut & Bolt (Fig-04) NOTE : Mark the old pulley with red marker as “REJECT” & send to QA for inspection. (Fig-05) Longer rib Three screws Metal Washer Al. Pulley (Fig-06) Metal Fan
Rework Procedure At same height Step 3 - Assemble of pulley to the wash motor : Fix the pulley to the shaft of wash motor (Fig-07) Tighten the nut and bolt to fix the pulley to wash motor shaft- (Fig-07). NOTE : Bolt hole in Pulley should face the flat side of Motor shaft. Top of Al. Pulley should match with top of Motor shaft. Nut (Fig-07) Step 4 - V-Belt fitment : Assemble the Base to machine carefully. Tighten all screws of base- (Fig-08). Assemble the V belt to Al. pulley first and then on Gear case pulley- (Fig-09). NOTE : The two side of V-belt roller should be at same height. (Fig-08) Gear box pulley Al. Pulley (Fig-09)
Rework Procedure Step 5 - Final checking & fitment of back cover : Check the wires and run the machine whether working properly or not. If it is working properly, then fit the back cover by 3 screws as fitted- (Fig-10). NOTE : Check and Tighten all the screws properly Back cover screw (Fig-10)