Download

1 / 24
320 likes | 1.1k Vues
USING Smart Art in MS WORD 2007. Teresa Tayag May 2010. Objectives. At the end of this training, you will be able to:. This text-based narrative looks plain and tedious. Why convert it to a SmartArt diagram?

E N D
USINGSmart Art in MS WORD 2007 Teresa Tayag May 2010
Objectives At the end of this training, you will be able to: Teresa Tayag / January 2010
This text-based narrative looks plain and tedious. Why convert it to a SmartArt diagram? Shapes, colors, and arrows help your audience understand and retain information better.
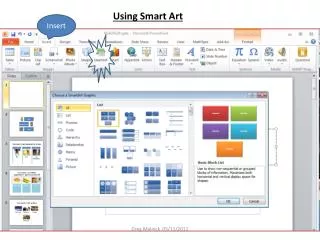
Insert a SmartArt Graphic Step 1 - Click Insert
Insert a SmartArt Graphic Step 2 - Under the Inserttab, in the Illustrations group, click SmartArt. Teresa Tayag / January 2010
Step 3 - Select the SmartArt Graphic In the dialog box, click the type of SmartArt that you want to use. In this example, click the highlighted choice. Teresa Tayag / January 2010
Change Colors - From the Design menu, Click Change Colors from the ribbon. Teresa Tayag / January 2010
Select Color In the drop down display, choose the color or color scheme you want to use. Teresa Tayag / January 2010
Add Text to SmartArt Shapes Notice the [Text] placeholders in the shapes. You may use the Text Pane to replace the placeholders with your own text. Click Text Pane button to toggle displaying the text pane Teresa Tayag / January 2010
Add Text Using the Text Pane Enter your own text in the placeholders. Click Next Arrow Teresa Tayag / January 2010
Add Text by – - Typing your text in the placeholders - Using Cut/Copy and Paste Copy and Paste your existing text in the selected SmartArt. Text entered in the Text Pane is automatically placed into the corresponding SmartArt shapes. The text placeholders show how your text will appear when typed directly into the SmartArt. Click Next Arrow Teresa Tayag / January 2010
Multi-Level Bullets determine where the text entered is located in the SmartArt shapes Click Next Arrow Teresa Tayag / January 2010
Add Text Directly into a Shape Click in the shape to enter text directly into it. The text is also reflected in the Text Pane. Click Next Arrow Teresa Tayag / January 2010
Add a Shape In the Text Pane, add a bulleted item. This adds the corresponding SmartArt shape. Take note what level generates the new shape you want to add. Click Next Arrow Teresa Tayag / January 2010
Add text details using lower level bullets. Click Next Arrow Teresa Tayag / January 2010
Close Text Pane Click the Close button on the Text Pane. Teresa Tayag / January 2010
Change color of a shape Select the shape you want to change From the Format Menu, select Shape File, select desired color. Teresa Tayag / January 2010
Remember this text-based document? We have transformed it to - - - > Teresa Tayag / January 2010
== This SmartArt diagram Teresa Tayag / January 2010
thots? Teresa Tayag / January 2010
Resources • F1 – Help • microsoft.com • Google Teresa Tayag / January 2010
Objectives Review Teresa Tayag / January 2010
USINGSmart Art in MS WORD 2007 Teresa TayagK-Force January 2010