Download
1 / 6
60 likes | 198 Vues
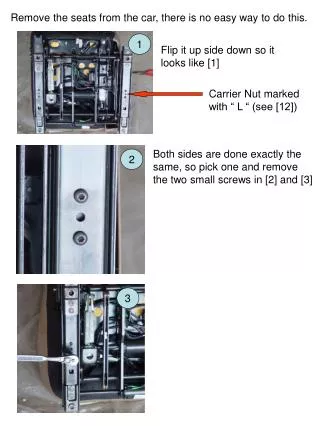
1. 2. 3. Remove the seats from the car, there is no easy way to do this. Flip it up side down so it looks like [1]. Carrier Nut marked with “ L “ (see [12]). Both sides are done exactly the same, so pick one and remove the two small screws in [2] and [3]. 5. 6. 4.

E N D
1 2 3 Remove the seats from the car, there is no easy way to do this. Flip it up side down so it looks like [1] Carrier Nut marked with “ L “ (see [12]) Both sides are done exactly the same, so pick one and remove the two small screws in [2] and [3]
5 6 4 The track should slide down very easily revealing the last bolt to be removed [4] and [5]. Remove bolt
7 Both sides are unbolted in [7] 8 I put the tip of the star bit into the small screw hole [8] Pull upward on the star bit and the track and carrier bolt should travel upwards, jiggle the carrier bolt and it should exit the top of the track [9] (yes I switched sides but they come out exactly the same way) 9
10 Carrier bolt exiting the top of the track [10] Remove the Carrier Bolt assembly from track (it’ll take some jiggling) Top view of the carrier, the two small screws secure it 11 Bottom view of the carrier assy (proper orientation for reassembly) Carrier Nut Rubber Bushing (what we’re replacing) Carrier Bolt Carrier This is the same assembly with three different views. The Left Carrier nut is marked with an “ L “. The left is as the seat installed in the car and you are viewing it looking from the front bumper to the rear bumper. (upside down, out of the car, viewing my photos it’s on the right)
Both assemblies, the lower has the aluminum bushing installed. Some have said their bolts are different sizes, but mine are the same. The Left Carrier nut is marked with an “ L “. The left is as the seat is installed in the car and you are looking at it from the front bumper to the rear bumper. (upside down, out of the car, viewing my photos it’s on the right) My version of the bushing [13] install the bushings one side at a time! After you replace the bushing twist the carrier on the bolt to get the same distance on the bolt as the unmodified one. I didn’t on the 1st one and it took about 30 min of trial and error to align them, once I started to put them back in, I measured when I did the passenger seat and it went back without a hitch. 12 13 14 Both bushings installed [14].
Proper positioning Jiggle the assembly while sliding the track up and down to get the carrier over the internal track bolts Driveshaft end OK this is the hardest part, on the end of the carriage bolt is a small square hole that the drive shaft must seat into. You can grasp the flexible drive shaft and guide the carriage bolt onto it Sorry about the quality on this pic. Carriage bolt Driveshaft Once it’s seated, hold the carriage bolt in with your finger from the top end and slide the track until the large bolt at the top of the assembly can be accessed, install large bolt, slide track until small holes line up etc….