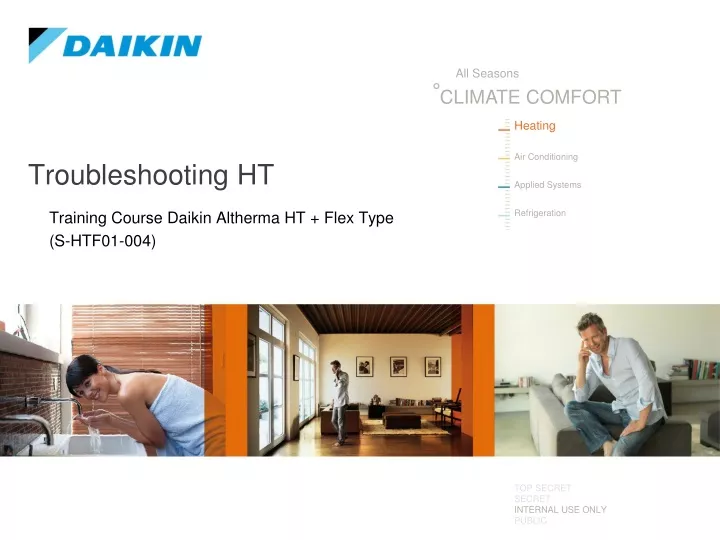
Troubleshooting HT
640 likes | 704 Vues
Learn how to troubleshoot Daikin Altherma HT & Flex Type systems, covering indoor & outdoor unit symptoms, error codes, servicing procedures, and safety precautions.

Troubleshooting HT
E N D
Presentation Transcript
Troubleshooting HT Training Course Daikin Altherma HT + Flex Type (S-HTF01-004)
CAUTION!!! When power is off, there still can be high voltage on the top surface of the capacitors!!!
Troubleshooting (1) • Opening unit for servicing • General symptoms • Indoor unit • DHW tank • Error codes • Inspection on remocon • Service mode 40 on remocon • Service PCB outdoor unit • Monitoring mode outdoor unit
Troubleshooting (2) • Vacuuming/recovering R410A • Pump down R410A • Vacuuming/recovering R134a • Check 3-way valve • Check fan motor • Spare part PCB
Opening unit for servicing (1) To faciliate access to: • Air purge valve • Thermal cut-out • 3-way valve • Thermistors • Field wiring duct • …
Opening unit for servicing (2) In combination with removing top panel: To faciliate access to: • manometer • Pressure relief valve • …
Opening unit for servicing (3) Disconnect all field wiring
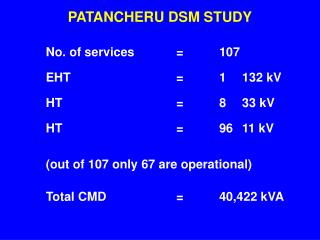
Error codes For detailed overview -> see error flow chart in appendix To reset the safety (in case problem is solved), push In case of “UA” error, wait till initialisation between outdoor unit and indoor unit is finished (after power ON, wait at least 12 minutes)
Outdoor Unit Error Codes (1) • A9: expansion valve R410A error • E1: compressor PCB error (R410A) • E3: high pressure error (S1PH) • E4: low pressure error (B1PL) • E5: compressor lock error (R410A) • E9: expansion valve error R410A • F3: discharge temperature error R410A • J3: discharge thermistor error R410A • J5: suction pipe thermistor R410A • JA: high pressure sensor R410A
Outdoor Unit Error Codes (2) • JC: low pressure sensor R410A • L1: compressor inverter PCB error (R410A) • L4: fin thermistor outdoor inverter PCB error • L5: compressor inverter PCB error (R410A) • L8: compressor inverter PCB error (R410A) • L9: compressor inverter PCB error (R410A) • LC: communication error • U2: power supply failure • U4: transmission failure • U5: transmission failure
Outdoor Unit Error Codes (3) • UF: transmission failure • UA: # of units • UH: malfunction of system: address error
Indoor Unit Error Codes (1) • A1-00: EEPROM error (main PCB A1P) • A6-00: pump error or other water system error • A9-00: expansion valve R410A error • AJ-00: capacity error • C1-00: communication error • C4-00: liquid thermistor error R410A (R3T) • C5-00: tank thermistor error (R2T) • C9-00: return water thermistor error (R4T) • CA-00: leaving water thermistor error (R5T) • E1-03: compressor PCB error (R134a)
Indoor Unit Error Codes (2) • E3-01: high pressure error (S1PH) (R410A) • E3-12: high pressure error (S1PH) (R134a) • E4-06: low pressure error (B1PL) (R134a) • E5-06: compressor lock error • E9-17: expansion valve error R134a (K2E) • F3-19: discharge temperature error R134a • J3-46: discharge thermistor error R134a (R6T) • J5-11: liquid thermistor R134a (R7T) • JA-16: high pressure sensor R134a (B1PH) • JC-16: low pressure sensor R134a (B1PL)
Indoor Unit Error Codes (3) • L1-30: compressor inverter PCB error (R134a) • L4-08: fin thermistor error (R8T ~ inverter PCB) • L5-13: compressor inverter PCB error (R134a) • L8-10: compressor inverter PCB error (R134a) • L9-09: compressor inverter PCB error (R134a) • LC-29: communication error (cascade) • PJ-11: combination error • U2-20/21: power supply failure (cascade) • U4-00: communication error • U4-04: communication error (cascade)
Indoor Unit Error Codes (4) • U5-00: remocon error • UF-06: communication error (cascade) • UF-10: communication error • UA-13: communication error with outdoor unit • UH-00: address error • LH-02: converter error • P1-06: main compressor PCB error
Remote Controller Error Codes • CJ: remocon thermostat thermistor
Error codes CODE DESCRIPTION POSSIBLE CAUSE CORRECTIVE ACTION A1 EEPROM error (main pcb A1P) EEPROM fail Try power OFF/ON Subcode 0 IU Broken pcb Replace pcb Subcode: When Indoor Unit error code IU: Indoor Unit error code OU: Outdoor Unit error code Remocom: Remote Controller error
Service PCB Outdoor Unit 8 leds (H1P ~ H8P) 2 dipswitches (do not change) 5 buttons (BS1 ~ BS5)
H*P leds • During initialisation: Multi led H8P blinks • In normal status: Indication led H3P is ON
Vacuuming/Recovering R410A circuit Setting 2-21 1) Press BS1 mode button for 5 seconds • H1P led is ON (= setting mode 2) 2) Press BS2 set button 21 times (= recovery/vacuuming operation) H8P 16 4 1 Binary code 21
Vacuuming/Recovering R410A circuit Setting 2-21 3) Press BS3 return button to enter 4) Press BS2 set button to set function to ON 5) Press BS3 return button to define setting 6) Press BS3 button to activate vacuuming/recovering operation
Vacuuming/Recovering R410A circuit Setting 2-21
Vacuuming/Recovering R410A circuit Setting 2-21 -> Vacuum the system with a vacuum pump / Recovery the system with a refrigerant reclaimer -> When finished, press BS1 mode button to reset
Pump down R410A circuit Setting 2-61 1) Close liquid stop valve (gas stop valve stays open) 2) Press BS1 mode button for 5 seconds • H1P led is ON (= setting mode 2) 3) Press BS2 set button 61 times (= pump down operation) 8 32 16 4 1 Binary code 61
Pump down R410A circuit Setting 2-61 4) Press BS3 return button to enter 5) Press BS2 set button to set function to ON 6) Press BS3 return button to define setting 7) Press BS3 button to activate pump down operation
Pump down R410A circuit Setting 2-61 -> Compressor and fan will start operating automatically. -> During operation, the led’s are showing the progress as shown as the figure below: -> If step 5 is reached (pressure drops below 3 bar) or if operation stops (after 30 minutes), close the gas stop valve
Pump down R410A circuit Setting 2-61 ONLY WHEN PIPING LENGTH IS BELOW 10M!!!
Vacuuming/recovering R134a Setting [E-00] • Setting [E-00] must be acitvated before!!! • Will force the unit into thermo OFF and will open the expansion valve of the indoor unit R134a circuit so full vacuuming is possible • Disabled (0) (default) or enabled (1) Do not forget to restore field setting [E-00] back to (0), when vacuuming/recovering is finished
Check 3-way valve DHW SH 220V 0V 0V 220V 220V 220V
Install 3-way valve (adjusting after wrong installation) Sleeve down Space heating From indoor Open To DHW Blocked
Compressor inspection - CAUTIONS • Never perform the inspection when the system is under a vacuum • Never perform the inspection when power is applied to the system
Insulation resistance inspection - Procedure • Remove all wiring from compressor terminals to isolate the compressor • Make sure the terminals and the compressor ground location are properly cleaned and free of oxidation • Switch the megger to 500 or 1000V, the set voltage should always be higher then the operational voltage of the compressor