Torque Constructor
Torque Constructor. CIS 487/587 Bruce R. Maxim UM-Dearborn. Goals. Torque Constructor is a tool that allows you two create collections of objects called scenes Constructor has several brushes (Cube, Cylinder, Sphere, Pyramid, Ramp) than can be assembled inot 3D objects

Torque Constructor
E N D
Presentation Transcript
Torque Constructor CIS 487/587 Bruce R. Maxim UM-Dearborn
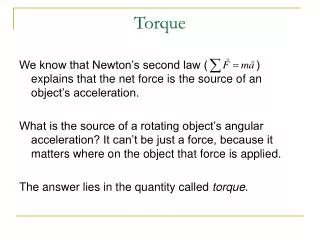
Goals • Torque Constructor is a tool that allows you two create collections of objects called scenes • Constructor has several brushes (Cube, Cylinder, Sphere, Pyramid, Ramp) than can be assembled inot 3D objects • CSG operations are supported (subtraction, intersection, knife, slice, clip) • Constructor save files as .map files and can export .map files as Torque .dif files
Where to begin? • Open Torque constructor and you will see a window with lots of panes (top, front, side, perspective) • The tool menu has several basic shapes to create a cube use your mouse left click and drag to size in one of the “flat” windows • Drag the corners till you get the right shape in the perspective pane • You can positions the object any where you like in the windows
Texturing • To change the texture look at the right side of the screen and under materials select Browse texture • In the texture dialog box select the Starter folder and drill down to the s17 text (a wood plank) • Select the make active button to change the appearance pf the cube and make it look more like a crate • Save your work as crate.map on your flash drive
Exporting to TGE • You will need to export the saved .map file as a .dif to get it into Torque • Use the Constructor menu item File>Rxport>Torque Game Engine (map2dif plus) • Again put on you flash drive and copy the file crate.dif to a Torque game directory like MyGame\data\interiors • Click OK when prompted, when “Done” appears close the window
Importing to TGE • Now it is simply a matter of launching you game mission file using Torque like usual • Open the World Editor Creator and drilling down using the lower right pane to the Interiors directory and locating the create • Click on the crate.dif file name is it will appear in the mission window ready for you to position and resize using the World Editor Inspection • you might need to change the scale numbers from 1 1 1 to 0.5 0.5 0. 5 to get crate that matches avatar
Making a House • Go back to Constructor and start by using the cube brush to make rectangular bas (9 units long, 6 units wide, and 8 units tall) use Enter to commit it • Create a second cube inside the first (make sure you have “walls” on all sides), do no use enter – use the tools “Modify” tab and select CSG Subtract to hollow out the cube • Hit delete to get rid of the inner cube
Adding Windows and Doors • To get doors and widows we follow a similar approach (subtract a rectangular box to get a door and cylinders to get windows) • Remember to delete doors and windows as the are carved out
Adding a Roof • Done by creating a rectangular box and putting it on top of the house (9 by 6 by 3) • Use the Vertices button on the bottom of the screen and then start selecting vertices one and a time • You can use the Transform tool in the Modify to move them and shape the roof (you can also select multiple vertices and use the Planar Scale tool to manipulate several vertices at once
Texturing House • To use different textures on different parts of the house, use the Face button instead of the Brush button to select the part of the house to texture • Select a texture and apply it • Be prepared to adjust the texture Scale (X and Y) and Shift (X and Y) • You may also need to play the Flip tool to align textures with object boundaries)