Socket Reduction Technique
This guide outlines a step-by-step methodology for implementing a socket reduction technique to enhance prosthetic fit. Begin by inserting a barb into the test socket for vacuum hose connection and place it in an alignment jig. Invert the socket to work from an upside-down position. Use a specific piece of Vivak to create seals and ensure proper shape and fit. The process includes applying vacuum for smoothness, sealing the socket fully, and preparing the final adjustments with plaster. This technique aims to optimize comfort and efficacy in prosthetic devices.

Socket Reduction Technique
E N D
Presentation Transcript
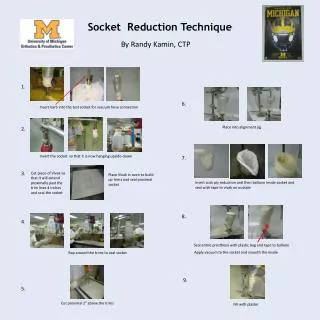
Socket Reduction Technique By Randy Kamin, CTP 1. 6. Insert barb into the test socket for vacuum hose connection Place into alignment jig 2. Invert the socket so that it is now hanging upside-down 7. 3. Cut piece of Vivak so that it will extend proximally past the trim lines 4 inches and seal the socket Place Vivak in oven to build up trims and seal proximal socket Insert sock ply reduction and then balloon inside socket and seal with tape to vivak on outside 8. 4. Seal entire prosthesis with plastic bag and tape to balloon Apply vacuum to the socket and smooth the inside Rap around the trims to seal socket 9. 5. Cut proximal 2” above the trims Fill with plaster