Download
1 / 17
180 likes | 747 Vues
PROPER USE OF FLOOR JACK AND SAFETY STANDS. NATEF TASK SHEET SECTION SAFETY. O BJECTIVE.

E N D
PROPER USE OF FLOOR JACK AND SAFETY STANDS NATEF TASK SHEET SECTION SAFETY
OBJECTIVE • Student will safely raise a vehicle with a hydraulic floor jack and set it up on safety stands. Student will then check to be sure the vehicle is securely set and put chocks behind the tires still on the ground (downhill side).
Materials Needed • 1. Hydraulic floor jack • 2. Safety stands • 3. Wheel chocks • 4. Vehicle (see instructor) • 5. EYE PROTECTION
Step 1 • WEAR EYE PROTECTION!
Step 2 • Look up lift points for vehicle being lifted in All-Data, Mitchell-on-Demand, or in Owner’s manual.
Step 3 • Park vehicle on level surface.
Step 4 • . Place shifter in park (automatic) or neutral (manual).
Step 5 • Set parking brake.
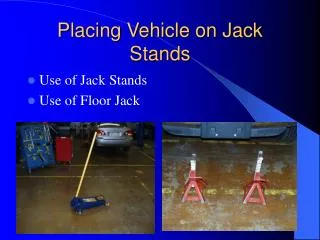
Step 6 • Place jack under correct lifting point. • Raise vehicle slightly higher than you intend it to end up.
Step 7 • Place the pair of safety stands under vehicle frame or lift points, one on each side.
Step 7 Continued… • Make sure both jack stands are set to the same height!
Step 8 • Slowly lower vehicle onto stands.
Step 9 • Place chocks behind tires of wheels still on ground (downhill side).
Step 10 • Verify vehicle is stable by pushing firmly on side of vehicle. • Have instructor inspect vehicle.
Finishing Up • Completely fill out task sheet • Have instructor verify task completion • Put away all equipment used • Have instructor sign task sheet
Questions? • Always ask if there is any question about the lift points on the vehicle being lifted.BEFORE YOU LIFT THE VEHICLE! • Have another student check your work • Think and work safely! • A MISTAKE CAN BE DISASTROUS!