OGRE Tutorial Three
OGRE Tutorial Three. Terrain Sky Fog The Root object. Choose a SceneManager. - To render terrain, set the SceneManager to the TerrainSceneManager In ExampleApplication::chooseSceneManager mSceneMgr = mRoot ->createSceneManager(ST_EXTERIOR_CLOSE);

OGRE Tutorial Three
E N D
Presentation Transcript
OGRE Tutorial Three Terrain Sky Fog The Root object
Choose a SceneManager - To render terrain, set the SceneManager to the TerrainSceneManager In ExampleApplication::chooseSceneManager mSceneMgr = mRoot ->createSceneManager(ST_EXTERIOR_CLOSE); - The Root object (mRoot is an instance of Root) is the "core" Ogre object. (To see UML diagram of the relationships between Ogre objects here.) - After invoking the function, the Root object then queries the SceneManagerEnumerator to find the SceneManager of the requested type and returns it.
SceneManager SceneManagers are not Singletons. Allow multiple SceneManagers Display multiple SceneManagers at the same time using multiple Viewports. The OctreeSceneManager registers itself as ST_GENERIC and overrides the base SceneManager class if the OctreeSceneManager plugin is used. (The OctreeSceneManager uses a system of culling objects that are not visible and thus it's generally faster than the default SceneManager.) Remove OctreeSceneManager plugin from plugins.cfg ?
SceneManager • - Use a Root object to create SceneManagers. • -OGRE is flexible? • install a plugin for creating SceneManagers called “MySceneManager". • To create a SceneManager of the type, call: • mSceneMgr = mRoot->createSceneManager( • “MySceneManager“, • SCENE_MANAGER_NAME); • - Root::destroySceneManager : clean up a SceneManager
Terrain • SceneManager::setWorldGeometry : create scene - By using the TerrainSceneManager, it is able to load a terrain configuration which is stored in a file. Code: Derive a new class DemoApp from ExampleApplication. In DemoApp::createScene mSceneMgr->setWorldGeometry("terrain.cfg"); • Problems : (1) Standard lighting not work properly in terrain (2) Not easy to get Shadows to work
Options for Terrain Generation • The TerrainSceneManager uses Heightmaps to generate terrain. • - Specify the heightmap (gray level image) • Heightmap.image=imageName • Set the texture • WorldTexture=imageName • Set detail Texture (which is interlaced with the • WorldTexture to make the terrain look more realistic. • DetailTexture=imageName • A more detailed explanation of the terrain config file can be found here.
Terrain texture Height Map Detail texture
Terrain With detail texture Without detail texture
About TerrainSceneManager - Designed with paging functionality. Paging terrain system : (1) the terrain is broken into chunks (2) display the portion which can be seen Advantages: -> (1) Be able to use a huge world (2) Maintain framerate For details, read Paging Scene Manager. 10
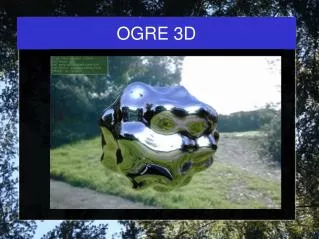
Sky Three types of sky: (1) SkyBoxes (2) SkyDomes (3) SkyPlanes To use the Example/* textures for sky, add the following line to the ExampleApplication::chooseSceneManager: ResourceGroupManager ::getSingleton() .initialiseAllResourceGroups();
SkyBoxes - A giant cube that surrounds all of the objects in the scene In createScene(): mSceneMgr->setSkyBox( true, "Examples/SpaceSkyBox"); 12
SkyDomes • A giant cube is created around the Camera and rendered onto • the texture is "projected" onto the SkyBox in a spherical manner. • It looks as if the texture is wrapped around the surface of a sphere. • Drawback : the bottom of the cube will be untextured • >have some type of terrain that hides the base. • In ExampleApplication::createScene: • mSceneMgr->setSkyDome(true, "Examples/CloudySky", 5, 8); 13 13
SkyPlanes - A single plane. - Best position: be somewhere towards the middle of the terrain and close to the ground. In ExampleApplication::createScene. Plane plane; plane.d = 1000; plane.normal = Vector3::NEGATIVE_UNIT_Y; mSceneMgr->setSkyPlane( true, plane, "Examples/SpaceSkyPlane", 1500, 75); 14
Fog • When use the TerrainSceneManager • - call the setFog function before the setWorldGeometry function • - depending on which is called first, a different vertex program will be chosen to create the fog and terrain. • When creating fog, it doesn't create a fog entity in empty space. • Fog is a filter applied to whatever objects are rendered • When nothing is seen -> no fog; only see the background color. • To have fog look correct, set the background to the fog color.
setFog 1st parameter: set the type of fog 2nd parameter: set the color of the fog 3rd parameter: fog density (not used in linear fog) 4th , 5th parameters: specify the range where the fog gets thicker. 16
Steps to create fog • set the background color • (2) create the fog • (3) If necessary, use the getNumViewports member function to get the number of viewports and iterate through them • ColourValue fadeColour(0.9, 0.9, 0.9); • mWindow • ->getViewport(0) • ->setBackgroundColour(fadeColour);
Types of fog Two types of fog (1) Linear fog (2) Exponential fog To create a linear fog: mSceneMgr->setFog(FOG_LINEAR, fadeColour, 0.0, 50, 500); (Remember, this code must appear before the setWorldGeometry call) 18
Exponential Fog • Two types of exponential fog: • (1) FOG_EXP • (2) FOG_EXP2: IE fog gets much thicker each unit compared to FOG_EXP • - set a density for the fog • mSceneMgr->setFog(FOG_EXP, fadeColour, 0.0005); • mSceneMgr->setFog(FOG_EXP2, fadeColour, 0.0005); • Using DirectX Renderer, it completely fogged out • calling setFog after setWorldGeometry fixes this. • The OpenGL Renderer behaves as documented. 19 19
OpenGL Fog mSceneMgr->setFog( FOG_LINEAR, fadeColour, 0.0, 50, 500); mSceneMgr->setFog( FOG_EXP, fadeColour, 0.0005); mSceneMgr->setFog( FOG_LINEAR, fadeColour, 0.0, 50, 5000); mSceneMgr->setFog( FOG_EXP2, fadeColour, 0.0005); Any problems? There is no fog when there’s no object. (see at the back)
Problem when Using SkyBox and SkyDome with Fog • - The problem: unnatural fog • - SkyDomes and SkyBoxes are cubes • fog works in a spherical manner • Let’s try this:. • -Problem one: if the skybox’s setting too small. • ColourValue fadeColour(0.9, 0.9, 0.9); • mSceneMgr->setFog(FOG_LINEAR, fadeColour, 0.0, 50, 5000); • mWindow->getViewport(0)->setBackgroundColour(fadeColour); • mSceneMgr->setWorldGeometry("terrain.cfg"); • mSceneMgr->setSkyDome(true, "Examples/CloudySky", 5, 8, 1000); • -Problem two: move the camera aroundnotice the blue coming through on the sides, but not in the middle) • Question: How to solve the problem ?
Fog as Darkness - Not use sky at all when you set fog, - set the fog to be thick enough so that the sky cannot be seen. - Set the fog to be very dark ColourValue fadeColour(0.1, 0.1, 0.1); mWindow->getViewport(0) ->setBackgroundColour( fadeColour ); mSceneMgr->setFog( FOG_LINEAR, fadeColour, 0.0, 10, 2000); mSceneMgr->setWorldGeometry( "terrain.cfg“ );
Tutorial FourFrame Listeners and Unbuffered Input • Use FrameListeners to do things that require updates every frame • Use Ogre's unbuffered input system
FrameLiseners • - Use FrameListeners to receive notification before and after a frame is rendered to the screen. • Two functions: • bool frameStarted(const FrameEvent& evt) • bool frameEnded(const FrameEvent& evt)
Major part of call graph GameApplication::go() GameApplication::setup() Root::startRendering() Root::renderOneFrame() Root::_fireFrameStarted() Root::_fireFrameEnded(); FrameListener::frameStarted(evt) FrameListener::frameEnded(evt) Root::_updateAllRenderTargets(); 27 27
FrameLiseners • An Application may have two or more FrameListeners. • - Cannot determine which FrameListener is called first, second, third...and so on. • To ensure that FrameListeners are called in a certain order • -> register only one FrameListener and have it call all of the objects in the proper order.
Example for Constructing a FrameLisener Derive a new framelistener from ExampleFrameListerner: Class DemoFrameListener : public ExampleFrameListener { public: DemoFrameListener( RenderWindow* win, Camera* cam, SceneManager *sceneMgr) : ExampleFrameListener(win, cam, false, false) { } bool frameStarted(const FrameEvent &evt) { return ExampleFrameListener::frameStarted(evt); } …… }
Registering a FrameListener • Create an instance of our DemoFrameListener and register it with the Root object: • In ExampleApplication::createFrameListener method, and add this code to it: • mFrameListener = new DemoFrameListener( • mWindow, mCamera, mSceneMgr); • mRoot->addFrameListener(mFrameListener); • - The mRoot and mFrameListener variables are defined in the ExampleApplication class.
FrameLiseners Root::addFrameListener: add a FrameListener, Root:: removeFrameListener : remove a FrameListener Note: add|removeFrameListener methods only take in a pointer to a FrameListener - FrameListeners do not have names ->Need to hold a pointer to each FrameListener
“Unbuffered" mouse and key input: call methods in frame listener to query the state of the keyboard and mouse. • A problem: • If a key is down, action can be taken on this information. However, what happens in the next frame? • Is the same key down and do the same thing again? • (1) Keep track of whether or not the mouse was also • down the previous frame • (2) Define a variable mToggle for indicating the state of • an action • (3) Allow actions to happen after a certain amount of time • has elapsed Unbuffered input
Specifying unbuffered input mode Class DemoFrameListener : public ExampleFrameListener { public: DemoFrameListener( RenderWindow* win, Camera* cam, SceneManager *sceneMgr) : ExampleFrameListener(win, cam, false, false) { } ….. } ExampleFrameListener's constructor: : ExampleFrameListener(win, cam, false, false) -3rd variable: specify whether using buffered key input -4th variable: specify whether using buffered mouse input
Specifying unbuffered input mode mKeyboard = static_cast<OIS::Keyboard*> (mInputManager->createInputObject( OIS::OISKeyboard, false )); mMouse = static_cast<OIS::Mouse*> (mInputManager->createInputObject( OIS::OISMouse, false ));
Open Input System (OSI) • - OSI povides three primary classes to retrieve input: • Keyboard, (2) Mouse, and (3) Joystick. • - OSI key codes: OSI::KC_* (More details: read KeyCode) • - To use the Keyboard and Mouse objects. • Steps: • (1) Capture the current state of the keyboard and mouse. • In DemoFrameListener::frameStarted: • mMouse->capture(); • mKeyboard->capture(); • Implement methods to handle key and mouse events. • For example, • if(mKeyboard->isKeyDown(OIS::KC_ESCAPE)) return false; 36
An Example: Control the movement of a camera Code: mCamNode->translate( transVector * evt.timeSinceLastFrame, Node::TS_LOCAL); Note: the magnitude of the translation should be depended on the amount of time since the last frame. Otherwise, how fast the movement of the camera would be dependent on the framerate of the application. 37 37 37 37
Control the rotation of the camera • use Quaternions for all rotation operations. • use a Quaternion to rotate a vector • apply all of the rotations done to the SceneNode to the translation vector.
Transformation Space • Specify which Transformation Space to use to move the object. • TS_PARENT : In parent node • TS_LOCAL : In object node • TS_WORLD: In world coordinate system • mCamNode->translate( • transVector * evt.timeSinceLastFrame, Node::TS_LOCAL);
Transformation Space To move a SceneNode along the direction specified by the orientation Method one: mCamNode->translate( mCamNode->getOrientation() * transVector * evt.timeSinceLastFrame, Node::TS_WORLD); Method Two: mCamNode->translate( transVector * evt.timeSinceLastFrame, Node::TS_LOCAL);
Tutorial Five: Buffered input • Use OIS's buffered input • Handle keyboard and mouse events • by using Listeners. • For more information about OSI, read Using OIS article.
Buffered input • - Unbuffered input : every frame the state of OIS::Keyboard and OIS::Mouse instances is queried to see what keys and mouse buttons were being held down. • Buffered input: use listener interfaces to inform the program that events have occurred. • When a key is pressed, a KeyListener::keyPressed event is fired. • When the button is released (no longer being pressed) a KeyListener::keyReleased event is fired to all registered KeyListener classes.
OSI • OIS's listener system : allow one listener per Keyboard, Mouse, or Joystick object. • call the setEventCallback function (which we will cover later) multiple times will result in only the last registered listener getting events. • If two or more objects have to get Key, Mouse, or Joystick events, write a message dispatch yourself. • call the Keyboard::capture and Mouse::capture in the frameStarted method. • (OIS does not use threads (or magic) to determine the keyboard and mouse states.)
The KeyListener Interface OIS's KeyListener interface provides two pure virtual functions. (1) keyPressed function (which is called every time a key is pressed) (2) keyReleased (which is called every time a key is released). The parameter passed to these functions is a KeyEvent, which contains the key code of what is being pressed/released.
The MouseListener Interface • MouseListener::mousePressed • MouseListener::mouseReleased • MouseListener::mouseMoved • Each receives a MouseEvent object: the current state of the mouse • The MouseState (const OIS::MouseEvent &arg) object contains • (1) the relative X and Y coordinates of the mouse move, • i.e. ( arg.state.X.rel, arg.state.Y.rel ) • (2) the absolute X and Y coordinates (that is, where exactly on the screen they are). • i.e. ( arg.state.X.abs, arg.state.Y.abs )
Registering keyboard callback and mouse callback • The OIS mMouse and mKeyboard objects are already obtained in the ExampleFrameListener constructor. • To register the DemoFrameListener as the listener by calling the setEventCallback method on these input objects: • mMouse->setEventCallback(this); • mKeyboard->setEventCallback(this);
FrameListener for buffered input class DemoFrameListener : public ExampleFrameListener, public OIS::MouseListener, public OIS::KeyListener { public: DemoFrameListener( RenderWindow* win, Camera* cam, SceneManager *sceneMgr) : ExampleFrameListener(win, cam, true, true) { …… …… } …… bool frameStarted(const FrameEvent &evt) { if(mMouse) mMouse->capture(); if(mKeyboard) mKeyboard->capture(); return mContinue; } } ; in ExampleFrameListener::ExampleFrameListener { … mKeyboard->setEventCallback(this); mMouse->setEventCallback(this); … } 47
Example for Key Bindings In DemoFrameListener::keyPressed : It is called with a KeyEvent object when a button of the keyboard is pressed. bool keyPressed(const OIS::KeyEvent &e) { switch (e.key) { case OIS::KC_ESCAPE: mContinue = false; break; default: break; } return mContinue; } 48
Example for Mouse Bindings • Find the mousePressed function • - Access to both a MouseEvent and a MouseButtonID. • Switch on the MouseButtonID to determine the button that was pressed in mousePressed • Mouse key code: OIS::MB_*
Other Input System: SDL • Cross platform windowing/input systems • Support joystick/gamepad input