Lecture 8 Side-Scrolling Game Development
Lecture 8 Side-Scrolling Game Development. Game Design. The first step in game design is having an idea for the game. This may seem like an odd statement but it is the first step and is skipped more often than you might suppose . Artwork.

Lecture 8 Side-Scrolling Game Development
E N D
Presentation Transcript
Lecture 8 Side-Scrolling Game Development
Game Design The first step in game design is having an idea for the game. This may seem like an odd statement but it is the first step and is skipped more often than you might suppose.
Artwork Once you have your game concept defined you should begin developing your artwork. This usually begins with the background image which can help to establish the overall style of your game. In this example, we use Power Point to construct simple scenes and characters. We copy these images to Paint Shop Pro for additional manipulation (any bitmap editing program will do for this step. For sprite sheets we are using magenta (255,0,255) as the transparency color. Magenta rectangles can be created in Power Point and placed as to background of any objects placed in the foregound. A screenshot of PPT slides or simply selecting and copying these objects to a bitmap editing program such as Paint Shop Pro will convert these collections of vectorize dobjects into bitmap images. If your source images have anti-aliasing features the magenta background may get blended at the borders which will produce magenta halo around your sprites. This can be removed by reducing the number of colors in the bitmap and then editing the palate to force all near-magenta pixels to the transparency color.
Power Point can be used to arrange simple shapes into a scene.
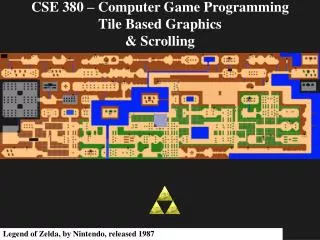
For a side scrolling game you might want to build the background in sections.
A few simple shapes can be copied and re-arranged to add variety while maintaining continuity. As segments of the background scene are ready they are converted to bipmaps by transferring them to an image editing application such as PaintShopPro.
Using techniques such as cut-and-paste, flip, and mirror you can tweak your scene within the bitmap editing application. This scene is 4096 x 480 pixels. If you are building a game for a mobile device or a desktop computer that does not support HiDef, you will be limited to a maximum dimension of 2048 pixels. For now we will use a simple red ball as our character which will be placed in a 32x32 pixel sprite sheet. PPT source image PNG sprite sheet from Paint Shop Pro
SideScrollingDemo GraphicsDeviceManager graphics; SpriteBatchspriteBatch; KeyboardStatekbd; // game will use keyboard interface Rectanglebkgdisplay; // display window will be set to 640x480 RectangleCharRect; // character rectangle will be 32x32 pixels Vector2 CharPosDisp; // handles maxY at bottom of display issues Vector2 CharOrig; // will be set to (16,16) which is the center of the character Vector2 CharPos; // character position Vector2CharVel; // character velocity Vector2CharAcc; // character acceleration Vector2bkgorig; // adjusted to keep character in center of scene when not near extremes Vector2orig = newVector2(0, 0); // upper-left corner of display region Vector2TextOrig = newVector2(15, 1); // location for start of text banner for key legend bool contact; // ensures that character is in contact with a surface before jumping Texture2D character; // will hold character sprite sheet Texture2Dbkg; // will hold background bitmap image SpriteFont font; // font to display key legend at top of screen The variables defined for this demo include the character position, velocity, and acceleration which will be used to define the display of the character and the portion of the backgound image for each frame.
Setting up the Game with the Initialize( ) & LoadContent( ) Methods protectedoverridevoid Initialize() { base.Initialize(); graphics.PreferredBackBufferWidth = 640; // display is set to 640x480 graphics.PreferredBackBufferHeight = 480; bkgdisplay = newRectangle(0, 0, 640, 480); graphics.IsFullScreen = true; // game will run in fullscreen mode graphics.ApplyChanges(); CharAcc.Y = (float)-0.3; // a constant downward acceleration simulates gravity CharRect.X = 0; CharPos.X = 0; CharRect.Width = 32; CharRect.Height = 32; CharPos.Y = 0; CharOrig.X = 16; CharOrig.Y = 16; CharPosDisp.X = 16; CharPosDisp.Y = 480 - CharPos.Y; contact = true; } protectedoverridevoidLoadContent() { spriteBatch = newSpriteBatch(GraphicsDevice); bkg = Content.Load<Texture2D>("side_scroller_bkg"); character = Content.Load<Texture2D>("character"); font = Content.Load<SpriteFont>("SpriteFont1"); bkgorig.X = 0; bkgorig.Y = 0; }
Driving the Character using Acceleration protectedoverridevoid Update(GameTimegameTime) { if (GamePad.GetState(PlayerIndex.One).Buttons.Back == ButtonState.Pressed) this.Exit(); kbd = Keyboard.GetState(); if (kbd.IsKeyDown(Keys.Q)) this.Exit(); if (kbd.IsKeyDown(Keys.Right)) CharAcc.X = (float)0.4; if (kbd.IsKeyDown(Keys.Left)) CharAcc.X = (float)-0.4; if (kbd.IsKeyDown(Keys.Space) && contact) { CharVel.Y = (float)7.0; contact = false; } if (kbd.IsKeyUp(Keys.Right) && kbd.IsKeyUp(Keys.Left)) CharAcc.X = (float)0.0; CharVel.X += CharAcc.X; CharVel.Y += CharAcc.Y; CharPos.X += CharVel.X + (float)CharAcc.X / 2; CharPos.Y += CharVel.Y + (float)CharAcc.Y / 2; While left or right arrow keys are pressed the acceleration of the character in the X direction is set to -0.4 or +0.4 respectively. If character is in contact with a surface (for now this is just the ground) pressing the SpaceBar sets the Y velocity of the character to +7.0. When arrow keys are up the character acceleration is set to 0.0. Laws of Kinematics applied here. Note for simplicity delta-time is assumed to be unity (1.0).
if(CharPos.X < CharSize / 2) { CharPos.X = CharSize / 2; CharVel.X = (float)0.0; CharAcc.X = (float)0.0; } if (CharPos.X > bkg.Width - CharSize / 2) { CharPos.X = bkg.Width - CharSize / 2; CharVel.X = (float)0.0; CharAcc.X = (float)0.0; } if (CharPos.Y < CharSize / 2) { CharPos.Y = CharSize / 2; CharVel.Y = (float)0.0; contact = true; } if (CharPos.Y > bkg.Height - CharSize / 2) CharPos.Y = bkg.Height - CharSize / 2; CharVel.X *= (float)0.9; bkgdisplay.X = (int)CharPos.X - graphics.PreferredBackBufferWidth/2; if (bkgdisplay.X < 0) bkgdisplay.X = 0; if (bkgdisplay.X > bkg.Width - graphics.PreferredBackBufferWidth) bkgdisplay.X = bkg.Width - graphics.PreferredBackBufferWidth; CharPosDisp.X = CharPos.X - bkgdisplay.X; CharPosDisp.Y = 445 - CharPos.Y; base.Update(gameTime); } Character not permitted to move beyond left-side of play region. Character not permitted to move beyond right-side of play region. Character not permitted to move below bottom of play region (ground surface). Character not permitted to move above top of play region. Character X velocity slows to zero when not being accelerated by arrow keys. When character reaches edges of play region, background image is blocked to keep it in the display.
Draw( ) Method protectedoverridevoid Draw(GameTimegameTime) { //GraphicsDevice.Clear(Color.CornflowerBlue); spriteBatch.Begin(); spriteBatch.Draw(bkg, bkgorig, bkgdisplay, Color.White, 0, orig, 1, 0, 1); spriteBatch.Draw(character, CharPosDisp, CharRect, Color.White, 0, CharOrig, 1, 0, 0); spriteBatch.DrawString(font, "Left Arrow = move left Right Arrow = move right Space = jump Q = quit", TextOrig, Color.CadetBlue); spriteBatch.End(); base.Draw(gameTime); } The Draw( ) method puts the background image at level 1 (back) and the character at level 0 (front). The Key Legend is displayed at the top of the screen and remains fixed relative to the display as the backgroun scrolls behind it. For now our character is a red ball. As we continue to develop or game it will be replaced with an animated character.
Globals publicList<block> blocks = newList<block>(); // holds the static (non-moving) objects GraphicsDeviceManager graphics; SpriteBatch spriteBatch; KeyboardState kbd; Rectangle bkgdisplay; // the 640x480 pixel region which will be the instan Rectangle CharRect; Vector2 CharPosDisp; Vector2 CharOrig; Vector2 CharPos; // character position Vector2 CharVel; // character velocity Vector2 CharAcc; // character acceleration float gravity = (float)-0.4; // acceleration due to gravity float jump = (float)10.0; // initial velocity of a jump Vector2 bkgorig; Vector2 orig = newVector2(0, 0); Vector2 TextOrig = newVector2(15, 1); bool contact; // true is character is touching something bool hit; // indicates character has collided with a block float sep = 8; Texture2D character; Texture2D bkg; Texture2D blocksprite; Vector2 blockOrig; double blockWidth; double blockHeight; SpriteFont font; int deltime; int bouncetime = 100;
readmap( ) Method publicvoid readmap() { int[,] map = newint[100, 1000]; string fname = "map2.dat"; // 0 = open 2 = block string txtline; int nrow, ncol; StreamReader tr = newStreamReader(fname); // creates an input stream nrow = 0; ncol = 0; do { txtline = tr.ReadLine(); // reads a line of the textfile if (txtline != null) { ncol = 0; foreach (string str in txtline.Split(' ', '\t')) // separates the line into numbers { if (str.Length > 0) { map[nrow, ncol] = Convert.ToInt32(str); // stores numbers in an array ncol += 1; } } nrow += 1; } } while (txtline != null && txtline.Length > 10); // checks to see if there is another line of text tr.Close();
generic List blocks //this section creates a generic list of block object called "blocks" blockWidth = (double)bkg.Width / (double)ncol; blockHeight = (double)bkg.Height / (double)nrow; for (int r = 0; r < nrow; r++) { for (int c = 0; c < ncol; c++) { if (map[r, c] > 0) { blocks.Add(newblock(c, // column number in map.dat r, // row number in map (int)(blockWidth*(double)c), // X position on background image (int)(blockHeight*(double)r) + 10, // Y position on background image (int)(blockWidth * (double)map[r, c]), // blit X position in blocksprite sheet 0, // blit Y position in blocksprite sheet (int)blockHeight, // block width (int)blockHeight, // block height map[r,c])); // block type number from map.dat } } }
Character Motion Control if (GamePad.GetState(PlayerIndex.One).Buttons.Back == ButtonState.Pressed) this.Exit(); kbd = Keyboard.GetState(); if (kbd.IsKeyDown(Keys.Q)) // quits demo this.Exit(); if (kbd.IsKeyDown(Keys.Right)) // accelerates character to right CharAcc.X = (float)0.4; if (kbd.IsKeyDown(Keys.Left)) // accelerates character to left CharAcc.X = (float)-0.4; if (kbd.IsKeyDown(Keys.Space) && contact) // allows character to jump if in contact { // with ground or a block CharVel.Y = jump; contact = false; } if (kbd.IsKeyUp(Keys.Right) && kbd.IsKeyUp(Keys.Left)) // decelerates character when left/right buttonss CharAcc.X = (float)0.0; // are not being pressed CharVel.X += CharAcc.X; CharVel.Y += CharAcc.Y; CharPos.X += CharVel.X + (float)CharAcc.X / 2; CharPos.Y += CharVel.Y + (float)CharAcc.Y / 2; if (CharPos.X < character.Width / 2) // stops character once it has slowed down enough { CharPos.X = character.Width / 2; CharVel.X = (float)0.0; CharAcc.X = (float)0.0; } if (CharPos.X > bkg.Width - character.Width / 2) { CharPos.X = bkg.Width - character.Width / 2; CharVel.X = (float)0.0; CharAcc.X = (float)0.0; }
more motion control if (CharPos.Y < character.Height / 2) // eliminates bounce once character bounce is small enough { CharPos.Y = character.Height / 2; CharVel.Y = (float)0.0; contact = true; } if (CharPos.Y > bkg.Height - character.Height / 2) CharPos.Y = bkg.Height - character.Height / 2; CharVel.X *= (float)0.95; // slows character down
managing Character-Block contact hit = false; foreach (block b in blocks) { if (hit) break; if (inside(CharPos, sep, b)) // figures out which side of block { // character has contacted hit = true; contact = true; diffxleft = Math.Abs(CharPos.X + sep - b.Pos.X); diffxright = Math.Abs(CharPos.X - sep - (b.Pos.X + b.Rect.Width)); diffytop = Math.Abs(CharPos.Y + sep - b.Pos.Y); diffybottom = Math.Abs(CharPos.Y - sep - (b.Pos.Y + b.Rect.Height)); diffx = Math.Min(diffxleft, diffxright); diffy = Math.Min(diffytop, diffybottom); if (diffx < diffy) { CharVel.X = -(float)0.95*CharVel.X; if (diffxleft < diffxright) CharPos.X = b.Pos.X - sep; else CharPos.X = b.Pos.X + b.Rect.Width + sep; } else { CharVel.Y = -(float)0.95*CharVel.Y; if (diffytop < diffybottom) CharPos.Y = b.Pos.Y - sep; else CharPos.Y = b.Pos.Y + b.Rect.Height + sep; } } }
Dealing with Scrolling Image bkgdisplay.X = (int)CharPos.X - graphics.PreferredBackBufferWidth/2; // prevents scrolling past edges of if (bkgdisplay.X < 0) // background image bkgdisplay.X = 0; if (bkgdisplay.X > bkg.Width - graphics.PreferredBackBufferWidth) bkgdisplay.X = bkg.Width - graphics.PreferredBackBufferWidth; if (contact && Math.Abs(CharVel.Y) > (float)0.0001) // resets contact boolean at end { // of image update time deltime += gameTime.ElapsedGameTime.Milliseconds; if (deltime > bouncetime) { contact = false; deltime = 0; } } foreach (block b in blocks) // forces blocks to remain fixed relative to { // background as background image scrolls left or right b.Disp.X = b.Pos.X + 10 - bkgdisplay.X; b.Disp.Y = 470 - b.Pos.Y; } CharPosDisp.X = CharPos.X - bkgdisplay.X; // manages character position in view CharPosDisp.Y = 480 - CharPos.Y;