Complete Guide to Setting Up and Configuring the DCS-942L Camera
440 likes | 562 Vues
This comprehensive guide covers all aspects of setting up and configuring your DCS-942L camera. Learn how to install the camera, change your admin password, reset forgotten login credentials, modify the LAN IP address, set up motion detection, and configure audio settings. Additionally, discover how to upgrade firmware manually and mount the camera securely. With clear step-by-step instructions, you’ll be able to access your camera remotely and make the most of its features.

Complete Guide to Setting Up and Configuring the DCS-942L Camera
E N D
Presentation Transcript
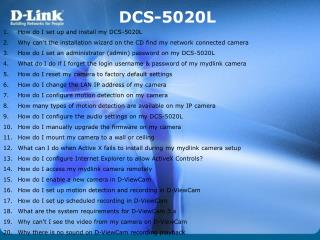
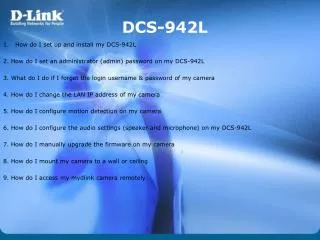
DCS-942L • How do I set up and install my DCS-942L 2. How do I set an administrator (admin) password on my DCS-942L 3. What do I do if I forget the login username & password of my camera 4. How do I change the LAN IP address of my camera 5. How do I configure motion detection on my camera 6. How do I configure the audio settings (speaker and microphone) on my DCS-942L 7. How do I manually upgrade the firmware on my camera 8. How do I mount my camera to a wall or ceiling 9. How do I access my mydlink camera remotely
How do I set up and install my DCS-942L Step 1: Download and the install wizard for your camera from http://www.mydlink.com/support Step 2: Launch the install wizard: Step 2.1 : Select a language from the drop-down menu and click Start.
Step 2.2: Accept the End User License Agreement by checking the box next to “I accept these terms and conditions”, then click Next Step 2.3: Follow the on-screen instructions to connect your camera to your router and connect the power. Click Next after you have completed each step.
Step 4.4: Confirm that the LED on the rear of the camera is lit solid green
Step 4.5: Select your DCS-942L using the radio button from the menu on the left-hand side of the camera name. Enter and confirm a new password for the administrator account in the fields provided. This password will be required when logging in to the camera’s web-based configuration interface. Click Next to continue.
Step 4.6: Using the radio buttons, select how you wish to connect your camera to your router for normal operation. You can choose to connect using a wired Ethernet connection (Ethernet cable), using Wi-Fi Protected Setup (WPS), or by selecting an available wireless network. Click Next to continue.
Step 4.6.1. If you selected Ethernet Cable connection, follow the on-screen instructions to connect your camera to your router using a wired connection. Once completed, click Next to continue the wizard. Step 4.6.2. If you selected By using Wi-Fi Protected Setup (WPS), follow the on-screen instructions to connect your camera to your wireless router using WPS. Once completed, click Next to continue the wizard. Note: Your router must support WPS Push-button Connection (PBC) in order to use this method.
Step 4.6.3. If you selected By Selecting a Wireless Network, choose an available wireless network from the drop-down menu. If you do not see your wireless network in the list, click Rescan to search for wireless networks again. If your network requires a password, enter it in the Wireless password field. Click Next to continue.
Step 4.7.1: In order to use the cloud features of your camera, you will need to add it to your mydlink account. If you do not have a mydlink account, you can create one at this step. To add the DCS-942L to your existing mydlink account, select Yes, I already have a mydlink account, then enter your mydlink account username (email address) and password in the fields provided and click Next.
Step 4.7.2: If you selected No, I want to sign up for a new account, enter the information required for account registration in the fields provided. Check the box to indicate that you accept the Terms of Use and Privacy Policy for mydlink cloud services. Click Next to continue.
Step 4.6.3: If you selected I don’t want to enable mydlink cloud service, you will not be able to use any of the cloud services associated with your camera. Click Next to continue.
Step 4.7: Setup is complete. A summary page with display your camera’s setup details, as well as your mydlink account information. Click Finish.
Step 5: Log in to your mydlink account to view and manage your DCS-942L http://www.mydlink.com
How do I set an administrator (admin) password on my DCS-942L Note: mydlink Cloud Service registration requires the admin password Step 1: Open a web browser and enter the IP address of the camera in the address bar (default is 192.168.0.20). Press Enter. Step 2: The default username is admin and the password field should be left blank. Click OK.
Step 3: Click the Maintenance tab at the top and then click Admin from the menu on the left-hand side. Step 4: To change the administrator password, enter the existing administrator password (leave blank by default), and enter a new password in the Admin Password Setting section. You will need to type the new password again in the Confirm New Password field. Step 5: Click Save to save the configuration. Note: If you forget the administrator password, you will need to reset the device to the factory default in order to access the configuration utility.
What do I do if I forget the login username & password of my camera(How do I reset my camera to factory default settings?) If you have forgotten the login username or password for your camera’s configuration utility, you will need to reset the camera to its factory default settings. This will erase all current settings. Note: After a factory reset you will need to re-register the camera with mydlink Step 1: With the unit on, use a paper clip to press the reset button inside the hole on the back on the unit labeled Reset. Step 2: Hold the button down for 10 seconds and release. Note: Do not unplug the power during this procedure. Step 3: The unit will then reboot. Once the power light stops blinking, the unit is reset and all settings are restored to their defaults.
How do I change the LAN IP address of my camera Note: If you change the LAN IP address of the camera, you will need to enter the new IP address into your web browser’s address bar in order to access the configuration utility. Step 1: Open a web browser and enter the IP address of the camera in the address bar (default is 192.168.0.20). Press Enter. Step 2: The default username is admin and the password field should be left blank. Click OK.
Step 3: Click on Setup on the top menu bar. Step 4: Go to Network Setup and select Static IP Address
Step 5: Change the IPv4 Address using the field provided. The new address should be within the same subnet as the factory default address (ie: 192.168.0.XXX). Step 6: Click the Save Settings button to save the new settings.
How do I configure motion detection on my camera Method 1 To be used if your D-Link Cloud Camera is already registered with the mydlink Cloud Service. Step 1: Open your web browser and enter http://www.mydlink.com/ Step 2: Enter your mydlink ID (email) and password at the login screen and click Sign in.
Step 5: Select the detection area and sensitivity you would like using the drawing tools. Click Next to continue.
Step 6: Click Finish to save the motion detection area configuration.
Step 7: Click Save to save the current configuration and activate motion detection. Step 8: Click Yes to confirm the changes.
Method 2 Step 1: Open a web browser and enter the IP address of the camera in the address bar (default is 192.168.0.20). Press Enter. Step 2: The default username is admin and the password field should be left blank. Click OK.
Step 4: Click Motion Detection from the menu on the left-hand side
Step 5: Check the Enable Video Motion or Enable PIR, or both Enable Video Motion: Select this box to enable the motion detection feature of your camera. If this option is selected, enter a level of sensitivity in the Sensitivity field adjacent to the video window. You also need to select the area of the video that you want to include or exclude for motion detection. You can choose to Draw motion area, whereby the selected area will be included for motion detection, or Erase motion area, whereby the selected area will be excluded from motion detection. To select an area, click and drag your mouse over the required area. Click Clear to delete all selections from the video window. Enable PIR: When this option is selected, the camera will use PIR (Passive InfraRed) motion detection. If this option is enabled, select a PIR Sensitivity from the drop-down menu.
Step 6: Click the Save Settings button to save the new configuration.
How do I configure the audio settings (speaker and microphone) on my DCS-942L Step 1: Open a web browser and enter the IP address of the camera in the address bar (default is 192.168.0.20). Press Enter. Step 2: The default username is admin and the password field should be left blank. Click OK.
Step 4: Click Audio and Video from the menu on the left-hand side. To enable the speaker, check the Speaker option, and select a volume from the drop-down menu. To enable the microphone, check the Microphone option and select a volume from the drop-down menu. Click Save Settings to the left to save the current configuration.
How do I manually upgrade the firmware on my camera Note: All firmware upgrades should be done over a WIRED connection. If your camera is currently configured for wireless, plug it directly into your router before proceeding. Step 1: Download the latest firmware file for your device from https://www.mydlink.com/support Step 2: Open a web browser and enter the IP address of the camera in the address bar (default is 192.168.0.20). Press Enter. Step 3: The default username is admin and the password field should be left blank. Click OK.
Step 4: Click the Maintenance tab and then click Firmware Upgrade from the menu on the left-hand side. Step 5: Click on Browse to located the downloaded firmware and then click the Upload button. The firmware upgrade will commence. Once completed, the camera will reboot, and you will need to log in to the configuration interface again.
How do I mount my camera to a wall or ceiling Step 2: Use a flathead screwdriver to remove the base cover from the mounting base. Place the mounting base where you want to position the camera and use a pencil to mark the holes. Step 1: The camera needs to be removed to expose the holes in the mounting base. Unscrew the camera head from the mounting base by turning it counterclockwise.
Step 4: Place the mounting base over the holes that are in the wall or ceiling. Make sure to align the mounting base holes with the holes in the wall or ceiling. Use the supplied screws to attach the mounting base to the surface of the wall. Step 3: Depending on the material of the wall or ceiling, use proper tools to drill two holes where you marked. If the wall is made out of concrete, drill the holes first, then insert the plastic anchors to support the screws.
Step 5: Place the base cover back on to the base. Make sure to align the base cover notch, with the mounting base for future removal. Afterwards, reattach the camera head onto the mounting base. Step 6: Adjust the angle of the camera as desired, then tighten the collar on the camera stem to lock it in place.
How do I access my mydlink camera remotely In order to view your mydlink camera remotely through the mydlink portal or using the mydlink app, you must first register your camera to a mydlink account. This is done while running the installation CD or camera installer which came supplied with your camera. Please visit https://www.mydlink.com/support to download the installer for your camera. Using mydlink Web Portal: Step 1: Log in to your mydlink account at http://www.mydlink.com
Step 2: Select your mydlink-enabled camera to view live video
Using the mydlink Lite app: Step 1: Download and install the mydlink Lite app from to your mobile device (check your camera’s packaging or documentation for compatibility). Step 2: Log into the app with your mydlink username and password.
Tap the camera that you wish to view the live feed for from the list which appears.
Your live video will be displayed. Depending on the model of camera you are viewing, you may be able to control certain functions using the buttons below the live feed screen.