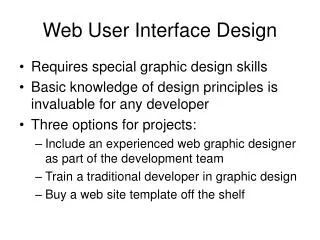
Datatel Colleague Web User Interface
The Datatel Colleague Web UI offers a dynamic search area for users to efficiently find people and forms. The person search allows you to locate individuals using IDs or names, with advanced search options for detailed results. For forms, simply input the mnemonic or keywords. The Favorites tab permits quick access to important records. The intuitive Toolbar provides options for saving, canceling, and accessing preferences, while the Help menu assists with shortcuts and version info. Responsive scaling ensures forms are displayed optimally, enhancing usability.


Datatel Colleague Web User Interface
E N D
Presentation Transcript
The Look of Web UI Tabs Search Area Context Area Menus Tool Bar Form Scale Slider
Search Area The search area of the UI window, in the upper left corner lets you search for people or forms to work with. You can click the icon on the left of the search field to switch between the person search and the form search.
Person Search When the search field is set to the person search you can search using a student ID or name. You can also do an advanced person search by clicking on the magnifying glass to the right of the search field. The advanced person search will allow you search for a person or organization using multiple search parameters.
Form Search To search for a from, type the mnemonic or words from the title of the form in the search box. When you enter in the mnemonic for a form it will open immediately. If you can not remember the mnemonic, but know one or two words from the form you can enter it and it will bring up a Search Results panel that displays all possible matching forms. *You can still use the mnemonic tree for access.
The search results tab stores your searches from the person and form searches. Tabs • Search Results Tab
Tabs • Click the Navigation tab to access a Colleague form by navigating through the Colleague menu structure. Here is where you will find the familiar mnemonic tree menu. *Note – you no longer need to switch between modules you now have access to any form you have permissions for without switching between modules. • Navigation Tab
Tabs • You can save people or forms to your favorites tab and access them by click on the tab. To add a favorite click on the Gold star button in the context area (for person related records), the UI Form Area (for forms), or while in the Favorites panel. • Favorites Tab
Menus With UI, menu items are available on the left side of the tool bar (which is just above the form area). These menus proved access to many of the UI controls and features. File Menu • The File menu provides access to the following features (many of these are also available using keyboard shortcuts): • Save – Save data on the current form • Save All – saves data on all open forms • Finish – Saves data on all open forms and closes all open forms • Cancel - Cancels changes on the current form • Cancel All – Cancels changes on all open forms • Detail – Accesses the detail form, or a menu of available forms, from the current field. • Add Active Form to Favorites – Adds the current form to Favorites • Print Form – Prints the current form • Logout – Exits UI
Options Menus • The Options menu provides access to the following features. Many of these features are also available using keyboard shortcuts: • Preferences – Accesses the Preference dialog box, where you can change preferences such as the color theme and other user settings • Clear Search History – Accesses the Clear History dialog box, where you can clear search history, contexts, and form scale values. • Set Form Scale Default – Sets the global default scale factor for all forms to the current scale factor (set using the slider bar at the top of the UI form area). Forms with individual scale factor overrides are not affected by this global default. • Clear All Form Scale Values – Clears all individual form scale factors and the global default scale factor. Without these scale values, forms are rendered using a “best fit” algorithm based on the size of the UI window. Help Menu The Help Menu provides access to process the field help for the current Colleague form. It also provides access a list of all keyboard shortcuts and a help about message that provides information such as the current UI version number.
Tool Tip Context Area The context area displays information about the current person-related record that you are working with. It can hold person cards, organization cards or both. It is important to remember that if you close out of a form you are not always closing out of the person or organization listed in the context area. You can set your context area to Auto-Close Context so that it will close out the record in the context area as you leave each form or you can set it to Keep Context Open which will leave the record available and default in on your next form. Auto-close Context is recommended to assist in limiting errors.
When multiple cards are loaded into the Context area you can use the Next and Previous buttons to scroll through the cards. You can also select View All to see all cards currently in context.
Tool Tip Window Resizing and Form Scaling When Colleague displays a form, it resizes to minimize scrolling. You can use the scale slider to resize the current form and make the information larger or smaller as needed.
Resolution Screens Select All Check Box Card View Button Grid View Button Export to Excel Button Open Button Collapse Button Input Field
Views Card View Allows for photos (people search) in addition to other information about the records. Grid View Results are displayed in spreadsheet format, with the results in rows and columns. You can sort the results by column and rearrange the columns.
Tool Tip Input Field In both views you can hover over the Input field to view a tooltip that will show the options that can be used in this field.
Exporting Search Results Web UI offers the option of exporting the search results to Microsoft Excel. Click the Excel icon. All search results records are exported to a spreadsheet.
Report Printing Report Page Navigation This area shows you how many pages are within the report and allows you to click through to the next page, first page or last page. Save As Saves a copy of the report to your network or local hard drive. You will be asked to name the file and path. Export PDF Exports the report as a PDF file. When you select this option Export PDF dialogue box is displayed and various formatting options for PDF file. The formatting options are not saved for future UI sessions. Print Remote Allows you to print to a network printer without downloading to your computer.
Table Controller Within a form a multi-value field you will now see a Table Controller appear when you click on those fields. This tool will make moving through the list of items easier. Scroll buttons allow you to move from record to record or directly to last or back to first. You can view the pages/fields in the list and you can export the items to excel. Click and hold on “page” to slide the controller across the fields for better viewing. Excel Export Scroll Buttons
User Preferences You can set your personal preferences for UI on the Preferences dialog box. Changes to these preferences apply to your user profile only. To access the Preferences dialog box, click on Options Preferences from the menu bar. • Click on the Layout & Colors section to change: • Color Theme: Various color themes are available for selection. • Form Background Color: Select one of the available background colors for UI forms
Custom Lookup Shortcuts Several look ups shortcuts have been created to aide in the process. When searching on a particular form with these shortcuts simply enter a semi colon ; then the short cut then the data. Example: A short cut on the person file is birthdate. The short cut is BD. The look up would be: ;BD 01/05/77 You can also join short cuts in the lookup to search for multiple values. Example: A birthdate of 01/01/77 and lives in the city of Orange The lookup would be: ;BD 01/01/77 ;C Orange
Custom Lookup Shortcuts Continued
Custom Lookup Shortcuts Continued
Custom Lookup Shortcuts Continued
Keyboard Shortcuts Non-form shortcuts These short cuts are available when your curser is not within a UI form. • Change focus to search box (toggles between Person and Form search): Ctrl+Shift+S • Show Search Results panel: Ctrl+Alt+R • Show Clear History dialog box: Ctrl+Alt+T • Show Advanced Person Search dialog box: Ctrl+Alt+A • Show Navigation Panel: Ctrl+Alt+N • Show Favorites Panel: Ctrl+Alt+F • Exit/Logout: Ctrl+Alt+L • Show Help (for current UI area in focus): Ctrl+Alt+H • Show Keyboard Shortcuts: Ctrl+Alt+K • View all records in Context Area (card selector drop-down): Ctrl+Shift+A • Close current record in Context Area: Ctrl+Shift+X • Close all records in Context Area: Ctrl+Alt+X • Add current record in Context Area to Favorites: Ctrl+Shift+V • Add all records in Context Area to Favorites: Ctrl+Alt+V • Go to next record in Context Area: Ctrl+Shift+N • Go to previous record in Context Area: Ctrl+Shift+R • Close open panels (and return to the main UI window): Esc • Note: Some of these shortcuts may not work in all browsers. Browser plug-ins or other applications may override these shortcuts and activate different commands.
Keyboard Shortcuts Form shortcuts These keyboard shortcuts are available only when working within a UI form(alternative keystroke combinations are separated by |). Most of these commands are also accessible with the mouse from the UI form menu. • Move to the next field: Tab • Move to the previous field: Shift+Tab • Open a drop-down list to select a value: Down Arrow • Scroll through the values in a drop-down list: Up/Down Arrow • Select the highlighted value in the drop-down list: Enter • Move forward one row in a table: Down Arrow * • Move back one row in a table: Up Arrow * • Move forward one page in a table: Page Up • Move backward one page in a table: Page Down • Move to the previous form: Ctrl+Page Up (Windows) | Command+Page Up (Mac) • Move to the next form: Ctrl+Page Down (Windows) | Command+Page Down (Mac) • Move to the beginning of the current field: Home • Move to the end of the current field: End • Move to the first row of a table: Ctrl+Home • Move to the last row of a table: Ctrl+End
Keyboard Shortcuts Form shortcuts Continued • Field insert in a table: Insert • Field delete in a table: Ctrl+Alt+D • Cancel from current form: F8 • Cancel from all forms: Shift+F8 • Finish from current form: Ctrl+F9 (Windows) | Ctrl+9 (Mac) • Save current form: F9 | Ctrl+0 (zero, not the letter o) • Save all open forms: Shift+F9 (Windows) | Ctrl+8 (Mac) • Detail: F2 • Print active form: Ctrl+Alt+P • Help: Ctrl+Alt+H | F1 (shows help for area currently in focus; F1 may not work in all instances) • Change focus to UI Form Menu Bar (then use tab and arrow keys to access menu items): Ctrl+U • Show Keyboard Shortcuts: Ctrl+Alt+K • Read all Inquiry fields on a form (with screen reader software): Ctrl+Alt+I • *If the current field within a table has a drop-down list, use Down Arrow to open the list, Up/Down Arrow to move up and down within the list, and Ctrl+Up or Ctrl+Down to move back or forward one row.