CURVED MIRRORS
SPHERICAL MIRRORS. CURVED MIRRORS. Curved Mirrors. Curved mirrors are also called spherical mirrors because they are part of a sphere (ball) a portion of the sphere was sliced away and then silvered on one of the sides to form a reflecting surface. There are two types of spherical mirrors….

CURVED MIRRORS
E N D
Presentation Transcript
SPHERICAL MIRRORS CURVED MIRRORS
Curved Mirrors • Curved mirrors are also called spherical mirrors because they are part of a sphere (ball) • a portion of the sphere was sliced away and then silvered on one of the sides to form a reflecting surface. • There are two types of spherical mirrors…
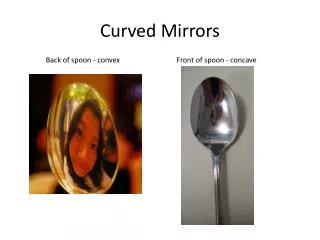
Types of Spherical Mirrors • Concave mirrors were silvered on the inside of the sphere • Convex mirrors were silvered on the outside of the sphere
Uses of Concave and Convex Mirrors • CONCAVE- barber/make-up mirrors- car headlights - light reflects wider- microscopes- dentist mirrors- solar cookers • CONVEX- security/surveillance mirrors- sunglasses- passenger side mirrors in vehicles
Diagram of Concave MirrorLabel the diagram below using the next slides.
Principal Axis • a line passing through the center of the sphere and attaching to the mirror in the exact center of the mirror.
Centre of Curvature • point in the center of the sphere from which the mirror was sliced is known as the center of curvature and is denoted by the letter C in the diagram below.
Vertex • The point on the mirror's surface where the principal axis meets the mirror is known as the vertex and is denoted by the letter A in the diagram below.
Focal Point • Midway between the vertex and the center of curvature is a point known as the focal point; the focal point is denoted by the letter F in the diagram below.
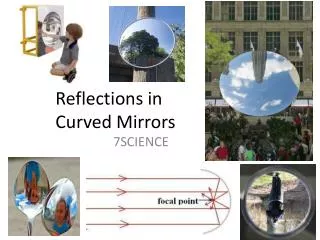
Why is it called a focal point? • Because rays of light parallel to the principal axis all pass through or CONVERGE at the focus or focal point. NOTE that the law of reflection still happens! Don’t copy anything from this slide!
Radius of Curvature • The distance from the vertex to the center of curvature is known as the radius of curvature (represented by R). The radius of curvature is the radius of the sphere from which the mirror was cut.
Focal Length • The distance from the mirror to the focal point is known as the focal length (represented by f). • Since the focal point is the midpoint of the line segment adjoining the vertex and the center of curvature, the focal length would be one-half the radius of curvature.
Using Ray Diagrams to Find the Image: Concave Mirrors • To draw these diagrams, we will use the two RAYS for concave mirrors: • 1. Any incident ray traveling parallel to the principal axis on the way to the mirror will reflect through the focal point upon reflection. • 2. Any incident ray passing through the focal point on the way to the mirror will reflect parallel to the principal axis upon reflection. Ray1: Parallel-FOCUS Ray 2: FOCUS-Parallel
Step-by-Step Method for Drawing Ray DiagramsParallel-FOCUS-FOCUS-Parallel You need 2 incident rays and 2 reflected rays to draw your image. Incident ray #1: Parallel-FOCUS • PARALLEL: From the top of the object, using a straight edge, accurately draw one ray (incident ray) to the mirror so that it travels exactly parallel to the principal axis. Label it “I” for incident ray and place arrowhead to show direction. • FOCUS: Where the incident ray “touches” the mirror, draw the second ray (reflected ray) such that it passes exactly through the focal point on the way from the mirror. Label it “R” and place an arrowhead upon the ray to show direction.
Incident ray #2: FOCUS-Parallel; • FOCUS: From the top of the object, using a straight edge, accurately draw one ray (incident ray) through the focal point on the way from the mirror until it touches the mirror. Label it “I” and place an arrowhead upon the ray to show direction. • PARALLEL: Where the incident ray “touched” the mirror, using a straight edge, accurately draw one ray (incident ray) from the mirror so that it travels exactly parallel to the principal axis. Label it for reflected ray and place arrowhead to show direction.
Predicting Images in a Concave Mirror Any incident ray parallel to the principal axis will……
Predicting Images in a Concave Mirror Any incident ray parallel to the principal axis will reflect through the Focus.
Predicting Images in a Concave Mirror Any incident ray passing through the Focus will……
Predicting Images in a Concave Mirror Any incident ray passing through the Focus will reflect parallel to the principal axis.
Predicting Images in a Concave Mirror Any incident ray passing through the Centre of Curvature will……
Predicting Images in a Concave Mirror Any incident ray passing through the Centre of Curvature will reflect back upon itself.
Predicting Images in a Concave Mirror Any incident ray striking the Vertex will……
Predicting Images in a Concave Mirror Where is the image?
Predicting Images in a Concave Mirror The object is located where the rays appear to come from.
Predicting Images in a Concave Mirror The image is also located where the rays appear to come from.
Predicting Images in a Concave Mirror Object is at the Centre of Curvature.
When the Object is at C Any incident ray parallel to the principal axis will……
Any incident ray parallel to the principal axis will reflect through the Focus.
Any incident ray passing through the Focus will reflect parallel to the principal axis.
Any incident ray passing through the Centre of Curvature will……
Any incident ray passing through the Centre of Curvature will reflect back upon itself.
Any incident ray parallel to the principal axis will reflect through the Focus.
Any incident ray passing through the Focus will reflect parallel to the principal axis.
Any incident ray in a direction the same as if it had passed through the C will……
Any incident ray in a direction the same as if it had passed through the C will reflect back upon itself.
The object is where all incident rays appear to meet or come from.
Any incident ray parallel to the principal axis will reflect through the Focus.
Any incident ray passing through the Focus will miss the mirror because it is parallel to it.