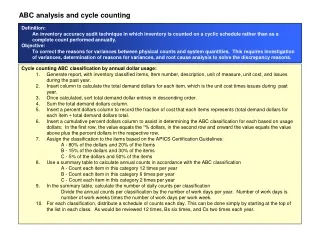
MAPICS XA Cycle Counting in Materials Management
430 likes | 1.02k Vues
MAPICS XA Cycle Counting in Materials Management. Presented by John Grindley CISTECH -Senior Consultant john.grindley@cistech.net 941-661-0556. Cycle Counting in Mapics. Goals of a Cycle Count Inventory: Verify the accuracy of the on hand balances

MAPICS XA Cycle Counting in Materials Management
E N D
Presentation Transcript
MAPICS XA Cycle Counting in Materials Management Presented by John Grindley CISTECH -Senior Consultant john.grindley@cistech.net 941-661-0556
Cycle Counting in Mapics • Goals of a Cycle Count Inventory: • Verify the accuracy of the on hand balances • Audit and adjust all inventory records to ensure an accurate inventory balance at least once a year. • Provides support for the dollar amount of inventory reported to the General Ledger • Ensures material planning (MRP) creates a valid plan for purchases and manufacturing orders • Allows employees to locate inventory to issue to manufacturing orders and/or ship to customers. • If differences exist between the on hand and count quantities, • identify the reason for the difference and correct procedures • Avoids full physical inventory and disruption to operations
Steps in Cycle Counting • Before starting inventory counting, create the inventory count groups to categorize the items you are counting. • When you create the inventory count group, the documents needed can be generated to record the count and activate the count. • If the count is not activated when creating the inventory count group, the Inventory Count Items object can be used to edit the items in the inventory count group. • If the selection to print the counting documents is not elected when creating the inventory count group, the counting documents can be generated after the inventory count items are • edited.
The counting documents can be lists, tag numbers, or bar codes. After the counters return the counting documents, enter counting information into the Inventory Count Groups or Inventory Count Items objects to compare with the current inventory information. After counts are entered, generate reports to help decide whether another count is required. Up to three counts can be activated for each count group. When confident the count information is the correct view of the inventory situation, then post the count to update XA with the inventory quantities determined during the count. Inventory count groups remain in the Inventory Count Groups list window after posting so that the posting date can be viewed. Subset the list to see the inventory count groups wanted. (Posted/ Unposted)
Frequency of Cycle Count/MAPICS • Frequency of count to is normally tied to the ABC classification of the Inventory: • ‘A’ items counted monthly • ‘B’ items counted quarterly • ‘C’ items counted semi-annually • ‘D’ items not cycle counted • ‘D’ items are typically considered as vendor consignment, low cost/low usage, etc. • Frequency of Cycle Count/VARIATIONS • Frequency of count to is normally tied to the ABC classification of the Inventory: • ‘A’ items counted quarterly • ‘B’ items counted semi-annually • ‘C’ items counted once a year
Mapics will assist with setting the ABC code of the item with the ‘ABC Analysis’ report. • From the Inventory Management Reports menu, select option #2 ‘Status/Analysis Reports’, then option #6 ‘ABC Analysis’ • The following screen will be displayed: • 1) The item type is a field in the Item Master record that defines whether the • item is made or purchased. 2) Can limit the information to a single warehouse. • 6) Lowest dollar amounts • for A and B items • 3) The ABC code is stored in the ‘Value Class’ field of the Item • Master record 2 1 3 • 6A) If the formula extends a dollar • amount greater than the lower • limit, then that code will be used • to identify the item • 5) ABC code can be valued on one of 3 formulas • 4) This report will, if asked, update the Item Master with the ABC code • 5A) The selection determines which formula will • be used to calculate the dollar amount which • will be used to determine A, B or C ranking for the item
Item Revision – Updates – Value Class Value Class is updated automatically Thru ABC report, or manually by the User. Informational Field
Item Warehouse – Cycle Count Fields Stored in the Item Warehouse/Item Balance file Flag to let you know if the item is being counted: Blank = record recently created/not currently being counted 1 = Item selected for count 2 = Item counted with a variance Changed back to blank when PH transaction is posted Transaction Compare -For items where cycle count code is not equal to 0. Number of transactions before the item is selected for cycle count even if the ‘Next Cycle Count Date’ has not been reached. Flag that Mapics sets if the total quantity on hand in the warehouse goes negative 0 = no need to count 1 = quantity on hand is or has been negative Scheduled date for the next count for this item If cycle count code =4 0 = No cycle count 1 = Count monthly 2 = Count quarterly 3 = Count every 6 months (semi-annually) 4 = Count on specific date (‘Date Next Count’) Date that the item was last counted Minimum percentage for accurate count. Used when Activating Next Count for an item. User defined class for cycle counting. Can be used for selection criteria when selecting items for count Number of transactions for this item/warehouse since the last PH transaction was posted Subsets can be created to only select items based on the Value Class/ABC code in the Item Master (ITEMASA) record and then perform ‘Mass Change’ to update the Item Warehouse records appropriately
Creating Count Groups From the ‘Materials’ Card in Mapics Browser, select (double click) on the ‘Inventory Count Groups’ object
Creation of a Cycle Count Group 1) Click on the “Create ICON” or the “Create” command from Maintain on the tool bar. This is release 6.0, not in release 7.8 or 9.0 • The following window will be • displayed (if ‘Do not prompt • for count type each time’ is • checked, window will not • be displayed) • 4) File choices for Subsetting Object • Item Location • Item Warehouse • Warehouse • Warehouse Locations 3) Select count type = 2 “Cycle count” and the file to be used for selecting items to be counted.
Inventory Control Group Selection Parameters This is release 6.0, not 7.8 or 9.0 This is release 7.8 or 9.0
Creation of a Cycle Count Group #5 Item Warehouse File Item Location File
Creation of a Cycle Count Group #5A Warehouse File – Physical Inventory Warehouse Locations File
Creation of a Cycle Count Group #5A Warehouse File – Physical Inventory
Creation of a Cycle Count Group - Continued Item Warehouse File – 7) User can select predetermined subset to call up specific items to be pulled into the Cycle Count Group • 6) Dialog Box is created with 3 Tabs • General Card • Selection Criteria • Reports
Creation of a Cycle Count Group – Continued #8 Add in description of count group Exclusion of production Line locations Compare Qty Determines when the ‘frozen’ quantity for the item/location will be established: Entry on Hand – copies the quantity in the location when the first count quantity is entered. Cutoff on Hand – copies the quantity in the location when the ‘Activate Next Count’ job is run. Assumes no Activity while counting is being done. Beginning tag number if tags are printed. Mapics Assigns#. For items that are set to ‘Inspect on Receipt’ or ‘QC Control’. These items can be omitted from Cycle Count if QC has not yet approved them for use by manufacturing Activate must be run before count quantities can be entered
Creation of a Cycle Count Group – Continued Selection Criteria- (9) Can add or subtract items selected by the subset criteria depending on the following options Compares the ‘Transaction Compare’ quantity to the ‘Transaction Activity Count’ to determine if enough transactions have occurred for the item to be cycle counted If the ‘Transaction Activity Count’ is within x percent of the ‘Transaction Compare’ select the item for count Select the item if enough time has passed since the last count (uses the Cycle Count Code to determine time span) If the Item Warehouse quantity has gone negative since the last count. If the Item Warehouse quantity is negative
Creation of a Cycle Count Group – Continued Report Inventory Count Criteria- (10) Materials Management can create either full page reports of items to be cycle counted or individual count tags or both (depending on what’s selected on the screen below) A check here will cause the report to print X How should the items on the report be sorted Allows for the quantity on hand in the location to be printed Prints the tag number next to the item/location (can be useful when entering tags)
Creation of a Cycle Count Group – Continued Report Criteria Tags- (11) A check here will cause the report to print X How should the items on the report be sorted Prints a bar code on the tag that can be used for ‘Random Count Entry by Barcode’ Allows for the quantity on hand in the location to be printed Prints the tag number next to the item/location (can be useful when entering tags)
Creation of a Cycle Count Group – Continued Once a Count Group is activated it cannot be edited to add or delete item numbers from the group. If Current Count group =1 , the count is activated, and the first count can be taken When the ‘Count Group’ is created, it will be displayed at the bottom of the list of groups
Creation of a Cycle Count Group – Continued • If ‘Activate Next Count’ was not run at the time that the Count Group was created it will need to be done prior to entering count quantities. • Single click on the Count Group from the list • Right Click and select ‘Maintain Menu’ then ‘Activate Next Count’ The Inventory Count Group is active with reports and tags if they were requested. Proceed to record the count. Double Click on “Count Group” and the detail list of items in the group will be displayed. Single click to activate line Right click to get maintenance option Message will come up on screen to activate the Count when Clicked on here. • Click “Yes’ when to ready activate the count • No more items can be added to the count • No more items can be deleted from the count • Items can only be voided from the count
Count Group Details “Count Information” Users can create their own view to display the count detail • View should include, • Warehouse • Item • Location • Lot Number • Tag# ( sort –by Tag) • Count Information • 3 counts allowed • Voided Items
Count Group Details “ Enter Count Information” Highlight the item to be counted, and then navigate to the Menu Bar and select “Maintain”. Select “Sequential Count” from the drop down and a dialog box to enter the count will appear. See next screen
Count Group Details “ Enter Count Information” • Speed Data Entry • Sequential Entry • Warehouse/Location/Item • Warehouse/Item/Location • Tag Number • Random Entry • By Item • By Tag • By Barcode
Count Group Details “ Enter Count Information” SEQUENTIAL • Initially the use must key the following information on the first item: • Count quantity for the item/location • Count by user – your name • Count Date – today’s date (if the count was done today) Continuing recording Counts for “count 1’ until complete. If ‘Auto advance to next entry’ is checked, then the next item/location on the list will be displayed on the card. Count by User and Count Date will remain so that they don’t have to be entered each time
Count Group Details “ Enter Count Information” RANDOM If an item is discovered in a location but Mapics is not showing any of that item in the location, then a tag can be created in the Count Group • From the ‘Maintain’ option on the menu bar, select ‘Random Count Entry’ • A dialog box will appear as shown on the next screen to record the item not initially included in the count.
Count Group Details “ Enter Count Information” RANDOM Verify that the Template (top of the window) is ‘Random Count Entry by Item’) • Key the following information: • Item • Warehouse • Warehouse Location • Count Quantity • Count by User • Count Date The item/location will be added to the count group
Count Group Details “ Enter Count Information” RANDOM Counts can also be recorded in random order via the tag number. Counters can turn the tags in and they can be recorded in the Order they are submitted, and the detail will be displayed On the browser screen. • The following must be recorded • Tag Number • Count Quantity • Count By User • Count date
Count Group Details “ Count 1 – Out of Tolerance Review count tolerance after count one to see which items will require a recount. Then “Activate Next Count” . If count is out of tolerance it will say “Yes”. The out of tolerance is based upon the count tolerance percentage Inputted in the item warehouse record. Activating the Next Count will start the process of recounting and taking the Second count. Navigate to Inventory Count Group object >Maintain>Activate Next Count. This cannot be completed from the item detail view.
Count Group “ Activating Count 2 “ To activate second or even 3rd count if required the Count group must be highlighted and then “Activate Next Count” Once activated the “Current Count” will change to the next sequential number, 2, 3
Count Group Details “ Count 2 “ If any count is out of tolerance the cursor is positioned directly to the line for input if the count is recorded in “Sequential Order”. The same information is required in the dialog box to record the count. Counts within tolerance do not require a 3rd count, and are displayed as “NO” in view Items still out of tolerance could require a 3rd and final count. This will require repeating the steps, starting with “Activating the Next Count”.
“ Generating a Variance Report“ • When all counts have been entered, a variance report can be generated: • From the ‘File’ option on the Menu Bar, select ‘Host Print’ A card file will be displayed:
“ Generating a Variance Report“ • Check the ‘Print’ box Select the ‘Variance Report’ tab • Select subset and sort for the report • This report will show the quantity and dollar difference between the cutoff quantity and the count quantity. • This report will also set the re-count flag for items where the difference between cutoff and count is greater than the tolerance percentage in the Item Warehouse record
“Updating Inventory Balances” Once all counts have been entered and approved then they need to be posted to the locations and item warehouse records. • From the Inventory Count Group Options navigate to the Menu Bar’ • Select - ‘Post Count Adjustments’ An ‘Are you sure’ window will be displayed:
“Updating Inventory Balances” • Clicking on ‘Yes’ will: • Update the on hand balances in the location files by creating a PH (Physical Inventory Adjustment) transaction for the difference between the final count quantity and the cutoff quantity • Update the total on hand for the item based on the sum of the count quantities • Create a report of PH transactions • Add the PH transactions to the transaction history file • Set the ‘Date of Last Count’ in the Item Warehouse file • Zero out the ‘Transaction Activity Count’ in the Item Warehouse file
“Cycle Count Steps” Create count group. Activate count group. This step flags the items to be counted and stores the on-hand quantity to be used for comparison to the physical count if using “Cutoff On-Hand Quantity” option. Print Count Sheet and/or Inventory Tags to be used for the physical counting process. Physically count. Enter the count – Sequential or Random Reconcile physical count to on-hand quantity in the system. Up to 3 Counts Print Variance and/or Counted/Uncounted Reports if desired. Review Variances – make corrections if required thru additional counts. Post results which will process PH Transactions Transaction history single Item to determine cause of error ( variance).
“Cycle Count Limitations” No Automatic Determination of how many A, B, C items to count within a set period of time, (week, month, year). There is no means to level load the daily count to achieve the site goals. There is no tracking system to display how many counts have been completed for A , B, or C, items, and what the remaining counts are for each of the classifications. Cycle count code 1,2, and 3 is assumed to align with A,B, and C classification determined thru ABC calculation and populating the value class field. Sites have different logic for how A,B , and C items are to be counted. There is no reason code tracking for variances. This data can be used to focus in on process changes to improve accuracy. Can enter a count comment. There is no reason code tracking for bypassing or voiding an item. No edit checking for Void reasons . ( 25 characters) Variance approval system is manual , and not an automated electronic approval process. There is no performance measurement system to display the results of the data by warehouse, planner, item class, location, etc. The data is tracked manually.
“Cycle Counting” QUESTIONS? Thank You for Attending.