Ch. 9 – Basic Router Troubleshooting
Ch. 9 – Basic Router Troubleshooting. CCNA 2 version 3.0 Rick Graziani Cabrillo College. Note to instructors. If you have downloaded this presentation from the Cisco Networking Academy Community FTP Center, this may not be my latest version of this PowerPoint.

Ch. 9 – Basic Router Troubleshooting
E N D
Presentation Transcript
Ch. 9 – Basic Router Troubleshooting CCNA 2 version 3.0 Rick Graziani Cabrillo College
Note to instructors • If you have downloaded this presentation from the Cisco Networking Academy Community FTP Center, this may not be my latest version of this PowerPoint. • For the latest PowerPoints for all my CCNA, CCNP, and Wireless classes, please go to my web site: http://www.cabrillo.cc.ca.us/~rgraziani/ • The username is cisco and the password is perlman for all of my materials. • If you have any questions on any of my materials or the curriculum, please feel free to email me at graziani@cabrillo.edu (I really don’t mind helping.) Also, if you run across any typos or errors in my presentations, please let me know. • I will add “(Updated – date)” next to each presentation on my web site that has been updated since these have been uploaded to the FTP center. Thanks! Rick Rick Graziani graziani@cabrillo.edu
Note • Most of the information in the module is a review of previous modules. • We will add some troubleshooting information to this presentation. Rick Graziani graziani@cabrillo.edu
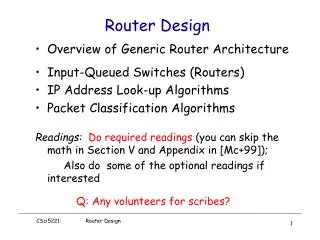
Overview Students completing this module should be able to: • Use the show ip route command to gather detailed information about the routes installed on the router • Configure a default route or default network • Understand how a router uses both Layer 2 and Layer 3 addressing to move data through the network • Use the ping command to perform basic network connectivity tests • Use the telnet command to verify the application layer software between source and destination stations • Troubleshoot by sequential testing of OSI layers • Use the show interfaces command to confirm Layer 1 and Layer 2 problems • Use the show ip route and show ip protocol commands to identify routing issues • Use the show cdp command to verify Layer 2 connectivity • Use the traceroute command to identify the path packets take between networks • Use the show controllers serial command to ensure the proper cable is attached • Use basic debug commands to monitor router activity Rick Graziani graziani@cabrillo.edu
9.1 Examining the Routing Table We have covered these and others in more depth in previous modules and the presentation on the Structure and Lookup Process of the Routing Table. • 9.1.1 The show ip route Command • 9.1.2 Determining the gateway of last resort • 9.1.3 Determining route source and destination • 9.1.4 Determining L2 and L3 addresses • 9.1.5 Determining the route administrative distance • 9.1.6 Determining the route metric • 9.1.7 Determining the route next hop • 9.1.8 Determining the last routing update • 9.1.9 Observing multiple paths to destination Rick Graziani graziani@cabrillo.edu
Static Routing Rick Graziani graziani@cabrillo.edu
Dynamic Routing Rick Graziani graziani@cabrillo.edu
Default Routes • There a couple of items of misinformation in this section that we need to address. Rick Graziani graziani@cabrillo.edu
Default Routes – ip default-network command The ip default-network command: • Must be used with IGRP • Can be used with EIGRP and RIP, but not recommended (use ip route 0.0.0.0 0.0.0.0) • On router that uses ip default-network command, it must either have a specific route to that network or a 0.0.0.0/0 default route! Rick Graziani graziani@cabrillo.edu
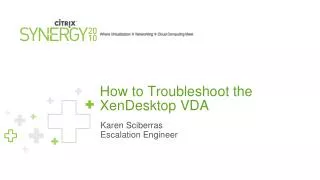
Default Routes - IGRP With IGRP: • Use ip default-network • Need specific or default route, so once packets arrive at Cisco A it can forward those packets toward public network. ip route 0.0.0.0 0.0.0.0 s0 router igrp 10 network 172.16.0.0 network 192.168.17.0 ip default-network 192.168.17.0 Rick Graziani graziani@cabrillo.edu
Default Routes - RIP With RIP: • Use 0.0.0.0/0 static route • Use default-information originate (IOS 12.0 and later) ip route 0.0.0.0 0.0.0.0 s0 router rip network 172.16.0.0 network 192.168.17.0 default-information originate Rick Graziani graziani@cabrillo.edu
Determining route source and destination Rick Graziani graziani@cabrillo.edu
Path Switching and Packet Forwarding Y X Path Switching • Host X has a packet(s) to send to Host Y • A router generally relays a packet from one data link to another, using two basic functions: 1. a path determination function - Routing 2. a switching function – Packet Forwarding • Let’s go through all of the stages these routers use to route and switch this packet. • See if you can identify these two functions at each router. • Note: Data link addresses have been abbreviated. Data Link Header IP (Network layer) Packet Data Link Frame = Data Link Header + IP Packet Rick Graziani graziani@cabrillo.edu
From Host X to Router RTA • Host X begins by encapsulating the IP packet into a data link frame (in this case Ethernet) with RTA’s Ethernet 0 interface’s MAC address as the data link destination address. • How does Host X know to forward to packet to RTA and not directly to Host Y? How does Host X know or get RTA’s Ethernet address? • Remember, it looks at the packet’s destination ip address does an AND operation and compares it to its own ip address and subnet mask. • It determines if the two ip addresses are on the same subnet or not. • If the are on the same subnet, it looks for the destination ip address of the packet in its ARP cache. – sending out an ARP request if it is not there. • If they are on different subnets, it looks for the ip address of the default gateway in its ARP cache – sending out an ARP request if it is not there. • If you do not remember, be sure to review our previous presentation, “ARP – The Process and the Protocol” 00-10 0A-10 192.168.4.10192.168.1.10 Rick Graziani graziani@cabrillo.edu
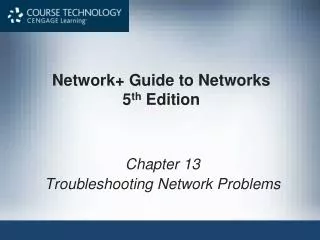
RTA to RTB 1. RTA looks up the IP destination address in its routing table. • 192.168.4.0/24 has next-hop-ip address of 192.168.2.2 and an exit-interface of e1. • Since the exit interface is on an Ethernet network, RTA must resolve the next-hop-ip address with a destination MAC address. 2. RTA looks up the next-hop-ip address of 192.168.2.2 in its ARP cache. • If the entry was not in the ARP cache, the RTA would need to send an ARP request out e1. RTB would send back an ARP reply, so RTA can update its ARP cache with an entry for 192.168.2.2. 0B-31 00-20 192.168.4.10192.168.1.10 1 3 2 Rick Graziani graziani@cabrillo.edu
RTA to RTB (continued) 3. Data link destination address and frame encapsulation • After finding the entry for the next-hop-ip address 192.168.2.2 in its ARP cache, RTA uses the MAC address for the destination MAC address in the re-encapsulated Ethernet frame. The frame is now forwarded out Ethernet 1 (as specified in RTA’s routing table. • Notice, that the IP Addresses did not change. • Also notice that the Routing table was used to find the next-hop ip address, used for the data link address and exit interface, to forward the packet in a new data link frame. 0B-31 00-20 192.168.4.10192.168.1.10 1 3 2 Rick Graziani graziani@cabrillo.edu
RTB to RTC 1. RTB looks up the IP destination address in its routing table. • 192.168.4.0/24 has next-hop-ip address of 192.168.3.2 and an exit-interface of s0 (serial 0). • Since the exit interface not on an Ethernet network, RTA does not need to resolve the next-hop-ip address with a destination MAC address. • Remember, serial interfaces do not have MAC addresses. FFFF 192.168.4.10192.168.1.10 1 2 Rick Graziani graziani@cabrillo.edu
RTB to RTC 2. Data link destination address and frame encapsulation. • When the interface is a point-to-point serial connection, the Routing Table process does not even look at the next-hop IP address. • Remember, a serial link is like a pipe - only one way in and only one way out. • RTA now encapsulates the IP packet into the proper data link frame, using the proper serial encapsulation (HDLC, PPP, etc.). • The data link destination address is set to a broadcast, since there is only one other end of the pipe and the frame is now forwarded out serial 0. FFFF 192.168.4.10192.168.1.10 1 2 Rick Graziani graziani@cabrillo.edu
RTC to Host Y 1. RTC looks up the IP destination address in its routing table. • 192.168.4.0/24 is a directly connected network with an exit-interface of e0. • RTC realizes that this destination ip address is on the same network as one of its interfaces and it can sent the packet directly to the destination and not another router. • Since the exit interface is on an directly connected Ethernet network, RTC must resolve the destination ip address with a destination MAC address. 2. RTC looks up the destination ip address of 192.168.4.10 in its ARP cache. • If the entry was not in the ARP cache, the RTC would need to send an ARP request out e0. Host Y would send back an ARP reply, so RTC can update its ARP cache with an entry for 192.168.4.10. 0B-20 0C-22 192.168.4.10192.168.1.10 1 3 2 Rick Graziani graziani@cabrillo.edu
RTC to Host Y (continued) 3. Data link destination address and frame encapsulation • After finding the entry for the destination ip address 192.168.4.10 in its ARP cache, RTC uses the MAC address for the destination MAC address in the re-encapsulated Ethernet frame. The frame is now forwarded out Ethernet 0 (as specified in RTA’s routing table. 0B-20 0C-22 192.168.4.10192.168.1.10 1 3 2 Rick Graziani graziani@cabrillo.edu
Determining the route administrative distance • Not the best path, but the best source of routing information. • “The administrative distance of the route is the key information that the router uses in deciding (which is the best path to a particular destination) –> what is the best source of routing information to a particular destination.” Rick Graziani graziani@cabrillo.edu
Routing Metrics - Corrections • MTU is not and has never been used as a routing metric with RIP, IGRP, EIGRP, OSPF, IS-IS, or BGP. Rick Graziani graziani@cabrillo.edu
Observing multiple paths to destination • Cisco routers will choose up to six equal cost paths to the same destination network, four by default. • Router(config-router)#maximum-paths 6 • Fast Switching vs. Process Switching (see presentation: Ch. 7 – Distance Vector Routing Protocols, Part 1 of 2: Distance Vector Routing and RIP) • This assumes the same routing protocols or the use of static routes, as you cannot compare RIP metrics with IGRP metrics. • Administrative distance will always choose one routing source over another, static routes over dynamic, IGRP over RIP, etc. • The variance command and IGRP/EIGRP is never explained in this curriculum. • For more information about the variance command see: • How Does Unequal Cost Path Load Balancing (Variance) Work in IGRP and EIGRP? • http://www.cisco.com/en/US/tech/tk365/tk207/technologies_tech_note09186a008009437d.shtml Rick Graziani graziani@cabrillo.edu
Network Testing and Troubleshooting • You most likely do troubleshooting already: • Cars, cooking, computer, etc. • Approach might vary slightly depending upon the scenario: • Lab • New implementation • Existing network • Change made • No changes made • Use all possible resources: • Support contracts • Web sites and newsgroups • Books • Friends and other people • Management Rick Graziani graziani@cabrillo.edu
Different Models Rick Graziani graziani@cabrillo.edu
Testing using the OSI Model Layer 1 errors can include: • Broken cables • Disconnected cables • Cables connected to the wrong ports • Intermittent cable connection • Wrong cables used for the task at hand (must use rollovers, crossover cables, and straight-through cables correctly) • Transceiver problems • DCE cable problems • DTE cable problems • Devices turned off Rick Graziani graziani@cabrillo.edu
Testing using the OSI Model Layer 2 errors can include: • Improperly configured serial interfaces • Improperly configured Ethernet interfaces • Improper encapsulation set (HDLC is default for serial interfaces) • Improper clockrate settings on serial interfaces • Network interface card (NIC) problems Rick Graziani graziani@cabrillo.edu
Testing using the OSI Model Layer 3 errors can include: • Routing protocol not enabled • Wrong routing protocol enabled • Incorrect IP addresses • Incorrect subnet masks Rick Graziani graziani@cabrillo.edu
Various commands • These commands show various levels of connectivity or lack of connectivity: • Ping • Traceroute • Telnet • Show interfaces • Show cdp neighbors • Show ip protocols • Debug • Show running-config • What do these commands tell you? Rick Graziani graziani@cabrillo.edu
Ch. 9 – Basic Router Troubleshooting CCNA 2 version 3.0 Rick Graziani Cabrillo College