Lenses
Lenses. Concave Convex Eye Double Lenses. Reading Question. A paraxial ray. 1. moves in a parabolic path. 2. is a ray that has been reflected from parabolic mirror. 3. is a ray that moves nearly parallel to the optical axis. 4. is a ray that moves exactly parallel to the optical axis.

Lenses
E N D
Presentation Transcript
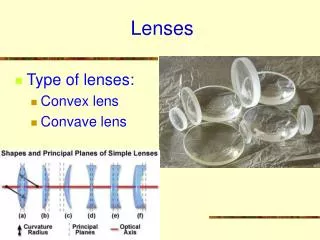
Lenses Concave Convex Eye Double Lenses
Reading Question A paraxial ray 1. moves in a parabolic path. 2. is a ray that has been reflected from parabolic mirror. 3. is a ray that moves nearly parallel to the optical axis. 4. is a ray that moves exactly parallel to the optical axis.
Reading Question A paraxial ray 1. moves in a parabolic path. 2. is a ray that has been reflected from parabolic mirror. 3. is a ray that moves nearly parallel to the optical axis. 4. is a ray that moves exactly parallel to the optical axis.
Reading Question A virtual image is 1. the cause of optical illusions. 2. a point from which rays appear to diverge. 3. an image that only seems to exist. 4. the image that is left in space after you remove a viewing screen.
Reading Question A virtual image is 1. the cause of optical illusions. 2. a point from which rays appear to diverge. 3. an image that only seems to exist. 4. the image that is left in space after you remove a viewing screen.
Reading Question The focal length of a converging lens is • 1. the distance at which an image is formed. • 2. the distance at which an object must be placed to form an image. • 3. the distance at which parallel light rays are focused. • 4. the distance from the front surface to the back surface.
Reading Question The focal length of a converging lens is • 1. the distance at which an image is formed. • 2. the distance at which an object must be placed to form an image. • 3. the distance at which parallel light rays are focused. • 4. the distance from the front surface to the back surface.
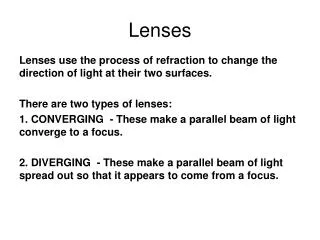
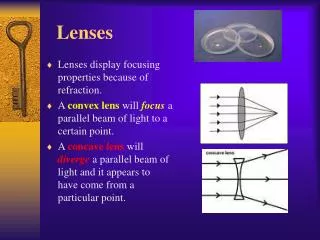
Lenses • On the table you will find a light box and a converging and diverging lens. Turn on the light box and set the window so that you have 5 light rays. Place one of the lenses in the path of the rays and observe the rays emerging from the lens. Now do the other lens. • From your observations can you see why one lens is called a converging lens and the other a diverging lens? Discuss this in your group. • Which lens is called a convex lens, the converging or diverging lens? Explain.
Light box Lenses • From your observations can you see why one lens is called a converging lens and the other a diverging lens? Discuss this in your group. • Which lens is called a convex lens, the converging or diverging lens? Explain.
Lenses • Converging or convex lens • Diverging or concave lens
Lenses • Measure the focal length of both the convex and concave lens. convex f = __________ concave f = __________
Lenses • Just as for the mirrors we use the three principal rays to find the image. Discuss the three principal rays in your group and describe the rays.
Lenses • Just as for the mirrors we use the three principal rays to find the image. Discuss the three principal rays in your group and describe the rays. • A parallel ray passes through the focal point. • A ray passing through the focal point is parallel. • A ray through the center is undeviated.
object focal point image Lenses • Now we will check out the principal rays one at a time. Draw a straight line across the center on a clean sheet of paper in the long direction. Place the converging lens on the line so that it passes through the center of the lens and is normal to the lens as shown on the next page. Trace the lens outline and mark the focal point on both sides of the lens. Draw an object (arrow) about 3 focal lengths from the lens on the left.
object focal point Lenses • Trace the lens outline and mark the focal point on both sides of the lens. Draw an object (arrow) about 2 or 3 focal lengths from the lens on the left.
Lenses • First we will check out the principal parallel ray. Adjust the light box so that you have one ray. Place the light box so that the beam pass over the tip of the object and is parallel to the center line of the lens. Trace the incident ray and the refracted ray (by the lens). Does this ray pass through the focus? Light box object focal point
Lenses • First we will check out the principal parallel ray. Adjust the light box so that you have one ray. Place the light box so that the beam pass over the tip of the object and is parallel to the center line of the lens. Trace the incident ray and the refracted ray (by the lens). Does this ray pass through the focus? Light box object focal point
Light box object focal point Lenses • Now do the same for the other two principal rays. Does the central principal ray pass straight through the lens? Does the ray passing through the focus emerge from the lens parallel to the central line of the lens?
Lenses • Now do the same for the other two principal rays. Does the central principal ray pass straight through the lens? Does the ray passing through the focus emerge from the lens parallel to the central line of the lens? Light box object focal point
Lenses • Now do the same for the other two principal rays. Does the central principal ray pass straight through the lens? Does the ray passing through the focus emerge from the lens parallel to the central line of the lens? Light box object focal point
object focal point image Lenses • Finally. • Now do the same thing for the concave or divergent lens.
Lenses • Next we will do the same for the divergent lens. Below is the drawing for a divergent lens with the object 2 or 3 focal lengths away. Use a single ray from the light box to find the image. Start with the parallel principal rays. object focal point
Light box object focal point Lenses • Below is the drawing for a divergent lens with the object 2 or 3 focal lengths away. Use a single ray from the light box to find the image. Start with the parallel principal rays.
Light box object focal point Lenses • Below is the drawing for a divergent lens with the object 2 or 3 focal lengths away. Use a single ray from the light box to find the image. Start with the parallel principal rays.
Light box object focal point Lenses • Below is the drawing for a divergent lens with the object 2 or 3 focal lengths away. Use a single ray from the light box to find the image. Start with the parallel principal rays.
Light box object focal point image Lenses • Below is the drawing for a divergent lens with the object 2 or 3 focal lengths away. Use a single ray from the light box to find the image. Start with the parallel principal rays.
Lenses Convex Lenses • Again we will use the program RAYTRACE to study lenses. Open the program and create a converging lens by Create > Element > Converging thin lenses. Make the lens as large as you can and set the focal length to 5 grid spacing or 100 units. • Use the Tape measure to draw an object about 3 focal lengths from the lens. Draw the object from the center line of the lens to about as tall as the lens (see figure on the next page).
Lenses • Use Ray from the Simulation menu to draw the three principle rays. Locate the image and use the Line tool to draw the image. Use the Length tool to measure the object distance (the distance from the lens to the object) and the image distance (the distance from the lens to the image). Don’t forget to use the sign convention. Object distance __________ Image distance __________ • Use the lens equation to calculate the focal length. Focal length _________ • How does the calculated focal length compare to the focal length you set?
object focal point Lenses • Below is a converging lens with the object placed between 3 and 4 focal lengths from the lens. Use the three principal rays to find the image.
object focal point Lenses • Below is a converging lens with the object placed between 3 and 4 focal lengths from the lens. Use the three principal rays to find the image.
object focal point image Lenses • Below is a converging lens with the object placed between 3 and 4 focal lengths from the lens. Use the three principal rays to find the image. • Is the image real or imaginary? Explain.
object focal point image Lenses • Below is a converging lens with the object placed between 3 and 4 focal lengths from the lens. Use the three principal rays to find the image. • Is the image real or imaginary? Explain. Real. The rays pass through the image point.
object focal point Lenses • Below is a converging lens with the object placed between one focal length and two focal lengths from the lens. Use the three principal rays to find the image.
object focal point Lenses • Below is a converging lens with the object placed between one focal length and two focal lengths from the lens. Use the three principal rays to find the image.
object focal point Lenses • Below is a converging lens with the object placed between one focal length and two focal lengths from the lens. Use the three principal rays to find the image.
object focal point image Lenses • Below is a converging lens with the object placed between one focal length and two focal lengths from the lens. Use the three principal rays to find the image.
object focal point focal point Lenses • Now try this one. The object is placed within one focal length of a converging lens. Use the three principal rays to find the image and draw it on the diagram.
focal point focal point object Lenses • Now try this one. The object is placed within one focal length of a converging lens. Use the three principal rays to find the image and draw it on the diagram. • Is the image real or virtual? Explain
Lenses • Now try this one. The object is placed within one focal length of a converging lens. Use the three principal rays to find the image and draw it on the diagram. • Is the image real or virtual? Explain focal point focal point object
Lenses • Now try this one. The object is placed within one focal length of a converging lens. Use the three principal rays to find the image and draw it on the diagram. • Is the image real or virtual? Explain focal point focal point object image
Lenses • You can also use the lens equation to find the image position. A nail is placed 3 cm in front of a converging lens with a focal length of 10 cm. Find the image of the nail. • The first thing to do is think about the sign convention for lenses. Is the focal length positive or negative? • What about the object distance? • Use the lens equation to find the image position.
Lenses • You can also use the lens equation to find the image position. A nail is placed 3 cm in front of a converging lens with a focal length of 10 cm. Find the image of the nail. • The first thing to do is think about the sign convention for lenses. Is the focal length positive or negative? Positive for a convex lens • What about the object distance? • Use the lens equation to find the image position.
Lenses • You can also use the lens equation to find the image position. A nail is placed 3 cm in front of a converging lens with a focal length of 10 cm. Find the image of the nail. • The first thing to do is think about the sign convention for lenses. Is the focal length positive or negative? Positive for a convex lens • What about the object distance? Positive when on the incident side. • Use the lens equation to find the image position.
Lenses • You can also use the lens equation to find the image position. A nail is placed 3 cm in front of a converging lens with a focal length of 10 cm. Find the image of the nail. • The first thing to do is think about the sign convention for lenses. Is the focal length positive or negative? Positive for a convex lens • What about the object distance? Positive when on the incident side. • Use the lens equation to find the image position.
Lenses • Is the image length positive or negative? What does a negative image length tell you? Discuss this in your group • Find the magnification. • Is the magnification positive or negative? What does a negative magnification tell you.
Lenses • Is the image length positive or negative? What does a negative image length tell you? Discuss this in your group Negative. It tells you the image is on the incident side. • Find the magnification. • Is the magnification positive or negative? What does a negative magnification tell you.
Lenses • Is the image length positive or negative? What does a negative image length tell you? Discuss this in your group Negative. It tells you the image is on the incident side. • Find the magnification. M = h’/h = - l’/l = - (-30cm/7)/3cm) = 10/7 ~ 1.45 • Is the magnification positive or negative? What does a negative magnification tell you.
Lenses • Is the image length positive or negative? What does a negative image length tell you? Discuss this in your group Negative. It tells you the image is on the incident side. • Find the magnification. M = h’/h = - l’/l = - (-30cm/7/3cm) = 10/7 ~ 1.45 • Is the magnification positive or negative? What does a negative magnification tell you. Positive. It tell you that the image is virtual. If h’, the image height is negative then the image is inverted.
Class Question A lens produces a sharply-focused, inverted image on a screen. What will you see on the screen if the lens is removed? 1. The image will be as it was, but much dimmer. 2. The image will be right-side-up and sharp. 3. The image will be right-side-up and blurry. 4. The image will be inverted and blurry. 5. There will be no image at all.
Class Question A lens produces a sharply-focused, inverted image on a screen. What will you see on the screen if the lens is removed? 1. The image will be as it was, but much dimmer. 2. The image will be right-side-up and sharp. 3. The image will be right-side-up and blurry. 4. The image will be inverted and blurry. 5. There will be no image at all.