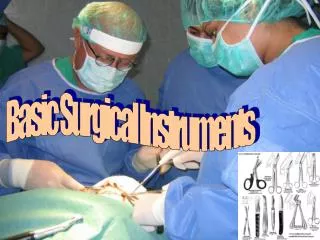
SPECIALIZED SURGICAL INSTRUMENTS & TECHNIQUES
SPECIALIZED SURGICAL INSTRUMENTS & TECHNIQUES. BIOPSY LASER ENDOSCOPY. Biopsy and Mass Removal. Indications Biopsy is usually recommended before mass removal Gives information about the behavior of the mass and allows for development of a treatment plan and prognosis.

SPECIALIZED SURGICAL INSTRUMENTS & TECHNIQUES
E N D
Presentation Transcript
SPECIALIZED SURGICAL INSTRUMENTS & TECHNIQUES BIOPSY LASER ENDOSCOPY
Biopsy and Mass Removal Indications • Biopsy is usually recommended before mass removal • Gives information about the behavior of the mass and allows for development of a treatment plan and prognosis
Biopsy and Mass Removal: Fine-Needle Aspiration • FNA is on of the simplest methods for cytologic evaluation of a mass. • Easy to perform • Minimal morbidity • No sedation required • Disadvantage: low diagnostic yield
Biopsy and Mass Removal: Impression Smears Indications, appropriate use As simple to perform as FNA Useful for ulcerated surface tumors & freshly cut surfaces Can be made from excised masses prior to placing in formalin
Biopsy and Mass Removal: Needle Punch Indications, appropriate use Generally requires sedation Usually guided by ultrasound to take samples of internal organs such as liver, spleen, prostate
Biopsy and Mass Removal: Punch Indications, appropriate use Used primarily for external and oral skin masses Does not penetrate deeply into the mass Patients are generally under general anesthesia
Biopsy and Mass Removal: Bone Indications, appropriate use Often painful and require general anesthesia Michele Trephine: Larger sample size, but increases likelihood of Pathologic fracture at the biopsy site Jamshidi needle: less invasive, but smaller sample size
Biopsy and Mass Removal:Incisional vs. Excisional Indications, appropriate use INCISIONAL BIOPSY Generally performed only after cytology or needle core biopsies have failed to provide a diagnositic sample A small wedge of the tumor is removed from the mass and submitted for histopathology EXCISIONAL BIOPSY Involves complete removal of the mass Generally performed only on benign skin tumors or when removal of the organ is indicated
Biopsy and Mass Removal: Excisional Indications, appropriate use
Biopsy Sample Handling and Fixation Importance of proper handling: Impression smears Mark margins of surgical excision sample Allow sample to dry for at least 20 min Place sample in fixative 10% neutral buffered formalin 1 part tissue to 10 parts formalin Large samples (>1cm in thickness) should be sliced like a loaf of bread prior to fixing Properly label sample container (date, patient name, site of sample removal) Paperwork should include the history, signalment, clinical findings, and tentative diagnosis
Laser Surgery How it works Clinical functions: ablation, incision, excision Laser light is absorbed and transformed into heat within the tissue Different tissues/substances absorb different wavelengths of light causing the tissue to heat Appropriate use From minor to more extensive procedures (feline declaw, lumpectomy, castration, amputation) Three types: CO2, diode, & Nd:YAG(neodymium:yttrium-aluminum-garnet) will not be discussed here Lasers are classified as I-IV according to the degree of possible safety hazards to patients and users
Laser Surgery: CO2 • Class IV laser • Available at wavelength of 10,600nm • Most use a noncontact mode in which the laser tip never comes in contact with the tissue • Highly absorbed by water – most tissues have high water content, so the laser energy is absorbed very close to the surface
Laser Surgery: Diode • Class IV laser • Available at wavelengths of 805nm to • 980nm • Can be used as a contact or noncontact • Mode • Absorbed better in hemoglobin and • Melanin • More collateral thermal damage may occur due to the deeper penetration • May provide more efficient hemostasis • And incisions
Laser Surgery Differences between CO2 and diode (e.g., contact vs. noncontact, wavelengths) Mode tips Both come with a variety of tips that are chosen based on the procedure Spot size Refers to the diameter of the aperture on the tip Moving the tip closer to the target tissue decreases the spot size; moving the tip further from the target tissue increases the spot size Exposure Refers to the duration of the laser beam or how long the tissue is exposed to the beam Charring refers to carbonization of tissue – char, that occurs at temps greater than 100°C Occurs when tissue absorbs heat faster than it can be released The clinician uses spot size, power, and exposure to control the interaction of the CO2 laser beam and its effects on the tissue.
Laser Surgery Safety standards: Set by the American National Standard Institute (ANSI) Warning sign should be posted on the surgery room door and all doors leading to it Dangers associated with class IV lasers include eye, skin, fire, and smoke plume hazards A record or log should be kept of each procedure performed as well as the power and duration settings This will help the surgeon choose settings to use for future procedures.
Laser Surgery Precautions Eye goggles • Everyone in the laser surgery room must wear • Eye goggles specific for the particular laser light • corneal or retinal damage can occur from scattered • Reflections • The eyes of the patient should be protected as well • Moistened sponges can be placed over the eyes • Patient eye shields are available
Laser Surgery Precautions Skin – damage may occur from direct or scattered laser beams. Clinicians should wear gloves and a gown for added protection Fire in surgery room – hazards include the surgical drapes, anesthetic agents, oxygen, animal’s fur, alcohol, methane from flatulence Place moistened sponges around the surgical area Be sure ET tube cuff is properly inflated Have fire extinguishers readily available Smoke plume Contains toxic and carcinogenic chemicals as well as bacteria and viral particles. An evacuator is usually purchased with the laser machine & should be placed within 1-2 inches of the smoke’s origin Wear laser surgery masks as regular surgical masks may not be sufficient
Laparoscopy • To examine peritoneal cavity and its viscera • A type of endoscope called a laparoscope is placed through a small midline incision or opening into the abdominal wall (lateral to midline) • Necessary equipment • Laparascope • Trocar-cannula unit • Fiberoptic light cable • Light source • Veressinsufflation needle • Gas insufflator • Camera/video system (optional)
Laparoscopic Equipment Usual sizes
Laparoscopic Equipment Trocar–cannula units Trocar punctures through the abdominal wall, and the cannula for the insertion of a laparacope
Laparoscopic Equipment Fiberoptic light cable and light source The fiber optic light cable emits light from the light source to the scope
Laparoscopic Equipment Veress insufflation needle Used for insufflation of the peritoneal cavity. This lifts the abdominal wall away from the abdominal organs.
Laparoscopic Equipment Gas insufflators CO2 – recommended due to rapid absorption Nitrous oxide Room air Tubing is connected from the gas insufflator to the Veress needle. Insufflation should not exceed 15mmHg
Laparoscopic Equipment Camera video system
Laparoscopic Equipment Camera video system
Laparoscopic Equipment Special instruments These instruments can be Passed through cannulas of accessory ports to aid in biopsy retrieval or to Perform surgical procedures.
Laparoscopic Equipment Special instruments Biopsy and grasping instrument tips
Laparoscopy Procedure Patient prep: fasting, bladder expressed Clip from xiphoid process to pubis Recumbency depends on procedure Draping Remove scope from glutaraldehyde solution Sterile saline over scope and light cable Dried by member of surgical team Sterile sleeve used to cover the camera; scope placed on the head of the camera Entry of Veress needle
Laparoscopy Procedure Outer trocar of needled is retracted Insufflation tubing can be connected to the needle NOTE: Insufflation of the abdomen can never exceed 15 mm Hg Place trocar–cannula View abdominal wall on the monitor Move scope as needed Additional cannula introduced if needed
Endoscopy Examine internal body structures via an orifice and using optical instruments Examine tissues directly, remove foreign bodies General anesthesia needed Proper fasting before procedure
Types of Endoscopes Standard flexible
Types of Endoscopes Flexible
Types of Endoscopes Fiberoptic Ifany images are to be taken, a camera head can be attached from the eyepiece on the endoscope to the endoscopy unit
Types of Endoscopes Video Similar to the fiberoptic endosdcopes except they do not have a direct viewing lens aided by an eyepiece.
Types of Endoscopes Rigid Best use – for procedures involving a direct pathway that are better viewed with a straight or direct line of sight such as the ears, nose, bladder, joint spaces
Endoscopy Preparation Veterinary technician is responsible for prep: Hook up endoscope Enter patient data on computer Turn on machine and check light source Test machine Get distilled water for flushing Air–water valve covered, distal end of insertion tube submerged in water, check for bubbles Leave tip submerged in water and test for suctioning
Endoscopy Room Store endoscopes in a hanging position Rather than in their original custom-padded cases. Never place them on a flat surface, even temporarily