Download

1 / 11
110 likes | 273 Vues
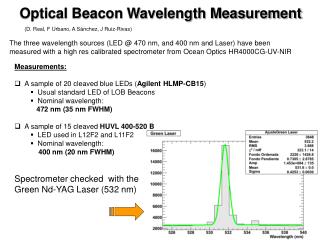
Measurement Basic OLP-5, OLP-6, OLP-8 Optical Power Meters. www.korearental.co.kr. Contents. • Power Supply • Differences between the devices • Front Panel & Display Overview • Measurements - System Power Level Measurement

E N D
Measurement Basic OLP-5, OLP-6, OLP-8 Optical Power Meters www.korearental.co.kr
Contents • Power Supply • Differences between the devices • FrontPanel& Display Overview • Measurements - System Power Level Measurement - Attenuation Measurement • Setting the wavelength • Power level display • Measuring Modulated Light • ”TWINtest” Mode
For dry batteries : 30 % capacity remaining BAT30 For NiCd cells : approx 50 % capacity remaining -28.53 dBm 850nm PERM Power Supply * Power-ON 이후 20분 이내에 ON/OFF 키를 누르면 전원을 OFF시킬 수 있으며, 20분 후에는 자동으로 전원이 OFF된다. Permanent Operating Mode - 20분 후에 자동으로 전원이 OFF되지 않고 계속 사용할 수 있도록 설정한다. - “ON/OFF”키를 약 2초 정도로 길게 눌러 전원을 ON 시킨다.
Measurements System power level measurement - System Power Level은 절대값(dBm)으로 측정된다. - System Power Level은 Transmitter의 Tx 출력 또는 Receiver의 입력 이전에 연결하여 측정한다.
Measurements Attenuation measurement - Fiber의 상호연결 또는 디바이스(e.g. connectors)들의 감쇠량을 측정할 수 있다. - Attenuation은 상대값(dB)으로 측정된다. - Attenuation 측정은 Test Source와 함께 사용이 요구되며 다음과 같이 두 단계로 이루어진다. 1. Reference Power Level Measurement 2. Relative Power Level Measurement (Attenuation)
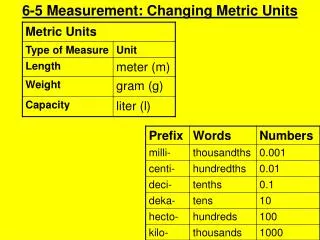
Setting the wavelength - 키를 눌러서 원하는 파장을 선택하거나 “AU”를 선택할 수 있다. - 고정된 파장 이외에 추가적으로 자동 파장 검출 기능을 사용할 수 있다. - 자동 파장 검출 기능이 활성화 되면 Display상에 “AU”라는 Indicator가 나타난다. * Automatic Wavelength Detection(AU)의 사용 제한 - 수신레벨이 매우 낮은 경우 - 간섭으로 인하여 파장이 검출이 잘 안 되는 경우 - 측정하려는 시스템의 파장 엔코딩이 Acterna사의 Power Source와 같지 않은 경우
Power Level Display - 키를 눌러서 절대값(dBm) 또는 상대값(dB)을 선택할 수 있다. (Toggle Function) * Storing a reference level - OLP를 Test Source와 광 케이블로 연결한다. - 두 장치(OLP, OLS) 모두 파장을 설정한다. - OLP의 키를 Reference Level인 0.00 dB로 나타날 때까지 누른다.
Measuring Modulated Light - OLP는 270 Hz, 330 Hz, 1 kHz와 2 kHz의 표준 주파수로 변조된 신호를 검출할 수 있다. - 변조주파수가 검출되면 LC Display상에 그 주파수가 표시된다. - 매우 낮은 신호레벨을 측정할 때 가끔 변조주파수를 검출하지 못할 경우도 발생한다. 이때에는 변조주파수 표시 위치에 두개의 하이픈(--)이 나타난다.
“TWINtest” Mode - OLP를 이용하여 동시에 두개의 파장으로 감쇠량을 측정할 경우 사용할 수 있다. - OLP는 두 파장에 관한 측정 결과를 4초 간격으로 교대하며 Display한다. * TWINtest Mode로의 Attenuation 측정 - OLP-5와 OLS-5를 광 케이블로 연결한다. - OLS-5를 dUAL mode로 설정한다. - OLP-5를 Automatic wavelength mode(“AU”)로 설정한다. - 850 nm와 1300 nm 측정값이 교대로(4초 간격) 출력되는지 확인한다. - 키를 지시값이 0.00 dB가 될 때까지 누른다. (Reference Level 설정) - OLS-5와 OLP-5 사이에 피측정체(DUT)를 삽입한다. - 교대로 나타나는 측정 결과를 확인한다. - End of Document -