Download
1 / 15
160 likes | 206 Vues
Once you are connected, you will see all of the accounts you have at this bank. Select the account you use for your business and tell QuickBooks what kind of accounts they are. QuickBooks (the software kind of) will download all of the transactions from the last 90 days, but they aren’t in QuickBooks

E N D
Toll Free : +1-844-551-9757 QuickBooks Online Banking Overview Presented By :- www.wizxpert.com
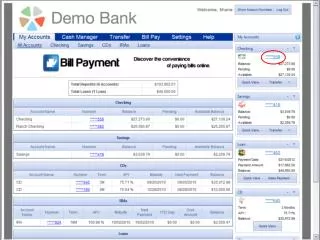
Connect Your Bank Account Open Homepage,right side corner under Bank Accounts click on Connect an Account.
Select your bank and the username and password you use to access your accounts. Click Log In when you are finished
Choose Your Account Once you are connected, you will see all of the accounts you have at this bank. Select the account you use for your business and tell QuickBooks what kind of accounts they are. QuickBooks (the software kind of) will download all of the transactions from the last 90 days, but they aren’t in QuickBooks just yet.
Entering Transactions On the Bank and Credit Cards page,later click regarding the Category or Match column to sort the transactions. You will see where QuickBooks tried to believe to be categories for some transactions.
Changing Transaction Category To divide this transaction in a different category, open the transaction menu and choose the right one. If this is a new transaction, click Add on the column to the right.
Choose a Payee Select Payee. If this is a new payee, click Add.
Enter their name and click on Save button. You can enter their details later
Split If you buy items from different categories with a single transaction, select Split.
It will open the move on the Transaction window, where you can choose the appropriate categories and how much you spent on each.
Batch Action If QuickBooks categorized many types of transactions correctly, you can take on these all at taking into consideration by clicking one of their checkboxes, holding beside the Shift key and choosing the definite one in the list.
Open Batch Actions and select Accept to accept them all together.
Correcting a Mistake If you included a transaction by mistake that doesn’t belong in this batch action, click on the In QuickBooks tab, choose the transaction and Undo it. It will reward to the New Transactions hence you can area it where it belongs. here are the steps of how to connect your bank account and you want to know more about the QuickBooks online Banking overview.
Transfer If you paid a business credit card bill or made a loan payment with a transaction, open the transaction and select Transfer.