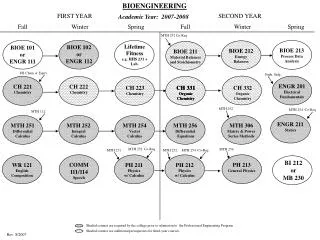
First year practicals
First year practicals. Lab 5: Mental Rotation. Measuring Mental Imagery. The concept of mental imagery can be traced back to Galton (1883) gave a questionnaire to 100 people asking them to remember their breakfast table and answer some questions about the images that they had


First year practicals
E N D
Presentation Transcript
First year practicals Lab 5: Mental Rotation
Measuring Mental Imagery • The concept of mental imagery can be traced back to Galton (1883) • gave a questionnaire to 100 people asking them to remember their breakfast table and answer some questions about the images that they had • With the questionnaire, Galton created a measure of imagery that was related to sex, age, and other differences specific to individuals • The basic findings were that there are striking individual differences in the ability to form mental ‘images’
Dual Coding Hypothesis • Paivio (1971) proposed the Dual-Coding hypothesis • The basic tenet of this theory is that information may be mentally represented either in a verbal system or a nonverbal (analogical) system • Each system contains different kinds of information. • Each concept is connected to other related concepts in the same system and the other system. • Activating any one concept also leads to activation of closely related concepts.
Pictures in the Head • Pylyshyn (1973) argues that whatever a imagery might be, it cannot be a ‘picture in the head’ or a ‘mental photograph’ • There would be far to many of them • There no possible means of organising them • Imagery is ‘conceptual’ and must be constructed from a more abstract form • The presence of imagery is epiphenomenal, i.e. not the functional process itself
Experiments on the Rotation of Mental Images • Roger Shepard and his colleagues designed a series of studies that looked at the extent to which people could manipulate their own mental images • Shepard & Metzler (1971) • showed subjects pairs of 3-D line drawings • 1600 pairs were generated • In some pairs the second image was a rotation of the first • Some pairs contained two different images • The rotations varied from 0 to 180 degrees
An example pair of stimuli • The picture to the right shows some typical pairs of stimuli taken from Shepard & Metzler (1971) • Science, 171, pp701-703.
Results of the Experiment • The subjects’ task in the experiment was to decide whether the two images were the same or different • The graph on the right shows the time to respond to pairs of stimuli as a function of the difference in degrees between the members of the pair Response time (s) 0 180 Rotation (deg)
Rotating Letters • Cooper & Shepard (1973) extended the findings by examining whether similar effects could be found when subjects had to recall a particular image • Subjects had to judge whether the letter was ‘normal’ or presented as a ‘mirror’ image • When the letters were rotated the same results were found
Today’s Practical • A replication of Cooper & Shepard’s (1973) experiment using letters • The analysis of the data will look at the correlation between the RT and the angle of rotation • NB It is possible to use Pearson’s coefficient of correlation to examine experimental data, not just data from correlational design! Response time (s) 0 180 Rotation (deg)
Creating the PsychoPy experiment • There are a number of steps to creating an experiment in PsychoPy: • Setup the way the types of trials and how they differ (in Excel) • Create settings for the monitor and experiment • Setup the timing and structure of each part (Routine) of the experiment • Setup the way that the Routines will be combined in the Flow • To start with, create a folder to save your experiment in and download the 4 image files to be used (*.png files)
Setting up trial types • In most experiments things differ from one trial to another in one or more ways • For PsychoPy you can control these changes using a spreadsheet of ‘Trial Types’ • In the spreadsheet; • each row will represent one type of trial that can occur • each column will represent a variable that determines some aspect of the trial (e.g. what image to present, what the ‘correct’ answer is,… )
Creating our ‘trial types’ file • Our study today will use a pair of letters, G and R, that are either reversed (mirrored) or not and are also presented at various angles. These will come from image files. • Subjects will have to hit one of two keys depending on whether they think the letter was reversed • Open a new document in MS Excel and create column titles in the first row with the names; • image, mirrored, orientation, corrAns • When you give names to columns like this you must not use spaces or punctuation. We’ve used a capital A to show that corrAns represents two words
Creating our ‘trial types’ file • In the columns we will insert the following info: • image: the name of the image file (G.png, revG.png, R.png, revR.png) • reversed: 0 (not reversed) or 1 (reversed) • orientation: a complete set of 0,10,20,…180 for each of the 4 stimuli • corrAns: left or right (left cursor when ‘mirrored’ column value =0, right cursor when ‘mirrored’ column value =1) • You should end up with 76 trial types/rows. • First, take your hand off the mouse and watch me do this. You can do it afterwards yourself
Creating our ‘trial types’ file • Always check very carefully that the Trial Types file specifies the conditions exactly as you want them. One very common place for mistakes in experiments is when the experimenter has forgotten to update the conditions correctly after copy/paste • Save the file as trialtypes.xlsx (or something else that’s obvious) in the same folder as the experiment
Create a new experiment in PsychoPy Builder • Open PsychoPy, go to the Builder view • Set up the properties of the Experiment by clicking the button marked marked like the diagonal of a screen: • Remember, you can always get a hint about what a button does by hovering the mouse over it
Setting the experiment properties • The dialog that comes up allows you to set various things about the experiment in general, such as the way the stimulus window appears and the dialog that gets info from subjects. • For most dialogs, you can get help on what the settings mean by clicking the help icon.
Setting the experiment properties • In the dialog, one of the settings says ‘Experiment Info’ and another says ‘Show info dlg’ • This allows us to present a dialog to subjects and control what gets stored • Let’s add boxes to ask for the subject age and gender, useful for writing the methods section • Set Experiment info to read; • {'participant’:' ', 'session':'005', 'gender':' ', 'age':' '} • Make sure your inverted comma’s match up! • Hit OK to close the dialog
Save your experiment • Save your PsychoPy experiment in the same folder as the trial types file and image files
Creating your trial Routine • Most experiments have several Routines, one of which usually controls a single trial • Timing of events within a Routine is generally very precise • Within a Routine you can have many Components that each control a stimulus, or method of responding etc • Components get added to the Routine by clicking the buttons on the right of the Builder • After being inserted you can edit a Component’s settings by clicking on its name or icon • In our study, we want to have a fixation point, followed by our stimulus, and then give subjects the chance to respond with one of two keys
Adding a fixation point • There are various things we could use to guide our subjects’ fixation. A simple one is to create a cross by presenting subjects with the character ‘+’ • Add a Text Component to the trial Routine by hitting the button marked like a pair of Ts (as above) • Give you text object the name fixation • Set its actual text to be simply + • Set its duration to be 0.5 ( for 500ms) • Set color to black • Hit OK • You can always go back and edit the fixation by clicking on its name or icon
Create the main stimulus • We want to present one of four images, at many orientations, based on parameters in our trial types file • Add a Patch Component (this is usually an image) with the icon above • Set the name of the stimulus to be something that you will remember, and not the same as anything else, e.g. target • Set the Start time for the patch to be 1.0 (seconds) and the duration to 3.0 (seconds) 3.0
Create the main stimulus • In the trial list we had a parameter called image. We can refer to that here using $ • We need the stimulus to change on each repeat (i.e. each trial)
Stimulus Orientation • Stimulus orientation also needs to be set from your file and changes on every repeat of the Routine
Stimulus size • By default the size of our stimulus is based on fractions of screen (or something like it), and because our screen is not square they will come out looking odd • Let’s make the images a fixed number of pixels in width and height, say, [400,400] and set the units to pix • Then we’re done, so hit OK
Get a response • To get a response from the subject we usually use the keyboard • Insert it with the keyboard icon • This is already set to use the ‘left’ and ‘right’ keys (the 4 arrows under the return key)
Get a response • We need to tell PsychoPy what the correct answers are. These are stored as corrAns in your file. • Tick the box storeCorrectand set the correctAns to be $corrAns You can leave duration blank (infinite) but set the start time to be 1.0. We don’t want the subject responding before the stimulus is visible
Overview of trial • Your trial should look like this. • Note how the resptime bar goes off the end of the view (to infinite), because it only stops when a key is pressed
Add a loop to repeat trials • We want the trials to repeat. In the Flow panel (bottom of the Builder view) click the ‘Insert Loop’ button once • An icon will come up showing an insertion point. Click once on each side of the trial box
Add a loop to repeat trials • As you select the second endpoint for your loop a dialog appears • Click on the Browse… button select your trial types file (from excel). PsychoPy will summarise how many types of trial there are and how many parameters/variables • Also, set the nReps to 2 (5x76 will take too long!)
Adding instructions • Let’s add some instructions • For this we need an extra Routine, to be positioned outside the trials loop • From the >Experiment menu select New Routine • Give the new Routine the name instructions • A new tab will appear in the set of Routines, but you may need to select it
Adding instructions • Insert a new Text Component • Give it the name instrText(we can’t call it instructions because we used that name for the Routine we just created) • Set the duration to be blank (infinite) • Type some instructions into the text field, telling the subject what to do NB. If you have lots of text you may need to reduce the height of the letters a little
Ending instructions • We told the user to press any key to begin. We better set that up! • Insert a Keyboard Component Set the name to be endInstr Set the allowedKeys to be blank so that any key can be pressed Set the store value to be ‘nothing’ Also uncheck the storeResponseTime setting at the bottom: Hit OK
Inserting instructions • Now we need to add that Routine to the Flow • In the Flow panel press (once) the Insert Routine button Select the Routine you want to insert …and then the place you want to insert it NB. If you insert your Loop or Routine in the wrong place you can right-click it and ‘remove’
Copy/paste a Routine • You could also add a thank you/goodbye message (that encourages subjects to leave once you’re finished!) • That’s going to be very similar to your instructions Routine • Make sure your instructions Routine is selected and go to >Experiment>Copy Routine • Then select >Experiment>Paste Routine • This is particularly handy for long/complex routines, and it can be done between different experiments too – but then you may need to make sure that the variables have the same names!
Alter your goodbye message • In your goodbye Routine, you need to; • Rename the instrText Component to be called something new (e.g. thanksText) • Give it some new text (obviously!) • Rename the Keyboard Component too
The end product • Remember to save!