Download
1 / 5
50 likes | 155 Vues
Learn the step-by-step process for printing on a Mac using the Epson R2400 printer located in the computer lab. This guide covers selecting the correct printer profile based on your paper type—Premium Semigloss, Premium Glossy, or EnhMatte Best Photo. It also explains how to adjust settings for page setup and print quality for optimal results. Follow these instructions for media type, color management, and print quality to ensure your prints come out perfectly. Get your print copy promptly at the print window!

E N D
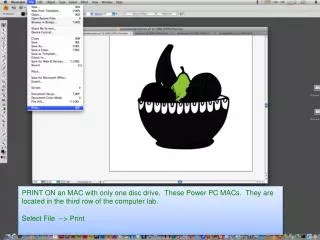
PRINT ON an MAC with only one disc drive. These Power PC MACs. They are located in the third row of the computer lab. Select File --> Print
The print dialog will appear. Choose Color management Change the printer profile to: SPR2400 PremiumSemigloss, SPR2400 PremiumGlossy, or SPR2400 EnhMatteBstPhoto.icc depending on the paper you are using. Change the Rendering Intent to: Perceptual
Now choose Page Setup in the lower left In Format for choose the printer you are using: For the glossy printer use Epson-R2400-Semi-Glossy-8.5x11 @ EQ_Room_123. For luster choose Epson-R2400-Luster-8.5x11 @ EQ_Room_123. For matte choose Epson-R2400-Matte-8.5x11 @ EQ_Room_123. Then click OK
Click the Printer button next to Page Setup. The printer dialog will open. Click Layout and scroll down to Print Settings.
change Media Type to the paper you are using: Premium Photo Paper Gloss Premium Photo Paper Luster, or Premium Photo Paper Matte Now change Color Settings to: Off (No Color Adjustment) In Mode Click advanced Print Quality should be Photo RPM High speed should NOT be checked. FINALLY Hit Print! Hit Print Again! Get your paper at the print window.