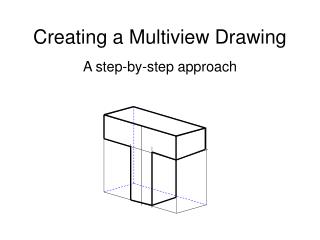
Creating a Custom Drawing Sheet
Creating a Custom Drawing Sheet. Tutorial. Opening a Drawing Sheet. Create a new standard drawing file from menu options. Adjusting the Sheet Size. A default C-size sheet should appear. Adjusting the Sheet Size. Change sheet size to A (8.5 in. x 11in.)


Creating a Custom Drawing Sheet
E N D
Presentation Transcript
Creating a Custom Drawing Sheet Tutorial
Opening a Drawing Sheet • Create a new standard drawing file from menu options
Adjusting the Sheet Size A default C-size sheet should appear
Adjusting the Sheet Size • Change sheet size to A (8.5 in. x 11in.) • The title block will indicate the letter A if the sheet has been properly resized
Delete the Existing Title Block • Erase ANSI title block • Right click ANSI – Large then left click delete
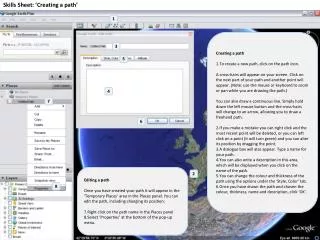
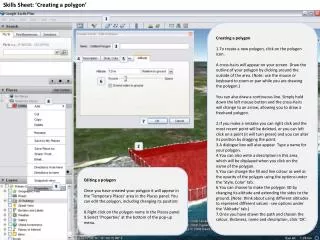
Creating a New Title Block Define a New Title Block. A sketch environment will appear Use the rectangle, line, and dimension sketch tools to create the image below. Placement is not important
Inserting a Logo • The lower left box will contain a logo which can be replaced later • Insert graphic into the box and resize as needed
Adding Text to the Title Block • Use text sketch tool to create information titles in the remaining boxes
Adding Property Fields Use the text sketch tool again to create Property Model entries for the Drawing Name <TITLE> and Date <CREATION DATE>. This information will be extracted from the solid model part file.
Adding Text Prompts Use the text sketch tool again to create Prompted-Entry fields in the remaining title block boxes. Each will say <Enter Prompt for Field>. This information will be inserted by the drawer for each different drawing.
Modify Text Prompts Edit each of the <Enter Prompt for Field> statements, and type the following statements as replacements.
Saving the Title Block The custom title block is now complete. Save the title block using the right-click function. Call it PLTW Title Block. The title block will disappear, but it has been saved in the Drawing Resources under Title Blocks, which is found in the Browser Bar.
Inserting the New Title Block To insert your new title block, right click on PLTW Title Block in the Browser Bar and select Insert. Type the required information into the dialog box that appears.
Inserting the New Title Block Note that the Drawing Name and Date are missing. This information be automatically entered when a model view is placed into the drawing.