Download
1 / 32
320 likes | 340 Vues
Learn how to systematically fault find electrical circuits and locate faults using circuit diagrams and inspection procedures. Develop a good understanding of safety rules, test instruments, and basic fault finding procedures.

E N D
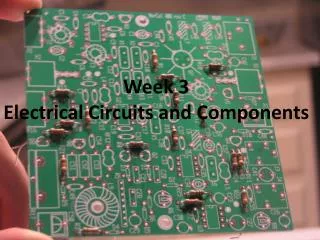
Electrical components and systems Topic 11 – Fault Finding in Basic Circuits
Fault find basic circuits Unit 11
Assumed prior learning • General Basic Safety • Wire a circuit • Tools and Electrical Measuring Instruments • Don’t feel confident yet about these topics? Click on each to review the content. • Feeling confident? Click next to proceed with this unit.
Outcomes • Use a systematic approach to fault find electrical circuits. • Locate faults on given electrical panels or equipment by using circuit diagrams and inspection and testing procedures. • Build a circuit and fault find hen there is no output voltage.
Introduction Whenever faults have to be rectified, it should be done efficiently and in the shortest possible time in order to save costs and reduce production downtime. Effective fault finding can only be done by using logical thinking and having a good knowledge of the equipment, which is essential. In this unit we look at the procedure to fault find basic electrical circuits.
Safety rules Safety can never be over-emphasized. Click on ‘Safety first’ for tips on safety that will help to ensure your safety and the safety of others in the workplace. SAFETY FIRST !
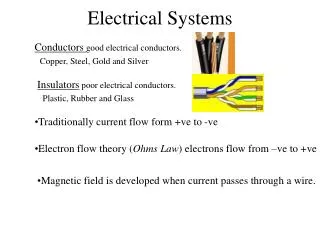
Test instruments The following instruments may be used for fault finding: • A bell tester to determine conductor continuity. • A multimeter to measure resistance. • A megger to determine if there is any breakdown of insulation or the resistance values of coils. NOTE: It is assumed that, by now, you know exactly how to use test instruments and that you can test and measure resistance, current, voltage, etc. correctly. Bell tester Multimeter Megger
When using measuring instruments remember: • Measuring instruments are expensive and must be handled with care at all times. • When an instrument is not in use, ensure that it is switched off and stored safely. • Check to ensure that the measuring instruments that you intend using are in good working order. • Select a measuring instrument that is the right one for the task.
Successful testing of electrical circuits Electric circuits must be systematically tested for faults. The results obtained at each stage of the testing must be used as guides to accurately locate faults that may occur. In general, the successful testing of electrical circuits depends on the following factors: • A fundamental knowledge of the circuit to be tested. • An understanding of the operation of the components in the circuit. • The ability to use the test equipment available. • The ability to analyse results correctly.
Basic fault finding flow chart Some of the equipment you are going to work on will most likely have manuals, hand books or instruction sheets with fault finding flow charts to assist you in tracing the likely faults quickly and efficiently. The Basic Fault Finding Flow Chart alongside should be of great help to do systematic fault finding.
Safe work procedure What follows will guide you through the procedure for fault finding an electrical panel, which is isolated from all sources of electricity. The only time, during training, that you will be allowed to restore power is to initially test the panel for diagnostic purposes. NOTE: Remember that, when you are at work in industry, you will be personally responsible for isolating and switching on power to circuits and equipment!
Fault finding procedure Fault finding is a systematic process of narrowing down the possible reasons for failure until only the actual cause of failure is left. The following should be considered when doing fault finding: • Symptoms of failure • Diagnosis • Visual inspection • Testing
Symptoms of failure A person doing fault finding must be able to perceive the symptoms that have possibly led to the failure. This means that they must be able to determine whether the panel or equipment operates according to the circuit diagram. It is therefore essential that the person doing fault finding is capable of reading circuit diagrams. Symptoms of failure method
Diagnosis Restore power to the panel. • Use Fig. 1 as a guideline to the systematic approach to fault finding. Procedure for diagnosis Click here for more information
Visual inspection Now that it has been decided in which area the fault is most likely to be, components must be visually inspected to determine if physical defects can be detected. It may be a burnt or loose connection, a blown fuse or something that visually indicates that there is a fault. Visual inspection process
Testing parallel circuits Select the appropriate testing equipment: • Remember when measuring resistance, parallel circuits may give false readings. Disconnect the circuit to ensure that the required component resistance is measured. • When continuity of conductors is tested using a continuity or bell tester, parallel circuits may give false readings because the tester conducts through the parallel circuit. See Figs. 2 and 3 on the following slide for examples of this.
Testing: continuity of conductors Using the multimeter to determine the condition of the contactor coil M1 may result in an inaccurate reading due to M1 being in parallel with relay coil R1.
Practise In your practical lesson you must fault find electrical panels, making use of circuit diagrams, testing instruments and by following a systematic fault finding procedure. Watch the video below before attempting to fault find the circuit you build. Vid 01: Fault find a circuit using Ohm’s law
Build the circuit Select the components from your electronics toolkit according to the diagram in the figure below. • Ensure that the supply to the training board is switched off. • Build the circuit of the given drawing on the training board. SAFETY FIRST ! Click here for further instructions
Finding the fault: no output voltage Step 1 - Fault – no output voltage - Follow the steps in the flow chart
No output voltage: Step 2 Step 2 • Disconnect the circuits at points A and B • Disconnect the capacitor at point C1
No output voltage: Step 3 Step 3 •Reconnect circuit at points A and B the carry out the following:
Quiz time We have come to the end of this unit. Answer the following questions to make sure you understand how to fault find basic electrical circuits.
Question 1 What safety measures must be taken before attempting to do fault finding on electrical equipment? • Ensure that the power to the equipment on which you are going to work is turned off and that it is locked out. • Use electrical test instruments in accordance with the manufacturer’s specifications to prevent damage to the equipment. • Do not restore power to the equipment unless you have ensured that no person can be injured. • All of the above.
Question 2 What effects will a parallel circuit have on testing procedures? • May give false readings. • It may cause a loose connection. • Overload the system. • System failure.
Question 3 A bell tester is used to determine if there is any breakdown of insulation. TRUE FALSE • Click on the correct answer.
Question 4 Rearrange the following in the correct order, as discussed in this unit, of the fault finding procedure. a) Visual inspection b) Diagnosis c) Testing d) Symptoms of failure
Let’s review: In this lesson we have covered: • Safety rules. • Test instruments. • Fault finding flow chart. • Fault finding procedure. • Building a circuit. • Fault find: No output voltage. Make sure you have a complete understanding of all the work covered here before you start the next unit.
Video01: Fault finding using Ohm’s law Get video: https://www.youtube.com/watch?v=qotB1xxQols Play full screen.