10 Quick Tips About interlocking deck tiles on grass
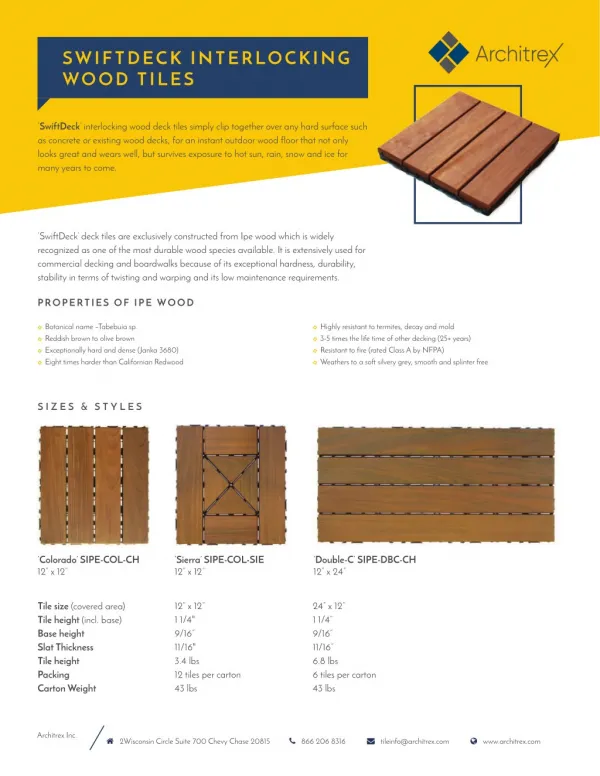
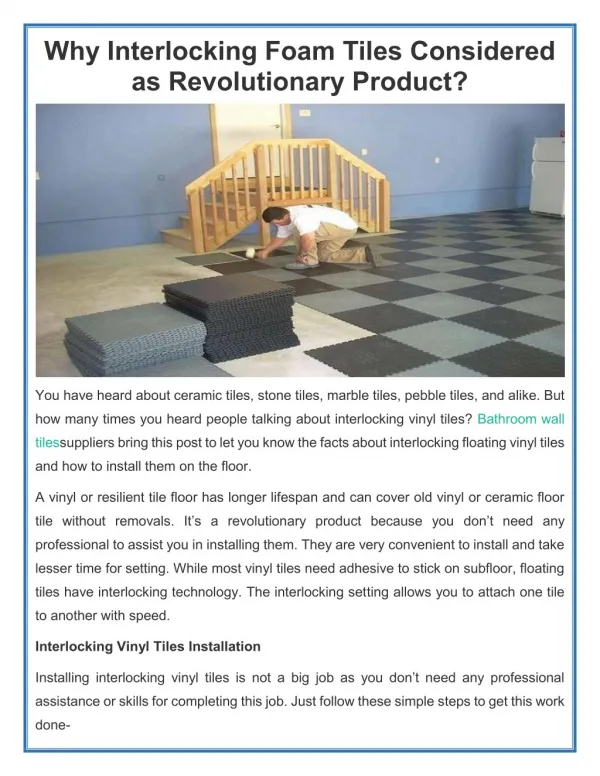
<h1>Benefits of Interlocking Outdoor Patio Decking Tiles</h1> <p>Interlocking patio decking ceramic tiles is a reasonably new term in the style as well as construction sector. For years, interior designers as well as residence builders alike have actually been using custom made or prefabricated products to satisfy their one-of-a-kind design demands. They use a vast array of benefits over other options.</p> <p> </p> <p>If you resemble most, you desire your residence to look excellent for many years to find and also interlocking outdoor patio decking floor tiles is the method to go. Decades from now, no one will certainly be able to inform that you used a premade product instead of something you developed on your own. Designers will marvel at your imagination and they won't be able to determine just how you managed to cut prices on these products. Interlacing deck tiles can conserve you hundreds of dollars, merely due to the fact that you won't need to get all those tools as well as materials you don't really need to start with.</p> <p> </p> <p>You don't require any type of special sort of wood or lumber for this project. If you already have the correct amount of wood and also are trying to find a means to save money, attempt using treated lumber. You can obtain it for a discount by buying second-hand lumber that has been with a wood-treatment process. Those who like to do the deck themselves can buy quality treated lumber if they so choose. It's not costly whatsoever.</p> <p> </p> <p>These ready-made deck ceramic tiles will never hold up as well as treated lumber. Those that are dealt with have actually been treated with a type of material. When exposed to sunshine, they break down as well as exfoliate. Yet those with unattended lumber just scratch the surface area, whereas, with the proper treatment, they never ever flake and also they will certainly never show a blemish.</p> <p> </p> <p>Interlocking patio area outdoor decking tiles are offered in various various colors. Because you can obtain them in countless styles, you have the capability to personalize your project to your very own personal preference. You can add some extra character to it. You can add some more fun by adding ornamental ornaments. It's really as much as you.</p> <p> </p> <p>You can discover these floor tiles at really budget-friendly rates. That's since the majority of them are supplied by preferred brands as well as suppliers.</p> <p> </p> <p>As an example, Ancoats makes interlacing patio area outdoor decking ceramic tiles that are ensured to endure moisture. Your service warranty will certainly assure that you have the best warranty readily available in the industry.</p> <p> </p> <p>Corian offers several of the best interlocking outdoor decking tiles on the market. These ceramic tiles are made from top-notch materials that will stand up to whatever nature can throw at them. Corian has actually gotten on the leading edge of ceramic tile innovation for many years, and they continue to thrill. Their sturdiness, remarkable top quality, and also quality efficiency lack inquiry.</p> <p> </p> <p>Architec is an additional brand of interlacing outdoor patio decking tiles that are offered. They offer high quality outdoor patio outdoor decking floor tiles that are sturdy and long-term. These floor tiles are likewise simple to install.</p> <p> </p> <p>Callisto offers an incredible line of amazing interlacing outdoor patio outdoor decking ceramic tiles. They are guaranteed to be both lovely and also durable. Some of the floor tiles are even available in solitary shade choices that provide you lots of alternatives when it involves designing your deck.</p> <p> </p> <p>Architec tiles have been using economical, top quality tiles for a variety of years. This tile maker creates the very best outdoor decking that cash can purchase. They do not damage or chip. They are of such top quality that they look far better than they do. When you are shopping for interlocking outdoor patio outdoor decking tiles, you do not need to opt for much less than the best. Instead, obtain one of the numerous high quality options that are offered.</p> <h1>Are You All set For Some Interlocking Patio Area Decking Tiles?</h1> <p>If you are thinking of including some interlacing patio area decking floor tiles to your house, you are making a smart decision. These can add to the worth of your home and also are very easy to mount without devices needed.</p> <p> </p> <p>You can make your deck entirely unique by choosing the correct materials and also including shades. Not only do these give an appealing look, yet they will certainly assist safeguard your wood flooring and furnishings from water damage. There is nothing more gorgeous than an interlocking patio outdoor decking tile that shines in the sunlight.</p> <p> </p> <p>To start you need to reduce the flooring ceramic tile initially. The base you pick need to be crude enough to penetrate the concrete below. This will certainly enable the top decking to be screwed in without a void. You may choose to make use of 3/4 inch ceramic tiles for this purpose if you don't have an existing flooring.</p> <p> </p> <p>Interlocking deck ceramic tiles been available in a wide array of designs. For example you can pick those made from engineered plastic. They can be found in a variety of colors. You can likewise pick environment-friendly interlacing outdoor patio decking tiles that look really attractive on a pre-existing hardwood floor.</p> <p> </p> <p>Even those that prefer to design their own homes can discover interlocking decking tiles that are similar designs as well as patterns. These can be reduced with precision.</p> <p> </p> <p>You will locate interlocking outdoor decking ceramic tiles that appear like slate or rock. When you make use of slate as a tile, you can have it cut to create any shape you desire. The sides of the tiles can be rounded off or squared off for the flooring.</p> <p> </p> <p>If you choose all-natural stone tiles you can obtain them cut to create the letters "A "as well as "E" for your house. You can also get one that is reduced in a circle for a sidewalk around your swimming pool.</p> <p> </p> <p>Other styles include tiles that can be found in a rose pattern or have stripes for a border around the swimming pool. When you want to add added shades you can utilize hot pink tiles to illuminate the patio area.</p> <p> </p> <p>It is also feasible to obtain interlacing decking tiles that are made from all-natural rocks. They come in a selection of colors. This includes an additional flair to any deck.</p> <p> </p> <p>As you can see, there are lots of alternatives when it pertains to interlacing patio outdoor decking tiles. For the majority of people this is an extremely appealing addition to their residence.</p> <p> </p> <p>Spend some time to discover the options prior to you purchase any kind of material. You will require to figure out just how the material will certainly respond to the numerous types of weather conditions that occur in your location. Your property owner's insurance coverage service provider might have special rules for sure materials.</p> <p> </p> <p>Finally, interlocking patio outdoor decking floor tiles are a wonderful enhancement to any kind of residence. You will certainly appreciate the elegance of a magnificently interlocking deck and you will have the ability to invest even more time outdoors enjoying your home.</p> <h1>Just How Good Is Interlocking Patio Decking Shingles?</h1> <p>If you are taking into consideration mounting a deck, however want the look of wood decks, interlacing patio area outdoor decking ceramic tiles can be simply what you are seeking. These are solid, low upkeep tiles that will certainly blend in nicely with your wooden decking.</p> <p> </p> <p>What's nice regarding these tiles is they resemble routine timber decking. They are readily available in a selection of colors and styles and have a natural look. With many styles, shades and styles available, it is simple to discover the ideal kind for your deck.</p> <p> </p> <p>Nowadays, these are made with thicker glass in order to stand up to the components as well as provide a tough and strong surface area that will certainly stand up to the tension of walking on the deck. It is also possible to set up these on the roof, pathways or in locations where there is no pathway.</p> <p> </p> <p>As an added advantage, they are a great deal easier to tidy than typical wooden decking. All you need to do is move them off each time you intend to remove crud. Say goodbye to require to scrub the dirt away as well as it makes them much easier to clean.</p> <p> </p> <p>Installment of interlacing outdoor decking tiles can be really easy, specifically if you purchase the interlocking type. You ought to discover these come with clear guidelines in addition to installment video clips.</p> <p> </p> <p>Some installation products are excellent for the newbie as well as would certainly be suitable for beginners. These include side rails which can assist make the deck remain level and protect against sagging. They are also excellent for those that choose not to have the exterior deck location straight subjected to the components.</p> <p> </p> <p>An additional wonderful advantage of these decks is the fact that they take really little maintenance. Like all decks, they additionally need mowing one or two times a year, but that is about it.</p> <p> </p> <p>Likewise, a lot of them are really lightweight. So you can relocate them around as you see fit. They also make great landscaping devices as they are incredibly easy to establish and take down.</p> <p> </p> <p>One more advantage is that you can quickly mount them over fencings or various other areas to help maintain things cool and also tidy. It is likewise simple to accumulate as well as remove after the snow has thawed. Your neighbors may also assume that you have actually done a fantastic job at keeping the deck in excellent form.</p> <p> </p> <p>If you want to include a little design to your exterior deck, after that you should consider using these interlacing patio area outdoor decking ceramic tiles. There are a number of styles available to pick from. So it is very easy to locate one that suits flawlessly with your garden area.</p> <p> </p> <p>To ensure you purchase top quality interlacing outdoor decking, you should purchase them from a trusted store that can guarantee their quality. These retailers are mosting likely to offer affordable prices and also if you order wholesale, you will obtain a discount rate.</p> <p> </p> <p>Interlacing patio outdoor decking ceramic tiles are a terrific financial investment for those that take pleasure in the outdoors. Not just will they maintain your deck dry and also tidy, however they are a great method to add elegance to your backyard.</p> <h1>The Real Conveniences Of Interlocking Outdoor Patio Decking Tiles</h1> <p>Making use of interlocking patio decking tiles has become a fashionable selection among lots of house owners in the last few years. It is currently among the most popular options to standard outdoor decking materials like wood or metal, as they can be cut as well as mounted almost anywhere. Furthermore, they can last longer as well as better if effectively cared for.</p> <p> </p> <p>However, it has actually been contrasted to imitation items as well as has been connected to fraudulence as well as not being genuine quality. This makes it a suitable factor to check out the benefits of interlacing decking floor tiles. Even though it does need even more initiative than various other choices, it deserves it over time.</p> <p> </p> <p>A lot of people want to prevent the fake products that have actually come to be prominent recently. They could prefer it because they offer a lot of benefits. As a result of this, it is vital to examine the benefits of interlacing patio area decking ceramic tiles thoroughly before getting.</p> <p> </p> <p>It uses a remedy to several troubles when it involves increasing the all-natural charm of your yard. It is easy to mount and will provide you with a long life. It will certainly be very tough to tell the difference in between a product made from various products and also a product that are interlocking patio area outdoor decking tiles.</p> <p> </p> <p>In addition, it can be installed easily and also the number of joints is unlimited. This suggests that no joints will show up, making it easy to conceal the items you wish to conceal. It will likewise resist warmth from coming to be moved to the substratum.</p> <p> </p> <p>It will certainly also minimize the time required for the installation process. It can be used by lots of people in a few hours and for the most part is done simultaneously, making it a lot easier than other alternatives. In fact, it can even be ready for a brief amount of time, which can conserve a lot of time and money when it comes to garden upkeep.</p> <p> </p> <p>It will certainly likewise offer competitive costs for a very long time to find. As a matter of fact, interlacing patio outdoor decking floor tiles can last a years or more, which is a lot longer than other outdoor decking products. This is a superb attribute if you are a person that wants your deck to look great for a long period of time.</p> <p> </p> <p>It is immune to water, making it a great selection for those that have challenging access to their decks. With appropriate treatment, it can even stand up to all weather conditions. It is likewise easy to keep and also can be easily fixed in situation of damage or leak.</p> <p> </p> <p>It can also be installed in a brief time period, lowering the risk of needing to hire a professional to install it. It is additionally easy to tidy. If you have to deal with something on it, it will certainly be a lot easier to cleanse it.</p> <p> </p> <p>It can be set up on any kind of kind of surface, including concrete and also wood. Due to this, it is a great option for those who do not have the most effective sort of deck. Moreover, it can be used anywhere in the globe without being harmed whatsoever.</p> <p> </p> <p>It will also be much easier to set up interlocking outdoor patio decking floor tiles if you are a person that does not recognize anything concerning it. You can conveniently discover thorough video clips online that will assist you through the procedure. On top of that, it will also be much easier for you to mount this type of decking product if you have a great deal of experience in doing so.</p> <p> </p> <p>In fact, these actual advantages make interlocking patio decking ceramic tiles an exceptional choice for people who want the best in materials and also are not terrified to experiment. If you are a person who wants the most effective in decks, the best means to set about it is to check out the alternatives used by interlocking patio area decking floor tiles.</p>
80 views • 5 slides