Download
1 / 12
120 likes | 314 Vues
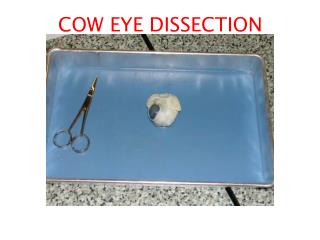
Biology in Action Eye Q – Cow’s Eye Dissection KGTC Model Lesson. Jessica LaFollette jlafollette@piperschools.com October 7, 2014. Why dissect an Eye?. Exciting hands-on e xperience for future doctors, veterinarians and scientists. Easy to obtain and dispose of.

E N D
Biology in ActionEye Q – Cow’s Eye Dissection KGTC Model Lesson Jessica LaFollette jlafollette@piperschools.com October 7, 2014
Why dissect an Eye? • Exciting hands-on experience for future doctors, veterinarians and scientists. • Easy to obtain and dispose of. • Not chemically preserved, so no “dissection smell” • Eye Dissection can be incorporated into a study of biology, the brain, or human perception.
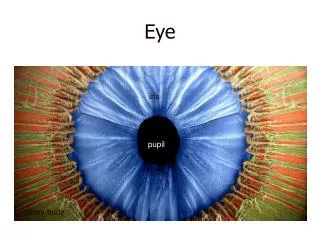
STEP 1 Examine the outside of the eye. See how many parts of the eye you can identify. You should be able to find the whites (or sclera), the tough, outer covering of the eyeball. You should also be able to identify the fat and muscle surrounding the eye. You should be able to find the covering over the front of the eye (the cornea). When the cow was alive, the cornea was clear. In your cow’s eye, the cornea may be cloudy. You may be able to look through the cornea and see the iris, the colored part of the eye, and the pupil, the dark oval in the middle of the iris. You should also see the optic nerve at the back of the eye. This is the eye’s connection straight to the brain.
STEP 2 Cut away the fat and muscle. The fat cushions the eye and the muscles help it move in all directions. Removing the fat and muscles may take a few minutes. If the eye is slippery and difficult to hold, use a paper towel to improve your grip. It is not necessary to remove every bit of fat and muscle.
STEP 3 Use a scalpel to make an incision in the cornea. (Careful—Don’t cut yourself!) Cut until the clear liquid under the cornea is released. That clear liquid is the aqueous humor. It’s made of mostly of water and keeps the shape of the cornea.
STEP 4 Use the scalpel to make an incision through the sclerain the middle of the eye. Make the incision horizontally, halfway between the cornea and the optic nerve. Be sure to hold your fingers or thumb over the cut you made in the cornea, so none of the interior structures are squeezed out. Use your scissors to cut all the way around the middle of the eye, cutting the eye in half. You’ll end up with two halves.
STEP 5 The next step is to pull out the iris. The iris is between the corneaand the lens. It may be stuck to the cornea or it may have stayed with the back of the eye. Find the iris and pull it out. It should come out in one piece. You can see that there’s a hole in the center of the iris. That’s the pupil, the hole that lets light into the eye. The iris contracts or expands to change the size of the pupil. In dim light, the pupil opens wide to let light in. In bright light, the pupil shuts down to block light out.
STEP 6 The back of the eye is filled with a clear jelly. That’s the vitreous humor, a mixture of protein and water. It’s clear so light can pass through it. It also helps the eyeball maintain its shape. Now you want to remove the lens. It’s a clear lump about the size and shape of a squashed marble.
STEP 7 The lensof the cow’s eye feels soft on the outside and hard in the middle. Hold the lens up and look through it. What do you see? Put the lensdown on a paper and look through it at the words on the page. What do you see?
STEP 8 Now take a look at the rest of the eye. If the vitreous humor is still in the eyeball, empty it out. On the inside of the back half of the eyeball, you can see some blood vessels that are part of a thin fleshy film. That film is the retina. Before you cut the eye open, the vitreous humor pushed against the retina so that it lay flat on the back of the eye. It may be all pushed together in a wad now. The retina is made of cells that can detect light.
STEP 9 Use your finger to push the retina around. The retina is attached to the back of the eye at just one spot. Can you find that spot? That’s the place where nerves from all the cells in the retina come together. All these nerves go out the back of the eye, forming the optic nerve, the bundle of nerves that carries messages from the eye to the brain. The brain uses information from the retina to make a mental picture of the world. The spot where the retina is attached to the back of the eye is called the blind spot. Because there are no light-sensitive cells at that spot, you can’t see anything that lands in that place on the retina. Under the retina, the back of the eye is covered with shiny, blue-green stuff. This is the tapetum. It reflects light from the back of the eye.
Adapted from: www.exploratorium.edu