Loading a Sensor Plug-In
This guide outlines the steps to load and configure a Sensor Plug-In from the BTAC home screen. Start by selecting the contact name, then access the drop-down menu to choose the sensor icon. You’ll find the BLUEFORCE Sensor Plug-In page, where you can browse through available Sensor Plug-Ins. Select the desired plug-in for installation, and confirm its success message. Learn to edit configurations, set the start options, and enable the sensor to get it fully operational. Follow the instructions carefully to manage your sensors effectively.

Loading a Sensor Plug-In
E N D
Presentation Transcript
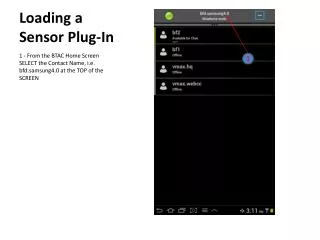
Loading a Sensor Plug-In 1 - From the BTAC Home Screen SELECT the Contact Name, i.e. bfd.samsung4.0 at the TOP of the SCREEN 1
Loading a Sensor Plug-In A DROP DOWN MENU will appear. 1 – SELECT the SENSOR Icon 1
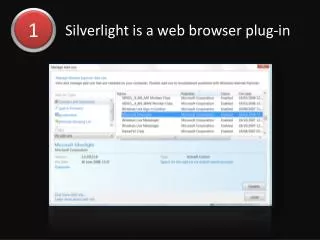
Loading a Sensor Plug-In The BLUEFORCE SENSOR PLUG-IN Page will appear. 1 – SELECT the All TAB 1
Loading a Sensor Plug-In SCROLL through the list of Sensor Plug-Ins until the desired Sensor Plug-In is located. 1 – SELECT the GREEN Arrow to INSTALL the desired Sensor A Message will appear saying “Plug-In Installed Successfully”, then disappear. 2 – A RED Trash Can will appear next to the Sensor plug-In name. If the RED Trash Can is SELECTED, the Sensor Plug-In will be DELETED. 3 – SELECT the Sensor Plug-In Name to configure the Sensor, if needed. 1 2 3
Loading a Sensor Plug-In 1 – SELECT Edit 1
Loading a Sensor Plug-In 1 – SELECT Configure Tab
Loading a Sensor Plug-In 1 – SELECT “SDCARD” Folder
Loading a Sensor Plug-In 1 – SELECT “BTAC_ReceivedFiles” Folder
Loading a Sensor Plug-In 1 – SELECT the “Select” Tab
Loading a Sensor Plug-In 1 – CHECK the BOX to “Start Sensor when BTAC starts”. 2 – SELECT “Done”
Loading a Sensor Plug-In 1 – SELECT “Sensor is off” to turn Sensor ON.
Loading a Sensor Plug-In 1 – Sensor is now ENABLED 2 – SELECT the RETURN Button twice to RETURN to the HOME PAGE