Creating a Login Process
Creating a Login Process. Creating a users table and a login form that denies access to unauthorized users. Creating a Login Process. Logging users in is an eight-step process: First, create a database containing a users table.

Creating a Login Process
E N D
Presentation Transcript
Creating a Login Process Creating a users table and a login form that denies access to unauthorized users
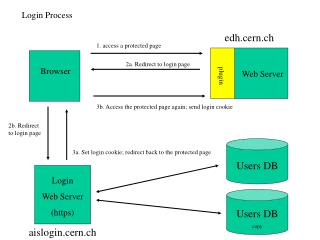
Creating a Login Process • Logging users in is an eight-step process: • First, create a database containing a users table. • Second, type into the users table the names and passwords of your authorized users. • Third, create the login form. • Fourth, create the page to which users will be sent if they log on successfully. • Fifth, create the page to which users will be sent when they are denied access. • Sixth, create a connection to the database containing the table of authorized users. • Seventh, add a login server behavior to the login page. • Finally, add a restrict access behavior to the other secret pages at your site.
Create the Database • Start Microsoft Access, pull down its File menu, and choose the option to create a new blank database. • When the File New Database dialog appears, name the database TopSecret.mdb, and save it in a folder that is not in Web space.
Create the Users Table • Double-click the option to create a table in Design view. When the Table window opens, create the following four fields. After you type each Field Name, press the Tab key, and a pull-down menu appears in the Data Type column. Pull down that menu and make the field’s data type match the ones illustrated here:
Save the Users Table • Pull down the File menu and choose Save; when the Save dialog appears, name the table Users. • When Access asks if you want a primary key, say yes. • Access will make UserID the primary key, because the autonumber data type makes each user have a unique UserID.
Populate the Users Table • Close the table by clicking its close icon. Then double-click the name of the table to open it in data entry mode. Type the following records into the table:
Create the Login Page • Use Dreamweaver to open the site in which you want to create the login form. • Pull down the File menu and choose New to bring up the New Document dialog. • Select the Dynamic Page category to make the Dynamic Page options appear. • Select ASP JavaScript and click the Create button; the new page appears. • Pull down the File menu, choose Save, and save the file in your site’s local root folder.
Create the Login Form • Set the Insert toolbar’s menu to forms. • Insert a form and create the following two text fields: • username • password • Insert labels to identify the username and password fields. • Insert a submit button and make its text be Login. • Use Dreamweaver to format the form as you wish, then save the file.
Create the Success Page • After the user logs in, there must be a page to which the user will be sent. • This is normally the site’s default page. • If this page does not exist, you must create it now.
Create the Rejection Page • If the login attempt fails, the user will be sent to a rejection page. • The rejection page often explains that access to the site requires an authorized username and password. • You may include instructions on how to get a logon, and you may include a link to the login page. • If the rejection page does not exist, you must create it now.
Make the Database Connection • In the Databases panel (Window > Databases) create a database connection to the database containing the table of authorized users. • Remember that the connection string has the form: "Provider=Microsoft.Jet.OLEDB.4.0;Data Source=C:\webs.oet.udel.edu\fthstudents\databases\yourLastName\TopSecret.mdb“
Add a Login Server Behavior • Open the login page containing your login form. • In the Server Behaviors panel (Window > Server Behaviors), click the Plus (+) button and select User Authentication > Log In User. • When the Log In User dialog box appears, complete the settings to match your login requirements.
Publish and Test • Publish the site and test it. • Try logging on as a valid user. Do you get in OK? • Enter bogus credentials in the login form. Does it reject you? • Troubleshoot any problems until you get the login process working.
Secure Other Pages • You can and should protect other pages at your site from access by unauthorized users. • To protect a page, open it with Dreamweaver. • In the Server Behaviors panel (Window > Server Behavior) click the Plus (+) button and select User Authentication > Restrict Access to Page.Note: Protected pages must be one of the dynamic page types, such as asp.