Medieval Tessellations
Medieval Tessellations. Math Project 4 th Quarter. Tessellation.

Medieval Tessellations
E N D
Presentation Transcript
Medieval Tessellations Math Project 4th Quarter
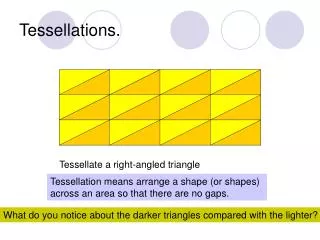
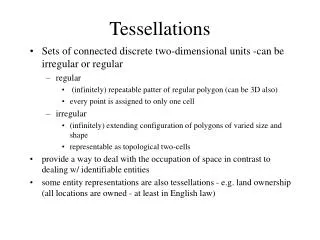
Tessellation The word tessellation comes from the Latin Tessella, which was a small Square stone or tile used in ancient Roman mosaics. Tiles and Mosaics are common synonyms for tessellations. A plane tessellation is a pattern made up of one or more shapes, completely covering a surface without any gaps or overlaps.Some shapes, or polygons, will tessellate and others will not. As for the regular polygons, tessellations can easily be created using squares, equilateral triangles and hexagons. I choose to use the equilateral triangle because of the unique visual arrangements it seems to lend itself to. It seems to both perplex and then amaze first the creator and then the viewer.
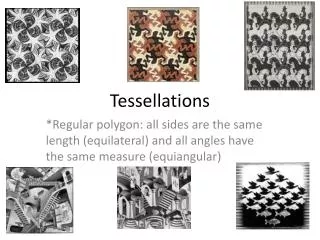
The King of Tessellations, M. C. Escher • Maurits Cornelis Escher (1898-1972) is a graphic artist known for his tessellations. His art is enjoyed by millions of people all over the world. He created visual riddles, playing with the pictorially logical and the visually impossible. • He is most famous for his so-called "impossible structures", such as Ascending and Descending, Relativity, his Transformation Prints, such as Metamorphosis I, Metamorphosis II and Metamorphosis III, Sky & Water I or Reptiles. What made Escher's pictures so appealing was that he used tessellations to create optical illusions. He also gave them depth by adding shade. • M.C. Escher, during his lifetime, made 448 lithographs, woodcuts and wood engravings and over 2000 drawings and sketches [You can buy a book at the bottom of this page that includes them all]. Like some of his famous predecessors, - Michelangelo, Leonardo da Vinci, Dürer and Holbein-, M.C. Escher was left-handed.
The King of Tessellations, M. C. Escher • M. C. Escher, Sky & Water I, woodcut, 1938M.C. Escher illustrated books, designed tapestries, postage stamps and murals. He was born in Leeuwarden, the Netherlands, as the fourth and youngest son of a civil engineer. After finishing school, he traveled extensively through Italy, where he met his wife Jetta Umiker. They settled in Rome, where they stayed until 1935. During these 11 years, Escher would travel each year throughout Italy, drawing and sketching for the various prints he would make when he returned home. • Many of these sketches he would later use for various other lithographs and/or woodcuts and wood engravings. He played with architecture, perspective and impossible spaces. His art continues to amaze and wonder millions of people all over the world. In his work we recognize his keen observation of the world around us and the expressions of his own fantasies. M.C. Escher shows us that reality is wondrous, comprehensible and fascinating. • Examining one of his woodcuts, Sky & Water I (right above), we see fish in the sea and as you go up, the space between the fish transform into black ducks. The tessellations are the fish shapes in white next to the duck shapes in white. Technically, the shapes at the top and bottom of his woodcut are no longer tessellations because they spread apart and the space around them no longer resemble fish or ducks.
M.C. Escher and Tessellation Drawings Website: http://www.mcescher.com/ Click on Galleries then Symmetry for examples of his works.
Gargoyles Website: http://davesgarden.com/guides/articles/view/2078/ Pictures Ideas:http://books.google.com/books?id=wrapjOyNdNQC&lpg=PP1&dq=gargoyles%20middle%20ages&pg=PA3#v=onepage&q=&f=false
Creating your Tessellation • Begin by drawing 3 half different symmetrical faces on the equilateral triangle. Draw half of a face (front view) next to each vertical line.
The faces should be as different from each other as possible, to provide variety in the design. • For examples - a clown. a cowboy & a little girl (or) an angel, the devil & a monster • The final designs rotate best if each of the three faces points in a different direction. In other words, if no two tops of heads point toward each other.
Each of the three faces should somehow fill the entire space available. • This is best done in a creative manner, for example - the hair on one head can become the fur collar on the next face when viewed from a different perspective. Another two faces might share lines and shapes that viewed one way looks like the crown of a queen, but from another angle becomes the shirt of a sailor. • The most difficult problem is utilizing the space in the center, of the triangle, between the three heads. It should not be left empty. It works best when somehow the shapes of the three 1/2 faces blend together to fill this space.
Students need to draw Medieval beasties. You should have one shape /form merge with another. • Website of Beasties: http://www.mostly-medieval.com/explore/ • Examples on next 3 slides
After the three faces inside one triangle are finished the lines should be darkened. (This makes them easier to trace and they will copy much better, later on the copy machine). • Next carefully fold the paper so that the two triangles line up precisely as seen through the folded paper. You may want to use the window to help trace. • Fold the rhombus on the centerline and that the edges of the paper need to line up.
Now carefully trace the image of the first triangle onto the second. • This traced reflection should be an exact copy (as much as possible) in order for later copies to match up with each other. • Darken the lines on the traced copy before making copies.
Place your name and class period outside the triangles . • Give your teacher your design and they will make twelve copies. • When you get your copies back cut out the 12 rhombus shapes, do it carefully and exact as possible, one at a time. They must be as precise as possible.
Practice laying out the design before trying to glue it down. • Arrange 6 shapes into a six-pointed star first. • Then the remaining shapes should fit in between the points of the star to create a hexagon.
Glue shapes down carefully, making sure they match. You may need to adjust shapes or overlap a bit to make everything fit. • Each error in drawing, folding, tracing, copying, and cutting multiplies the problems in getting the final design sections to align.
ADDING COLOR Colored markers make these tessellations really look fantastic. To do the color correctly (tessellate the colors also) each time a shape repeats in the design, the color should repeat as well.