Subscriber Mounting Considerations
300 likes | 314 Vues
Ensure successful wireless setup by following antenna mounting guidelines. Tips for installation, equipment, and troubleshooting included.

Subscriber Mounting Considerations
E N D
Presentation Transcript
Subscriber Mounting Considerations Ermanno Pietrosemoli EsLaRed-ULA ICTP, February 2002
Subscriber Mounting Considerations • ·Locate the antennas so that they have clear line of sight to the antennas at the opposite endpoint of the link. • ·There should be no obstructions within ±10 degrees azimuth of the antenna bore sight. • ·The elevation of the antennas should be sufficiently high, as to avoid any obstructions within –10 degrees elevation of the lower antenna. • ·Mounting the antennas close to the edge of the rooftop (on a flat top roof) helps to avoid problems with the latter requirement.
Typical Installation • Equipment • Two or more radios • Antennas (depend on install requirements) • Antenna Mount (skid, pole, wall mount, etc) • COAX Cable 50 Ohm LMR400 or LMR 600 • RP-TNC and N style connectors • Crimp and Soldering tools
Typical Installation • Before you install, DO A SITE SURVEY • Plot on a good map your LOS • Use a hand held GPS to get coordinates • Use a good spotting scope and find the other end • Look for other antennas on near by buildings • If Avail, use a spectrum analyzer • Do your Loss and Distance Calculations
Typical Installation • Make sure you follow local code and ord’s • Make sure you know the T&C’s for communities, gated, etc. • Adjust your AUP and or T&C’s to reflect • not responsible for WX issues (lightning,etc) • not responsible for interference • MTBR for down links can vary, have spare parts
Typical Installation • Do a “Test Install” first: • take a 4-6 foot pole and attach a 23dBi dish • connect to radio and search for other end • verify connectivity quality and strength • note general heading of antenna • note elevation (did you have to lift it up, etc) • now try antenna you plan to use
Typical Installation • Most important part of install (Antenna) • Make sure the mount is STRONG • Will NOT move in wind (antenna loads are high) • Well grounded, ground rod or similar • COAX is tied down with gentle sweeps • Lightning arresting equipment is grounded • Use a rubber mat for skids, to protect roof
Typical Installation • Keep COAX length S H O R T • No more than 100 feet • Extend reach on the Ethernet Side • Use FIBER to extend reach • Not affected by “plant / electrical noise” • Wonderful lightning protection
Typical Installation • Tape and secure ALL connections • Use 3M All Weather Tape • NOT Electrical tape or duct tape • Use BLACK Nylon Ties • White ones will break down in UV • If able, place COAX in conduit for protection
Interference from other buildings • Major building areas are big potential for problems
Troubleshooting / Problems • When troubleshooting: • try slower speeds • try different frequency ranges • verify connections • verify lightning arrest equipment • know your environment • Buildings along the path (new installs by others)
Troubleshooting / Problems • Interference can cause: • Packet loss because of poor queue depth • Packet resends • higher latency because of resends
Subscriber Mounting Considerations • ·Other considerations include proximity to the cable run to the rooftop. • ·When locating the antenna mast it is desirable to have it in close proximity to the building rooftop ground system if present. It then becomes a simple matter to provide a short, low resistance, connection to the building ground system.
Subscriber Mounting Considerations • ·Conditions for microwave path design must be considered such as Earth curvature and Fresnel zone clearance. • ·Observe local building and electrical codes when running all cables. • ·It is necessary to determine how the IF cables will be brought up to the rooftop from inside the building.
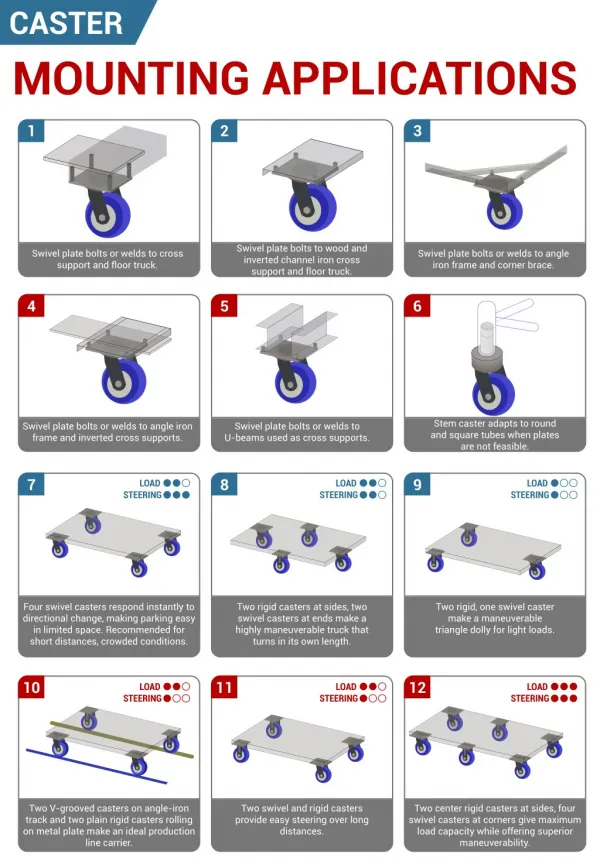
Mount Options There are three common types of system installations employed. They are non-penetrating roof mount antenna assemblies for use on flat top roofs and the wall mount assembly for use on existing structures such as chimneys or the sides of a buildings. If the antennas have to be mounted more than about 4 m above the rooftop, a climbable tower may be a better solution to allow easier access to the equipment and to prevent antenna movement during high winds.
Non-Penetrating Roof Mount • · For a non-penetrating roof mount assembly a mount made by Rohn, model number FRM125 or equivalent is recommended. • · At least 4 cement blocks (to be used as ballast) or equivalent, are also required. • · 1 piece of 90 cm x 90 cm rubber padding can be placed under the assembly to provide roof protection.
Wall mount • For applications where the roof is not flat or strong enough to hold the weight of the non-penetrating roof mount the wall mount is the most effective solution · This mount is affixed to the side of a building, wall or chimney
Wall mount • ·The structure must be capable of handling the weight of the mast, antennas, and transceiver plus wind loading stress. • ·This type of mount requires drilling four holes into the structure. • ·When mounting to masonry expansion type bolts or lead anchors should be inserted into the hole drilled as a means of attaching the mounting bracket to the structure.
Tower Mount • A climbable tower is normally made of aluminum with a triangular cross section, about 30 cm per side. • Each section is about 3 m long and several sections can be bolted together to attain the required height • The tower must be properly guyed to withstand the expected wind in the area, as well as to support the weight of the equipment and one person
Tower Mount • Many countries require special training for people to be allowed to work on towers above a certain height • A harness and adequate helmet must be worn when working on or below towers • Avoid working on towers during strong winds or storms
Self Supporting Towers • Self supporting towers are expensive but sometimes needed for the Base Station • An existing tower can sometimes be used for subscribers, although AM Transmitting station antennas should be avoided because the whole structure is active. • FM station antennas are O.K.
Ground Antenna Mast It is recommended that the antenna mast be grounded to either the building rooftop lightning ground system or to a separate earth ground system. The mast should be connected to the ground by a low resistance heavy gauge cable #10 stranded copper or larger is recommended. Use suitable ground clamps to attach the cable to the mast and the ground system. Make sure the cable is making a good electrical connection, remove all paint and corrosion from the area the clamp attaches to. Use dielectric grease on the clamp connection to prevent any electrolysis activity due to dissimilar metals.
Protect connectors from exposure • Connectors should be protected with special tape or compound, since humidity cropping in is the main observed cause of CPE failures • Cables should have dripping loops to prevent water getting inside the transceiver