
PCA: Loadings Plot (p1/p3)
PCA: Loadings Plot (p1/p3). Season. Conclusions: p3. Summer. INTERPRETATION Component 3: Summer chips vs. winter chips. Winter. So what have we accomplished?.

PCA: Loadings Plot (p1/p3)
E N D
Presentation Transcript
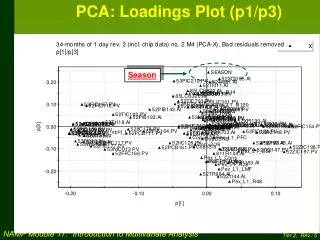
PCA: Loadings Plot (p1/p3) Season
Conclusions: p3 Summer INTERPRETATIONComponent 3: Summer chips vs. winter chips Winter
So what have we accomplished? Using PCA, we have determined that 45% of the variability in the original 130 variables can be represented by using just 3 new variables or “components”. These three components are orthogonal, meaning that the variation within each one occurs independently of the others. In other words, the new components are uncorrelated with each other. Component 3 Explains 6% SUMMER / WINTER REFINER THROUGHPUT Component 1 Explains 32% BRIGHTNESS Component 2 Explains 7% Example 1
What exactly are the new components? Each new component is simply a linear combination of the original variables. For instance in this case component 3 is nothing more and nothing less than the following equation: Component 3 = 0.242472 x “SEASON” + 0.159948 x “85LCS320.AI” + many more positive terms… – 0.224472 x “52ZI144.AI” – 0.214372 x “52TR964.AI” – many more negative terms… Obviously this equation, when written out fully, has 130 terms, one for each original variable. Many of these, however, have coefficients close to zero, meaning that they have little impact on that component. Example 1
What about the unexplained variance? • Our PCA model has captured 45% of the variability in the original dataset. What about the other 55%? • The unexplained variance has several sources: • We only retained three components. More variance is captured by the higher-order components, but much of this is noise and of no use to us as process engineers. • In any case, our linear model is a simplification of the original dataset, and so can never explain 100% of the variance. • Outliers and other problems with the original data can severely weaken the model (“Garbage in, garbage out”) • Some of the variables impacting the process were not measured (or may even be unmeasurable) • This last point is very important for our example, since many key chip characteristics including wood species were never measured. Example 1
Use of PLS Now we will have a brief look at the use of PLS, using the same data. An important pulp characteristic is average fibre length, because longer fibres make stronger paper. This characteristic is represented in our data by three variables: “Pex_L1_LMF”, “Pex_L1_R28” and “Pex_L1_R28”. We will designate these three variables as Y’s. The rest of the pulp characteristics were excluded from the PLS analysis. All the other variables were designated as X’s. PLS Example 1
Results for PLS Model This is the R2 and Q2 plot for the PLS model. The R2 values tell us that the first component explains 23% of the variability in the original Y’s, the second another 13% and the third another 8%, for a total of 44%. The Q2 values are only slightly lower, meaning that the model performs relatively well in predicting new Y values. Example 1
PLS: Score/Loadings Plot When doing PLS, one of the main things we want to know are which X’s are important to the model. In other words, which X’s are correlated with our Y’s? We can determine this by studying score and loadings plots which show the X’s and Y’s in relation to the new components. However, these plots can be messy and complicated to read, as shown on the next page. Note that the axes are labelled differently for the PLS plots. Instead of p(1), for instance, the abcissa is designated w*c(1). This refers to the dual nature of this plot, showing both X and Y space together. Example 1
PLS Loadings plot Interpretation of this messy and confusing plot is not obvious. We therefore turn to other outputs…
PLS: Other plots • We will now look at a number of different plots that can help us interpret the PLS results. • The first is the “X/Y Overview plot”, which gives R2 and Q2 for each original X. This tells us how well each original variable was modelled. Example 1
X/Y Overview Example 1
PLS: Other plots • The next type of plot is the “coefficient plot”, which shows the actual PLS equation in graphical form. Coefficients for each X are shown as positive or negative bars. Example 1
PLS coefficients Example 1
PLS: VIP plots Another very useful output is the ‘Variable Importance Plot’ (VIP) which ranks the X’s in terms of importance to the model. Note that, because no designed experiment has taken place, we cannot infer that these X’s influence the Y’s. MVA on its own does not prove cause and effect. All we can say is that they are correlated, meaning that they tend to change at the same time. The real cause may be external, like a change in raw material quality. Let’s have a look at the VIP plot. Example 1
“Variable Importance Plot” X’s These are the X’s that have the strongest correlation to our Y’s. Y’s Average fibre length variables Example 1
The most important X’s The most important X, according the VIP plot, is “Season”. This means that the fibre length varies more with the season than with any other X variable. The other X’s on the list are mainly refiner operating parameters such as dilution water flows, hydraulic pressures, and energy inputs. An expert on refiner operation would find these results interesting, but we will not examine them in detail here. Example 1
The limitations of PLS PLS results are difficult to interpret. It is always preferable to perform a PCA on the entire dataset first, to get a feel for the overall trends. One of the trickiest aspects of PLS is that the first component in the X space must correspond to the first component in the Y space, the second with the second, and so forth. Finding a physical interpretation for each of these can be extremely difficult. It is critical for the student to understand that only those X’s which were measured can be included in the PLS model. There is nothing magical about PCA or PLS. These techniques can only find patterns and correlations that existed in the original data in the first place. MVA is not magic Example 1
End of Example 1: We’re starting to tame the MVA lion!
2.2: Example (2) Using Fewer Variables
Why use fewer variables? One obvious problem with the previous example is that the plots are very hard to read, because there are so many variables. We will therefore look at smaller number of variables from the same dataset. There is another good reason for doing this. In the previous example, our first “throughput” component dominated the others, probably because so many process variables are associated either directly or indirectly with the overall flowrate through the system. In other words, there was a great deal of redundancy in our choice of variables. This was not inherently a bad thing, and we did manage to learn some useful things about our process, but perhaps by reducing the number of initial variables we can learn other things as well. Example 2
Iterative nature of MVA • At this point, our approach is probably starting to look CONFUSED. The student may be wondering: • Do we use all the data, or remove the outliers first? • Do we do PCA, or PLS? • Do we use all the variables, or fewer variables? • The answer is that MVA is very iterative, and there is no foolproof recipe. The results of one step guide the next. Sometimes you have to try different things to get useful results, bearing in mind what you know about the process itself and the dataset. • People who are adept at using MVA have a tendency to try all kinds of things, all kinds of different ways. In fact, just doing a basic PCA is the easy part. The difficult part is deciding what to try next, because there are countless possibilities. Knowledge of the process itself is key, which is why this is a job for chemical engineers and not statisticians. Example 2
Which variables to use? Getting back to the example, we made a ‘short list’ of key variables based on our knowledge of the process itself. Just because hundreds of variables are available does not mean that we are obliged to use them all for each MVA trial. The variables related mainly to chip quality (density and moisture content) and to pulp quality (brightness, consistency, …). Also included were “SEASON”, given its prominence in the previous PCA analysis, bleach consumption and specific refiner energy. In all, only 14 variables were used. ? Example 2
PCA on 14 variables This is the R2 and Q2 plot for the 14 variables. The MVA software only found 2 components, which is not uncommon when there are so few initial variables. The first component explains 28% of the variability in the original data, the second another 16%, for a total of 44%. The Q2 values are much lower, with a cumulative of barely 24%. This means that the predictive value of the model is much lower than before. This is hardly surprising, since the inherent information contained within the 116 excluded variables is now missing. Example 2
Score Plot for 14 variables The score plot for the 14 variables is shown on the next page. It is impossible to create a 3-D score plot in this case, since there are only 2 components. The vast majority of the days fall on or near the first component. Is is plainly obvious from this graph that the first component is related to individual seasons, with clear segregation between the three years. Note how this first component resembles the second component from example 1 (more on this later…) Autumn: Sep 1 – Nov 30 Winter: Dec 1 – Feb 28 Spring: Mar 1 – May 31 Summer: Jun 1 – Aug 31 Example 2
Score Plot 2nd component strongly influenced by these points Autumn: Sep 1 – Nov 30 Winter: Dec 1 – Feb 28 Spring: Mar 1 – May 31 Summer: Jun 1 – Aug 31 Jun 25 – Jul 1, 01 Aug 8 – 12, 01 2002 2000 2001 2000 2001/2002 SUMMER WINTER INTERPRETATION Component 1: Individual seasons
Second component The second component is largely influenced by the observations in the upper-right quadrant (remember, it is the observations that influence the components, not the other way around). Looking back at the original data, we saw that these observations fell within certain specific periods in June and August 2001. What differentiated these periods from the rest of our three-year timeframe? Trying to figure this out by looking at the original data would be very tedious, if not impossible. We therefore make use of the ‘Contribution plot’ for one of the dates of interest. The contribution plot shows the values of the original variables for that observation point (June 29, 2001) relative to the average of all the observations taken together. It gives us a quick, visual answer to “What’s different about this observation?” Example 2
Contribution Plot: June 29, 2001 More fines than average Fewer long fibres than average
Contribution plot results The bars on the contribution plot graph tell an important story: during the period of interest, the refiners generated more fines than usual, and fewer long fibres. It appears that the refiners were chopping up the fibres, eliminating the longest size fractions while generating fine fragments. This is not a desirable process performance, and therefore a significant finding. A study of the loadings plot confirms that the second component is definitely related to fibre length (variables in red ovals). Note that a variable does not have to lie directly upon a component to influence it; in this case, very few of the variables are close to the component line, yet clearly they are affecting it. Their distance from the axis merely means that they are also related to the first component. Note that specific energy is also related to the second component (green oval). This is highly significant, since it is this energy that chops the fibres! Bleach consumption, pulp brightness and season are related to the first component (blue ovals). Again, this is similar to example 2. Example 2
Loadings Plot INTERPRETATION Component 2: Fibre length - _Blan +
Same two components? The most striking difference between the example 1 results and the example 2 results is that the “throughput” component has disappeared. This is because we have removed all the variables that relate to this process parameter. This leaves us to wonder if the two components we found in example 2 are just the second and third components from example 1. In other words, now that we’ve eliminated throughput, the next most significant component has been “promoted” to become the first component, and the third to second. Because all components are statistically independent, this is plausible. 1 2 3 The physical interpretations of these components seem to be compatible, so this shift is entirely possible. If so, a comparison of examples 1 and 2 could give us further insights into the process. X Example 2
Was it worth trying fewer variables? Absolutely! We were able to generate cleaner, easier to interpret graphs, while focussing on the variables we were the most interested in. Once again, we saw the importance of Season, lending credence to our physical interpretations in Example 1. Other similarities with the example 1 results, particularly the two components themselves, could yield further insights about what is actually going on in the process. However, the Q2 for this bare-bones case is quite low, meaning this model has poor predictive value. Also, a great many important variables were left out completely, so this is not a full picture, but rather an additional view of our original dataset. Example 2
End of Example 2: Getting smarter…