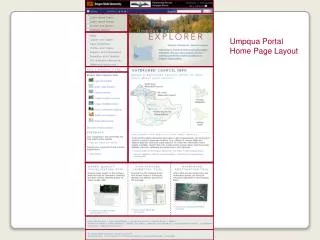
Page Layout
Page Layout. creating a page layout. With the index.htm and recipe.htm pages you created, you got some hands-on practice creating different kinds of design elements using HTML tags and CSS.


Page Layout
E N D
Presentation Transcript
creating a page layout • With the index.htm and recipe.htm pages you created, you got some hands-on practice creating different kinds of design elements using HTML tags and CSS. • And while they're perfectly acceptable as Web pages, most websites actually use a layout that makes it easy to recognize what site you're in—and easy to get from one page to the next within the site (assuming the site has more than one page).
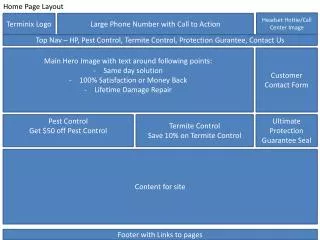
Header • As you can see, there are three sections (also called page divisions). • The top section, or division, is usually referred to as the header or branding bar. • Studies have shown that the first place most people look when viewing a page is the top left corner. • The header (or branding bar) often contains brand-name information about the site, such as a corporate logo
If the site contains multiple pages, the navigation barsection comes next, under the header, and it contains links to other pages within the site. • The third section down is sometimes called the main content or content area. • And that section can contain anything—text, pictures, lists, tables—whatever it takes to best convey the information you're trying to convey.
Create a Page Layout • Modern Web pages are often organized into a page layout that consists of multiple sections or page divisions. In HTML, we use these two simple tags to define each page division: <div> </div> • The <div> tag marks the top or start of a division, and </div> marks the end of the division.
div tag • Since any page might contain multiple divisions, we often use multiple pairs of div tags in a page. • To give each one a unique identity that we can apply styling to, we assign a name using the id= attribute, followed by the name enclosed in quotation marks. • The name can be anything you like, so long as it starts with a letter and doesn't contain any blank spaces. • For example, the first division on the top of the page is sometimes referred to as the page header, and so the div is also often named header as below. <div id="header"> </div><!-- End header -->
Nav bar • The next page division under the header is often the navigation bar, or navbar for short. Its name is often navbar or nav or something similar, and its tags might look like this: <div id="nav"> </div><!-- End nav --> • In between those tags, you'd put the code and content for a navigation bar. • As always, the comment after the closing tag is optional, but it's a good idea, because it makes it easy to see which division that </div> tag is closing.
Note • HTML5 has <header> and <nav> tags that can be used in place of divs. • HTML5 is still very much in the early experimental stages and doesn't work in all current browsers. • Web developers continue to use named divs, like those above.
main • After the navigation bar comes the main content area. Its name is often main or content, and its tags look like this: <div id="main"> </div><!-- End main --> • So basically, we use a pair of div tags to define each major page division in the layout. • We assign an id name to each division, because (as you'll see shortly), that allows us to create a CSS style rule for each one.
Note that these new tags don't replace or undo anything you've already learned in this course. Every page that you create still requires all of the mandatory tags you've learned about in previous lessons, including the html, head, title, and body tags. • Let's go ahead and create a page that contains all of the mandatory tags as well as tags for three page divisions. We'll start with the code and a little temporary placeholder text. Follow these steps: • Open the program you normally use to create and edit Web pages. (If you've been following along in this course without any prior experience, that's probably Notepad in Windows or TextEdit on a Mac). • Type (or copy and paste) all of the following code into the page:
Update sample <!DOCTYPE html> <html> <head> <title>My Layout</title> </head> <body> <!-- Header division --> <div id="header"> Header content goes here </div><!-- End header --> <!-- Navbar division --> <div id="nav"> Links go here. </div><!-- End nav --> <!-- Main content division --> <div id="main"> Main content goes here. </div><!-- End main --></body> </html>
Creating the Style Rules • The next step is to start styling the divisions. • Styling has to do with colors and such, and it's typically done with CSS style rules in the professional world of Web design. • A style rule is a set of CSS property:value pairs that define the style of an element. • There's a selector that describes the element that the style applies to, followed by the property:value pairs that describe the style.
Style Rules • saw style rules that apply to different types of html elements. • For example, the body{} style rule applies to the body element, which is defined by <body>...</body> tags. • And the h1{} style rule applies to h1 headings (any text between <h1>...</h1> tags).
With named divs, the style rule selectors work a little differently. • You don't want to use div as the style rule selector, because that style rule would apply to all divs on the page—not to just one particular page division. • When you want a style rule to apply to a specific named element, you need to use the name, preceded by a # sign, as the selector. • For example, this style rule applies only to the element named header: #header { }
div style tags • Or in other words, it applies only to the element whose opening tag contains id="header". So any property:value pairs you put in that style rule apply only to text between these tags in the page: <div id="header"> </div><!-- End header --> • Let's examine another example. Take a look at this style rule: #nav { } • The #nav means apply this style to the element with id="nav" in its opening tag. So that style rule applies to anything
Styling the Divisions • But we only included some styled divisions and temporary placeholder text so far, so it doesn't really look special when we view the Web page in a browser. • Start styling those page divisions by adding an internal style s • Move the cursor just past the </title> tag near the top of the page, and press ENTER to start a new line after that one. • Type <style type="text/css"> (which is the tag to start the internal style sheet), and then press ENTER a couple of times. • Type </style> (the closing tag for the internal style sheet), just so you don't forget to type it later. • Move the cursor so it's inside the internal style sheet (between the <style type="text/css"> and </style> tag).
#header { background-color: #fe9900; color: white; } #nav { background-color: #ffff66; text-align: center; } #main { }
Three style rules added to the internal style sheet • The first style rule we added applies an orange color (#fe9900) to the background of the div namedheader, and it sets the text color inside that div to white. • The second style rule applies a yellow shade (#ffff66) to the div named nav, and it centers text inside that div. • Nobody knows or memorizes all the color hex codes. • The third style rule is for the div named main. We haven't put any property:value pairs in that one yet, so it won't have any impact on the style of that div. But the style rule is in place, and you can add property:value pairs at any time in the future.
Creating a Navigation Bar • Our layout still isn't too impressive yet, because at the moment, it only contains some generic placeholder text. • It doesn't really have anything in the way of content. • By content, I mean the words and pictures that the site is about. And those can be anything your heart desires. • You can use any tags and any CSS property:value pairs you'd like to define and style your content. • But you do want to think in terms of page divisions. You don't want to just start throwing stuff into the page at random. • The idea behind that page division is to present links that lead to other pages within the same site. • Of course, a website can have only one page—in which case, there'd be no need for links or a navigation section to put the links into.
Nav Bar Questions • To create a navigation bar for your own site, you first have to make a couple of decisions: • How many pages do I want in my site? • What will I name those pages? • You don't need to make those decisions right this moment.
CSS width: property • As its name implies, that property allows you to define how wide you want an element to be. • You can specify the width in pixels (using px) or in percent (using %). • The % is good when you want to create equal-width columns, because you just divide 100 by the number of items you want included it the width to determine the percent width of each column. • For example, if you were to have five items, each would have a width of 20% (100 divided 5). • If you wanted four items, each would have a width of 25% (100 divided by 4). • If you have three items, each would have a width of 33.3%. (You can't use fractions like 1/3 or 1/2 in CSS or most other programming languages. You have to use a decimal point.)
The navigation bar on most Web pages contains links to other pages within the site. • There's no rule that says your site must have multiple pages though. So that division is optional. • Create a relatively simple, nice-looking navigation bar for a site with five pages in it. • Use a table cell for each link. • To make them equal in width, I'll make each of the five cells 20% the width of the table, so the widths total 100%. • Follow these steps to try it out: • Open layout.html in your editor (or just switch to that window if it's still open from the previous chapter). • Click inside the navigation bar division (between the tags <div id="nav"> and </div><!-- End nav -->). • Delete the temporary placeholder text Links go here.
nav table <table style="width: 100%" cellspacing="2" cellpadding="2"> <tr style="background-color: #ffcc33;"> <td style="width: 20%"><a href="index.html">Home</a></td> <td style="width: 20%"><a href="products.html">Products</a></td> <td style="width: 20%"><a href="services.html">Services</a></td> <td style="width: 20%"><a href="about.html">About Us</a></td> <td style="width: 20%"><a href="contact.html">Contact Us</a></td> </tr> </table>
A Look at the Code • We used a table to contain the navigation bar. (You learned about tables in Lesson 5.) • The table starts with <table> and ends with </table>. The opening <table> tag looks like this: <table style="width: 100%" cellspacing="2" cellpadding="2"> • The width:100% ensures that the table is the full width of the browser window. • While not a technical requirement, it does give the navigation bar a nice look and makes it easy to make equal-sized cells for links across the table. • The cellspacing and cellpadding attributes add a couple pixels of empty space between and inside the table cells.
The <tr>...</tr> tags define a single table row. • In the opening <tr> tag, we use an inline style to set the row's background color to #ffcc33 which is the orange color you see on each button. • The lighter yellow color between table cells is the navbar division's background color. • We defined this in the #nav style rule by setting its background color to #ffff66.
Each link is contained in a table cell that is 20% the width of the table. • The opening tag for each cell is <td style="width: 20%">, and the closing tag is </td>. • We used 20% because there are five cells, and we want their widths to total 100% to fill the width of the table.
Inside each table cell is a link. • This link (below) refers to a page named products.html that we never created: <a href="products.html">Products</a> • So when you click the link text (the underlined word Products) in the Web browser, you get an error message. • Rather than painstakingly typing each page from scratch, we can start each page using code that's in the layout page. • That can save a lot of typing, a lot of testing, and a lot of finding and correcting errors!
A Look at the Page Names • Even though those pages don't exist, you'll notice we used relatively short, simple filenames like • index.html, • products.html, • services.html, • about.html, and • contact.html. • You're free to come up with whatever pages you want for your site, and you can name them pretty much whatever you want. • But remember, every Web page must have an .htm or .html extension. • There's no difference and no advantage or disadvantage to either one, so feel free to use whichever extension you like.
Layout Summary • To define a division in a Web page, we use <div>...</div> tags. • Because a page usually consists of multiple divisions, we often assign each division a unique identity (name) using an id= attribute. • The name you give to a division can be any name you like, so long as it starts with a letter and doesn't contain any blank spaces. • the first division is often named heading using <div id="header"> as the tag. • The next division, which often contains links to all of the pages within the site, is called the navigation bar. • And the div tag for that one might be <div id="nav"> or something similar. • Then, the main content for the page comes next and is often enclosed in a division that starts with <div id="main">. • The main reason for giving each division a name is so that you can create a style rule for each, which allows you to define its coloring and other stylistic features. • Normally, the selector for a style rule is the tag that you want the style rule to apply to. For instance, when creating a style rule for h1 elements, you just use h1 as the selector. • When you want to associate a style rule with an id name rather than an element type, you have to use a # sign in front of the name to indicate an id. • So the selector for an element that contains id="header" is #header.
So far, the page header in sample.html just contains some placeholder text. • Open sample.htmlfor editing in Notepad • Put the text inside the header div, and delete the placeholder text that reads Header content goes here. • With the cursor still in between the <div id="header"> and </div><!-- End header -->, carefully type the following: • <h1 style="margin:0">Lou's Records</h1> • Verify that you typed the code correctly inside the header page division, as shown in this image: • Open sample.htmlin a Web browser. Or if it's already open in a Web browser, Refresh or Reload the page there.
Putting style="margin:0" in the h1 tags removes the default margins from the heading, thereby removing the strange empty white space below the heading and bringing the navbar up right under the orange header division. • If you prefer to center the text in the header, just add text-align:center to your #header style rule, as below: #header { background-color: #fe9900; color: white; text-align:center; }
Homework • Make a homepage for your website. • The website must have • A logo (or picture in the header area) • A title • A nav bar • Some content • Print (or write down) your index.html files and bring them to class tomorrow.