Download
1 / 36
370 likes | 758 Vues
Arduino-BOT Lecture #1 EGR 120 – Introduction to Engineering. Introduction to the Arduino-BOT. Arduino-BOT Lecture #1 EGR 120 – Introduction to Engineering. References : 1) Arduino -BOT Lectures #1-5 - http://faculty.tcc.edu/PGordy/Egr120/

E N D
Arduino-BOT Lecture #1 EGR 120 – Introduction to Engineering Introduction to the Arduino-BOT
Arduino-BOT Lecture #1 EGR 120 – Introduction to Engineering References: 1) Arduino-BOT Lectures #1-5 - http://faculty.tcc.edu/PGordy/Egr120/ 2) Robotics with the Board of Education Shield for Arduino web tutorials - http://learn.parallax.com/ShieldRobot 3) Board of Education Shield for Arduino documentation - http://www.parallax.com/Portals/0/Downloads/docs/prod/robo/35000-BOEShield-v1.2.pdf Arduino web site (software, microcontrollers, examples, and more) - http://www.arduino.cc/ Much of the information in this presentation comes from these online tutorials from Parallax
Arduino-BOT Lecture #1 EGR 120 – Introduction to Engineering 3 Robotics Why study robots? 1) Applications– There are creative uses of robots all around us in fields such as space exploration, undersea mapping, manufacturing, medicine, navigation, military applications and more. 2) Fun– Most engineering students have a fairly broad exposure to computers, but few have used computers to communicate with external devices. A robot is little more than a specialized computer used to read input devices (sensors) and to control output devices (motors, relays, servos, lights, sirens, etc.) It is challenging and fun to use computers to accomplish tasks and the applications are unlimited. 3) Common usage– A large number of introductory engineering courses around the country include robotics projects. Students are also commonly involved in robotics-based team competitions, such as the ASEE Model Design Competition or the IEEE Autonomous Vehicle Competition.
Arduino-BOT Lecture #1 EGR 120 – Introduction to Engineering 4 ASEE Model Design Competition TCC Engineering students have built a number of vehicles for the ASEE Model Design Competition that have been powered by the BASIC Stamp or Arduino microcontrollers.. This TCC vehicle followed a black line on a track by using the BASIC Stamp to read four optical sensors and to steer the vehicle by changing the speed of each rear wheel separately (powered by servos). Infrared sensors
Arduino-BOT Lecture #1 EGR 120 – Introduction to Engineering 5 This TCC vehicle was designed to climb over barriers on the track instead of following a black line around the barriers. The BASIC Stamp read one optical sensor which counted wheel revolutions. The BASIC Stamp also controlled relays to reverse the tank’s direction at the turn point (after a certain number of wheel revolutions) and stopped the tank at the end of the course.
Arduino-BOT Lecture #1 EGR 120 – Introduction to Engineering 6 This TCC vehicle had to navigate a difficult figure-8 track with sharp hills and valleys. It featured a body that twisted in the middle to maintain traction. The BASIC Stamp was used to read three optical sensors to follow a line and then turned a servo for steering. Additionally, the BASIC Stamp was used to slow the inside rear wheel on the sharpest turns to assist the steering.
Arduino-BOT Lecture #1 EGR 120 – Introduction to Engineering 7 • Selecting a robot: • The key component to a robot is the computer (or microprocessor or microcontroller) that serves as its “brain.” Some features to consider in a microcontroller are: • Number of input/output ports • Programming language • Complexity (time required for students to learn to use it) • Cost • Size • Power requirements • Support (such as documentation and sample code that is readily available online)
Arduino-BOT Lecture #1 EGR 120 – Introduction to Engineering 8 • Potential choices: • 1) Lego Mindstorm • Easy to use • Limited to three inputs/outputs • Somewhat oversimplified with all snap-together pieces • 2) Handy Board • A computer board powered by the 68HC11 microprocessor that can be easily used to power robots. • The 68HC11 is commonly used in junior/senior courses in EE (as part of a microcontrollers course) • Supports many advanced features and has 14 input/outputs • More difficult to program (assembly language or C)
Arduino-BOT Lecture #1 EGR 120 – Introduction to Engineering 9 • 3) BASIC Stamp BOE-BOT • Easy to program (using a version of BASIC) • 16 input/outputs (digital) • Easy to use editor • Used in EGR 120 for previously • Arduino-BOT • BOE-BOT above modified to use the popular Arduino microcontrollers • Several Arduino microcontroller models can be used. • Arduino programming language based on C/C++ which will be used later EGR 125 and EGR 262. • Great online resources • Used in EGR 120 currently
Arduino-BOT Lecture #1 EGR 120 – Introduction to Engineering 10 Arduino Microcontrollers Arduino produces several versions of microcontrollers. Three of these have been tested with the Arduino Shield, a development board produced by Parallax which works nicely with the BOE-BOT. These three microcontrollers are: • Arduino UNO R3 • Atmega 328 microcontroller • 14 digital I/O pins • 6 analog I/O pins • 16 MHz clock speed • 32 kB flash memory • Used in EGR 120 • Arduino Duemilanove • Atmega 168 microcontroller • 14 digital I/O pins • 6 analog I/O pins • 16 MHz clock speed • 16 kB flash memory • Arduino Mega 2560 R3 • Atmega 2560 microcontroller • 14 digital I/O pins • 6 analog I/O pins • 16 MHz clock speed • 256 kB flash memory For more information - www.arduino.cc
Arduino-BOT Lecture #1 EGR 120 – Introduction to Engineering 11 The Board of Education Shield for Arduino The Parallax Board of Education Shield for Arduino allows different Arduino microcontroller boards to be plugged into the bottom on the board, leaving the top of the board free for access to I/O pins, servo ports, LEDs, and a breadboard. Arduino UNO Microcontroller plugs into the bottom of the shield The Arduino Shield with the Arduino UNO is ready to be mounted on a BOEBOT. Arduino Shield
Arduino-BOT Lecture #1 EGR 120 – Introduction to Engineering 12 The Board of Education (BOE) Shield for Arduino
Arduino-BOT Lecture #1 EGR 120 – Introduction to Engineering 13 • Power Switch • The BOE Shield for Arduino comes with a 3-position power switch that operates as follows: • 0) Power off • Power to breadboard, but not to servo ports. • Power to breadboard and to servo ports. LED lit when servo ports are powered LED lit when breadboard is powered Note: Position 1 is useful for downloading programs that don’t use the servos or when you don’t want the servos to start turning quite yet. 3-position switch
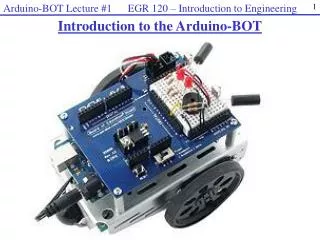
Arduino-BOT Lecture #1 EGR 120 – Introduction to Engineering 14 The Arduino-BOT The Arduino-BOT is a robot with a Board of Education (BOE) Shield mounted on it and the Arduino UNO microcontroller under the shield. We will learn to program the Arduino-BOT in this course. Arduino UNO
Arduino-BOT Lecture #1 EGR 120 – Introduction to Engineering 15 The Arduino-BOT Arduino Shield Breadboard on the shield is convenient for connecting sensors or other circuits. Arduino UNO mounted under the shield Batteries mounted under the chassis power the BOE, servos, and other devices. Drive wheels mounted on servos. Steering is accomplished by turning one servo faster than the other. Free rolling rear wheel (or used as front wheel) Chassis has numerous holes for mounting sensors.
Arduino-BOT Lecture #1 EGR 120 – Introduction to Engineering 16 • Powering the Arduino-BOTThe Arduino can be powered using: • USB cable (5V input) • 4 AA Batteries ( ≈ 6V input) • 5 AA Batteries (≈ 7.5V input) – recommended since specifications for the Arduino call for a 7-12V input. The Arduino will also run longer using 5 AA batteries. • If both the USB and (strong) batteries are connected, the Arduino will select the batteries • Using the USB only is fine for downloading programs, but will give limited voltages for other uses as noted below (results from one Arduino-BOT tested in lab): * Assuming that the jumper on shield is in the 5V position
Arduino-BOT Lecture #1 EGR 120 – Introduction to Engineering 17 Powering the Arduino-BOT Power through USB connection Power through AA battery pack Be sure to unplug the battery packconnection at the end of each class or else it will continue to power the Arduino and will drain the batteries.
Arduino-BOT Lecture #1 EGR 120 – Introduction to Engineering 18 • The Arduino Programming Environment • The Arduino software (Arduino 1.01 or later) is available on lab computers and can also be downloaded from http://arduino.cc • The software requires no installation and can even be launched from a flash drive. • Open Arduino in the Arduino-1.0.1 folder as indicated below • The file opened is referred to as a “sketch” and will be automatically named using the date. You can rename it if you wish. The file below has the name sketch_jul06a.ino
Arduino-BOT Lecture #1 EGR 120 – Introduction to Engineering 19 • Notes: • Verify is used to compile your program (or sketch). (It checks for errors). • Upload is used to send the program (sketch) to the Arduino-BOT via the USB cable. • Arduino programs have two main parts: • setup – a function to initialize items or to perform operations one time. • loop – a function with commands that will be repeated indefinitely • Serial.begin(baud rate) is used to establish serial communications between the Arduino-BOT and the computer. Data is transmitted at 9600 baud (bits/second). Note that Serial uses digital pins 0 and 1 so they cannot be used for other inputs/outputs. • Serial.print(text, values, or variables) is display information from the Arduino-BOT on the display window. • Select Serial Monitor to open a window to view printed messages from the Arduino-BOT. The Arduino Programming Environment The Arduino software is based on C/C++. Note that the instructions are case-sensitive. C++ is not line-oriented, so a semicolon (;) is needed to indicated the end of an instruction.
Arduino-BOT Lecture #1 EGR 120 – Introduction to Engineering 20 More on functions Functions in C/C++ have a particular structure as indicated below for the setup function. • Functions execute a series of statements contained within curly braces. • Functions begin with a particular form: • return_type function_name (parameter_list) • In the case above, the return_type is void (no output), the function_name is setup, and the parameter_list (typically inputs) is empty. • Both statements in the body of the setup function are calls to functions in Arduino’s Serial library. We will introduce more useful functions as we continue in this course.
Arduino-BOT Lecture #1 EGR 120 – Introduction to Engineering 21 Want more information? For more info on the Arduino programming language, select Help – Reference.
Arduino-BOT Lecture #1 EGR 120 – Introduction to Engineering 22 Online tutorials are available from Parallax at http://learn.parallax.com/ShieldRobot Tutorial Topics
Arduino-BOT Lecture #1 EGR 120 – Introduction to Engineering 23 Example – Printing a message repeatedly The previous program was modified. The Serial.print(“Hello!”) instruction was moved into the loop function. Now it will be written to the output screen repeatedly. • Notes: • The following instruction causes a delay of 1000 ms or 1 second. • delay(1000); • Hello! is now printed to the display window once per second. • If we want each Hello! statement printed on a new line, we can used the following command: • Serial.println(“Hello!”)
Arduino-BOT Lecture #1 EGR 120 – Introduction to Engineering 24 Controlling Lights (LEDs) with the Arduino-BOT In our first lab we will control lights (LEDs) using the Arduino. First we need to introduce two new components: 1) Resistors 2) Light-emitting diodes (LEDs)
Arduino-BOT Lecture #1 EGR 120 – Introduction to Engineering 25 Resistor - A resistor is a component that resists the flow of electricity. This flow of electricity is called current. Resistance is measured in ohms, and the sign for the ohm is the Greek letter omega (Ω). There may be a fourth stripe that indicates the resistor’s tolerance. Tolerance is measured in percent, and it tells how far off the part’s true resistance might be from the labeled resistance. The fourth stripe could be gold (5%), silver (10%) or no stripe (20%). Example: R = 470 What is the value of R for a resistor with the colors brown-black-orange-silver? R = ________________
Arduino-BOT Lecture #1 EGR 120 – Introduction to Engineering 26 Resistor Color Code Calculator – A quick online search will yield many resistor color code calculators. An example is shown below. The instructor for this course will typically let you know what value (and color) resistors to use, but it is a good idea to check the values as well. http://samengstrom.com/24614782/en/read/4_Band_Resistor_Color_Codes
Arduino-BOT Lecture #1 EGR 120 – Introduction to Engineering 27 LEDs – A simple device that we can control with the BASIC Stamp is an LEDor light-emitting diode. LED’s are simple lights easily controlled using the 5V output from the Arduino. You commonly find LED’s on all sorts of electronic equipment. You computer monitor and keyboard probably uses small LED’s that light to let you know when the power is on. • Polarity – An LED has a positive terminal (anode) and a negative terminal (cathode) so you must be careful to place it in a circuit in the correct direction (correct polarity). You can tell which terminal is which in two ways: • The lead for the anode (+) is • typically longer. • There is a flat side to the LED • by the cathode (-). Long lead (+) Flat side (-)
Arduino-BOT Lecture #1 EGR 120 – Introduction to Engineering 28 Current limiting resistor (direction doesn’t matter) LED anode (+) connected to positive (+) side of battery LED cathode (-) connected to negative (–) side of battery LED Brightness – The brightness of an LED is related to the amount of current passing through it (or the number of electrons passing though it). A device called a resistor is generally placed in series with the LED to limit the amount of current. When 5V is used to light the LED, resistor values from 200 ohms to 470 ohms are commonly used (the LED is brighter with 200 ohms than with 470 ohms). Using no resistor will result in too much current and will often destroy the LED. The resistor is often referred to as a current-limiting resistor.
Arduino-BOT Lecture #1 EGR 120 – Introduction to Engineering 29 Breadboard – The Arduino-BOT comes with a convenient circuit board called a prototype board or a breadboard where circuits can be easily connected to the Arduino. In addition to giving a handy place to build circuits, the breadboard gives ready access to: 5V, 3.3V, and Vin These connections are like the positive end of a battery (the negative end is at GND). Vin is the battery voltage when using batteries (perhaps 6-7V). Digital Inputs/Outputs 0-14 Digital values should be 0V (LOW) or 5V (HIGH). Analog Inputs 0-5 Analog input values can range from 0V to 5V Ground (GND) This is like the negative (-) terminal of a battery. All voltages (3.3V, 5V, etc.) share a common ground. breadboard
Arduino-BOT Lecture #1 EGR 120 – Introduction to Engineering 30 Controlling two LEDs with the Arduino– Suppose that we want to use digital outputs 12 and 13 from the Arduino to turn on and off two LEDs. We could wire the circuits on the breadboard as shown below. Be sure that the cathodes (-) of each LED are connected to GND and not the anodes. What value resistors are used here? (red-red-brown-gold) R = _____________
Arduino-BOT Lecture #1 EGR 120 – Introduction to Engineering 31 Sample program – The program below will blink the LED connected to digital pin 13 once per second. • Notes: • pinMode( )can be used to specify whether a pin will be an INPUT or an OUTPUT • Recall that C++ is case-sensitive! • digitalWrite( ) can be used to set an output HIGH (5V) or LOW (0V). • How could the program be modified to blink both LEDs at the same time? Alternating?
Arduino-BOT Lecture #1 EGR 120 – Introduction to Engineering 32 Variables and loops– Suppose that we wanted to blink an LED a certain number of times? To do this we need to see how to declare variables in C++ and to form loops. Declaring variables in C++: We will consider three types of variables: int – used to declare integer variables (ranging from -32768 to 32767) float – used to declare floating point variables (values with a decimal point) char – used to declare character variables (single symbols within single quotes) Examples: inta,b,c; // declare integer variables a = 25; // assign value to integer variable int d = -21; // declare and assign value char c = ‘m’; // declare character variable and assign value float g =-9.81 // declare floating point variable and assign value
Arduino-BOT Lecture #1 EGR 120 – Introduction to Engineering 33 Using variables with the Arduino
Arduino-BOT Lecture #1 EGR 120 – Introduction to Engineering 34 for loop in C++: Several types of looping structures can be used in C++. We will only consider the for loop. The for loop is especially useful when you want to execute instructions in the loop a specific number of times. See the example below. Form: for (initialization; condition; increment) { // body of loop } Note: C++ sometimes uses shortcut operators to increment, decrement, or change variables in loops. i++ means add one to i j-- means to subtract one from j k+=2 means add 2 to k
Arduino-BOT Lecture #1 EGR 120 – Introduction to Engineering 35 Blinking an LED a specific number of times The program below can be used to blink an LED (on digital pin 12) 10 times.
Arduino-BOT Lecture #1 EGR 120 – Introduction to Engineering 36 • Comments • Comments are an important part to computer programs. • Comments allow you to explain your code to someone reading or using the code. • // is used to indicated a comment in C++ • Tips for good comments: • Do not explain how C++ works. Explain how you are using the code. • Example: • digitalWrite(12, HIGH); // make digital pin 12 HIGH • (Weak comment. Why are you making it HIGH?) • digitalWrite(12, HIGH); // turn on LED (pin 12) • (Good comment) • Explain similar instructions only once. • Example: • digitalWrite(12, HIGH); // turn on LED (pin 12) • delay(500); // wait 500 ms = 0.5 s • digitalWrite(12, LOW); // turn off LED (pin 12) • delay(500); // wait 500 ms = 0.5 s (unnecessary comment - repeated)