Lower extremity
Lower extremity. Intended Learning Outcomes. The student should be able to recognize clinical radiographic technical principles of the lower limb. A-P Lower Leg. Measure: A-P at mid-lower leg Protection: Apron draped over pelvis SID: 40” Table top No Tube Angle


Lower extremity
E N D
Presentation Transcript
Intended Learning Outcomes • The student should be able to recognize clinical radiographic technical principles of the lower limb.
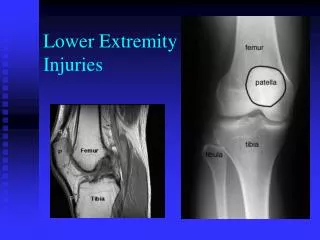
A-P Lower Leg • Measure: A-P at mid-lower leg • Protection: Apron draped over pelvis • SID: 40” Table top • No Tube Angle • Film: 7”x17 I.D. down or diagonal 14” x 17
A-P Lower Leg • Patient lies on back on table. • Leg internally rotated 15° until in true A-P position • Film centered to include knee and ankle joints. The top of the film will be about 2” above knee. • Horizontal CR is centered to film
A-P Lower Leg • Vertical CR: long axis of lower leg • Collimation top to bottom: From knee joint to ankle joint or slightly less than film size. • Collimation side to side: soft tissue of lower leg • Instructions: Remain still • Make exposure and let patient relax.
A-P Lower Leg Film • Must include both knee and ankle articulations • No evidence of rotation • As with this example, the 14” x 17” cassette can be turned diagonally to get both joint spaces on film.
Lower Leg Lateral • Measure: Lateral at mid lower leg • Protection: Apron draped over pelvis • SID: 40” Table Top • No Tube Angle • Film: 7” x 17” I.D. down or diagonal 14”x17” Regular
Lower Leg Lateral • Patient lies on affected side with lower leg in lateral position. • Film centered under leg to get both knee joint and ankle joint on film. Top of film will be about 2” above knee joint. • Horizontal CR centered to film
Lower Leg Lateral • Vertical CR: long axis of lower leg. • Collimation top to bottom: to include knee joint space and ankle joints • Collimation Side to side: soft tissues of lower leg.
Lower Leg Lateral • Make sure that the knee and ankle are in lateral position. The condyles should be perpendicular to film and foot in lateral position. • Collimation Top to Bottom: include both knee joint space and ankle joints
Lower Leg Lateral • Collimation Side to Side: soft tissues of lower leg. • Instructions: Remain still • Make exposure and let patient relax
Lower Leg Lateral Film • Must include both knee and ankle joints. • Both joints should be in true lateral positions. • A 14” x 17” may be turned diagonally to get both joints on film.
Ankle Radiography • Routine views at PCCW • AP • Mortise Oblique • Medial Oblique • Lateral • We do both oblique views for Dr. Scuderi • The mortise open the joints better • The medial oblique demonstrates Jones Fractures.
Ankle A-P • Measure: A-P at malleoli • Protection: lead apron • SID: 40” Table Top • No Tube Angle • Film: 1/2 of 12” x 10 extremity cassette I.D. up
Ankle A-P • Patient is seated or lying on table. Leg is internally rotated until the leg is in a true A-P position position. • The foot is dorsiflexed until the plantar surface is perpendicular to film. • Horizontal CR: at level of talo-tibial joint or malleoli.
Ankle A-P • Half of film is centered to Horizontal CR. • Vertical CR: Long axis of lower leg. • Collimation top to bottom: distal lower leg to soft tissue below calcaneus. Slightly less than film size.
Ankle A-P • Collimation side to side: soft tissue of lower leg and ankle. • Patient Instructions: Remain still • Make exposure and let patient relax.
Ankle A-P Film • A-P on left. • There should be no rotation as evidenced by the medial mortise joint being open. • The talotibial joint should also be open. • Soft tissue of plantar area of foot should be seen.
Ankle Medial Oblique • Measure: A-P at malleoli • Protection: lead apron • SID: 40” Table Top • No Tube Angle • Film: 1/2 of 12” x 10 extremity cassette I.D. up
Ankle Medial Oblique • Patient is seated or lying on table. Leg is internally rotated 45° from true A-P position position. • The foot is dorsiflexed until the plantar surface is perpendicular to film. • Horizontal CR: at level of talo-tibial joint or malleoli.
Ankle Medial Oblique • Half of film is centered to Horizontal CR. • Vertical CR: Long axis of lower leg. • Collimation top to bottom: distal lower leg to soft tissue below calcaneus. Slightly less than film size.
Ankle Medial Oblique • Collimation side to side: soft tissue of lower leg and ankle. • Patient Instructions: Remain still • Make exposure and let patient relax.
Ankle Medial Oblique Film • Oblique on right. • The lateral malleolus should be clear of the talus. • The medial mortise joint may be open • The talotibial joint should also be open. • The tarsal sinus will be open.
Ankle Mortise Oblique • Measure: A-P at malleoli • Protection: lead apron • SID: 40” Table Top • No Tube Angle • Film: 1/2 of 12” x 10 extremity cassette I.D. up
Ankle Mortise Oblique • Patient is seated or lying on table. Leg is internally rotated until the medial and lateral malleoli are parallel to the film , about 15 to 20 °. • The foot is dorsiflexed until the plantar surface is perpendicular to film. • Horizontal CR: at level of talotibial joint or malleoli.
Ankle Mortise Oblique • Half of film is centered to Horizontal CR. • Vertical CR: Long axis of lower leg. • Collimation top to bottom: distal lower leg to soft tissue below calcaneus. Slightly less than film size.
Ankle Mortise Oblique • Collimation side to side: soft tissue of lower leg and ankle. • Patient Instructions: Remain still • Make exposure and let patient relax.
Ankle Mortise & Oblique Film • Oblique on right., Mortise on left • The lateral malleolus should be clear of the talus. • The medial mortise joint must be open • The talotibial joint should also be open.
Ankle Lateral • Measure: Lateral at malleoli • Protection: Lead Apron • SID: 40” Table Top • No Tube Angle • Film: 8” x 10” I.D. up
Ankle Lateral • Patient lies on the affected side with lower leg aligned with table center line. • Foot dorsa-flexed to form a 90° angle with lower leg. • Plantar surface of foot is perpendicular to film and malleoli are perpendicular to film.
Ankle Lateral • Horizontal CR: medial malleolus • Vertical CR: medial malleolus and long axis of lower leg. • Collimation top to bottom: distal tibia to soft tissue below calcaneus
Ankle Lateral • Collimation side to side: to include soft tissue around calcaneus and lower leg. • Instructions: Remain still • Make exposure and let patient relax.
Ankle Lateral Film • Must include distal tibia, talus and calcaneus. • The talus domes must be superimposed. • The fibula should overlie the distal tibia. • The talotibial joint should be open. • Note wrong I.D. location
Calcaneus Axial View • Measure: Lateral at calcaneus • Protection: Lead Apron • SID: 40” Table Top • Tube Angle: 40° cephalad • Film: 1/2 of 8”x10” Extremity Cassette
Calcaneus Axial View • Patient lies or sits on table with affected leg centered to table. • Lower leg in true A-P position and foot dorsiflexed until the plantar surface is perpendicular to film. • A strap or tape may be used for the patient to hold foot in dorsiflexion.
Calcaneus Axial View • Horizontal CR: 1.5 to 2” up the calcaneus tuberosity • Film centered to Horizontal CR. • Vertical CR: long axis of foot. • Collimation top to bottom: to include all of calcaneus and adjacent soft tissues
Calcaneus Axial View • Collimation Side to Side: soft tissue of foot or slightly less than 1/2 of film. • Instructions: Remain still • Make exposure and let patient relax.
Calcaneus Axial View Film • The calcaneus tuberosity will be seen free of distortion. • The Calcaneal-Talus joint space should be seen. • If the foot is not properly dorsiflexed, the joint space will be closed and the tuberosity foreshortened.
Calcaneus Lateral View • Measure: Lateral at calcaneus • Protection: Lead Apron • SID: 40” Table Top • No Tube Angle • Film: 1/2 of 8”x10” Extremity Cassette
Calcaneus Lateral View • Patient lies on table on affected side with affected leg centered to table. • Lower leg in true lateral position and foot dorsiflexed. • Horizontal CR: 1.5 to 2” up the calcaneus tuberosity • Film centered to Horizontal CR.
Calcaneus Lateral View • Vertical CR: through medial malleoli • Collimation top to bottom: to include all of calcaneus and adjacent soft tissues • Collimation Side to Side: soft tissue of foot or slightly less than 1/2 of film.
Calcaneus Lateral View • Instructions: Remain still • Make exposure and let patient relax.
Calcaneus Lateral Film • The calcaneus, talus and ankle should be demonstrated in a true lateral position. • The domes of the talus will be superimposed. • Soft tissues adjacent to the calcaneus and ankle should be visualized.
Foot Radiography • Fractures are characterized by involvement of the subtalar joint (75%) and not involving the subtalar joint. • Stress fractures are common in runners but typically not seen on radiographs. • Stress fractures , plantar fascitis or heel spurs are common repetitive use conditions.
Foot or Heel Radiography • Views of the foot and calcaneus are totally different. • If a heel injury is suspected, take heel views and not foot views. • A 30 degree medial oblique view can be useful. The oblique and lateral will demonstrate the subtalar joint.
Foot Radiography • Foot view must include the tarsal bones, metatarsals and phalanges. • A tube angle is used to open the tarsal bone articulations on the A-P view. • If the patient is flat footed, no tube angle would be needed.