Optical Mineralogy
690 likes | 1.44k Vues
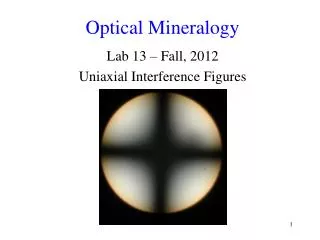
Optical Mineralogy. Lab 13 – Fall, 2012 Uniaxial Interference Figures. Conoscopic Observation. In order to observe an interference figure the microscope must be used in the conoscopic mode

Optical Mineralogy
E N D
Presentation Transcript
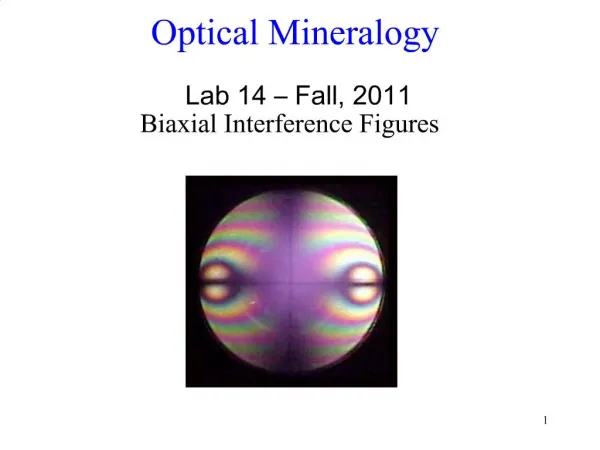
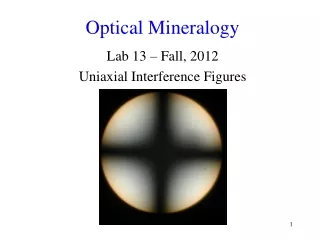
Optical Mineralogy Lab 13 – Fall, 2012 Uniaxial Interference Figures
Conoscopic Observation • In order to observe an interference figure the microscope must be used in the conoscopic mode • Conoscopic refers to the cone-shaped illumination obtained when the condenser lens is near the thin section • This requires that the following conditions be met
Conoscopic Technique • A. Analyzer inserted and crossed with respect to polarizer (CN) • B. Objective lens with a numerical aperture (N.A.) 0.65 must be used • C. The condensing lens must be moved (or swing-out lens inserted) to focus the light on a small area • D. The Bertrand lens must be inserted
Choosing a Grain • Choose a grain that stays in extinction or has very low colors • You are trying to locate a grain with its optic axis perpendicular to the slide • You want to be looking along the optic axis, or as close as you can possibly get – this produces a “centered” optic axis figure • How close that is depends on the birefringence of the mineral
Choosing a Grain, II • For quartz, the grain must be almost black at all times, for olivine, first-order gray will do • For calcite, any recognizable interference color will probably work • Try to be at least in the lower 10% of the mineral's color range • Sometimes you just can't do it with a given thin section, especially if the mineral you're dealing with has only tiny grains or very few of them
Conoscopic vs. Orthoscopic Observation • Diagram compares the two types of viewing
Conoscopic Procedure • Select a grain whose interference you wish to check • Make sure the cover slip is facing up • Move the grain to the center of the stage • Be sure you are in CN (are the polars crossed?) • Focus at low power • Make sure you are not focused on a crack or impurity in the grain
Conoscopic Procedure, II • Increase to medium power, double check focus • Move up to high power and double check focus • Be sure to raise or flip in the auxiliary condenser lens
Bertrand Lens • Insert the Bertrand lens • If your scope does not have a Bertrand lens, remove the eyepiece and look down the microscope tube • An interference figure should appear – rotate the stage to see if there is any change
No Interference Figure? • Check that the microscope is in the correct configuration • Check that the grain on high power is not focused on a crack or impurity • Also check that the high power objective is properly centered
Uniaxial Minerals • The optical class uniaxial has minerals from two mineral systems: • Tetragonal – A4 • Hexagonal • Rhombohedral division A3 • Hexagonal division A6 • Each system has a unique high order axis, as shown – this is the optic axis
Quadrant Labels • The quadrants are labeled starting in the upper right and going counterclockwise • Roman numerals are used to designate quadrants
Optic Axis • The optic axis is designated as the crystallographic “Z” axis • When a thin section of a mineral is cut perpendicular to the optic axis, and then viewed perpendicular to the thin section, light is traveling along the optic axis • Light traveling in this direction experiences a single index of refraction, ω (omega)
Optic Axis Figures The isogyre has 1º color; the area between the isogyre arms is 1º white, unless isochromes are present
Low vs. High Birefringence • Quartz, low birefringence Calcite, high birefringence
Origin of Isogyres Figure 21, page 28, W. W. Moorhouse, The Study of Rocks in Thin Section – S marks the slow ray (for the + case) • In conoscopic view, ω always vibrates ║ to the z axis and tangential to the isochromes, whereas ε ́ always vibrates to the isochromes • Whenever one of these vibration directions is parallel to the polarizer (i.e., E-W), extinction occurs
Origin of Isogyres, II • The two bands of extinction form a centered cross for an optic axis section • The point where the isogyres meet is called the melatope and represents the optic axis itself • Melatope comes from Greek words meaning “dark” and “place”
Origin of Isochromes • Light which travels along the optic axis is not split into two rays, nepsilon' = nomega, and exits the mineral to form the melatope • No retardation "between" rays
Origin of Isochromes, II • Light following paths 2 & 4 experience moderate retardationnepsilon' < nomega ~ 550 nm • Light following paths 3 & 5 experience moderate retardationnepsilon' << nomega ~ 1100 nm because light makes a larger angle with optic axis and must take a longer path through the sample
Photomicrograph of High-Birefringence Mineral • The colored rings are isochromes • Calcite – highly birefringent
Accessory Plates • Accessory plates are plates of anisotropic minerals ground to a thickness that gives a particular retardation of light • When inserted into the light path, they change the retardation of light coming through the thin section by a specific amount and the resultant interference color helps to identify the mineral
1o Red Accessory Plate • This is the compensator you will encounter most frequently • The lab microscopes are equipped with one, and we will use it extensively • The full wave plate is also called a gypsum plate, 1l plate, 550 nm plate, or 1o red plate (1orot, in German) because it is usually made of gypsum and produces a 550 nm or 1o red retardation
Quarter Wave Plate • This plate is found on your microscopes in lab, but we do not use it extensively • As the name implies it produces a retardation of ¼l • It is also called a mica plate, 150 nm plate, and 1o gray plate, because it is usually made of muscovite (glimmer in German) and produces a retardation of 150 nm, or 1o gray
Quartz Wedge • This is a crystal of quartz cut into a wedge shaped • Since its thickness varies along the wedge, it can produce a range of retardations that correspond to interference colors from 0 (1o black) up to about 3800nm (5o green) - this varies from wedge to wedge • The wedge, like all compensators usually has its slow direction clearly marked, and is inserted into the microscope tube such that slow direction in the compensator is at a 45o angle to the polarizing direction
Uniaxial Positive Sign • In a uniaxial mineral, the two principle indices of refraction are denoted ε (epsilon) and ω (omega) • If ε > ω, the mineral is uniaxial positive
Uniaxial Negative Sign • If ε < ω, the mineral is uniaxial negative
Determination of the Optical Sign • Accessory plates may be used to determine the optical sign • Minerals with isochromes are usually treated differently than minerals without isochromes
Uniaxial Mineral, No Isochromes • The 1º red (Rot 1) plate is inserted • On most microscopes, this will be from the SE • The slow direction of the accessory plate (N) should be aligned NE-SW • A blue color appears in quadrants I & III, which indicates addition • A yellow color in quadrants II & IV indicates subtraction • This is a uniaxial positive mineral with low birefringence
Uniaxial Positive with 1º Red Plate • Uniaxial positive mineral, with 1º red plate • Note blue in quadrants I & III, yellow in quadrants II & IV • The isogyres show the 1º red color of the accessory plate
Uniaxial Mineral, No Isochromes • A mica or quarter λ plate may be used for minerals with low to moderate birefringence • It produces a pair of black dots in quadrants where subtraction occurs Figure 24b, page 30, W. W. Moorhouse, The Study of Rocks in Thin Section
Uniaxial Mineral, with Isochromes • The isochromes in quadrants I &III move inward, and those in quadrants II & IV move outward • This is a uniaxial positive mineral with moderate to high birefringence
Multiple Isochromes • If the interference figure displays numerous isochromes, color changes produced with the 1º red plate become difficult to detect • In this case the quartz wedge is used • Inserting the Quartz wedge results in the movement of the isochromes about the isogyres
Use of the Quartz Wedge • In quadrants where the colors subtract, the isochromes move outward as lower order colors form near the melatope and displace higher order colors • In quadrants where the colors add, the isochromes move inwards, towards the melatope • The isogyre, on insertion of the accessory adopts the interference color corresponding to the retardation of the accessory
Uniaxial Mineral, with Isochromes, using Quartz Wedge • Left, positive; right, negative
Uniaxial Mineral, No Isochromes • A blue color appears in quadrants II & IV, which indicates subtraction • A yellow color in quadrants I & III indicates addition • This is a uniaxial negative mineral with low birefringence
Uniaxial Mineral, with Isochromes • The isochromes in quadrants I &III move outward, and those in quadrants II & IV move inward • This is a uniaxial negative mineral with moderate to high birefringence
Uniaxial Negative with 1º Red Plate • Uniaxial negative mineral, with 1º red plate • Note blue in quadrants II & IV, yellow in quadrants I & III • The isogyres show the 1º red color of the accessory plate
Summary of Uniaxial Sign Determination • The diagram summarizes the determination of uniaxial signs using a 1o red plate
Off-Center Figures • Finding a grain with the optic axis oriented exactly perpendicular to the stage will sometimes be very difficult • It would be much more common to find one wherein the optic axis is at a slight angle to being perpendicular to the microscope stage
Off-Center Figure Properties • Such a grain will exhibit the following properties: • It is a grain that shows w refractive index and an e' refractive index that is close the w refractive index • It would also show very low order (1o gray interference colors between extinction positions if the analyzer is inserted in orthoscopic mode
Off-Center Figure Diagram • On rotation of the stage, the melatope would rotate in a circle around the perimeter of the field of view, and the bars of the isogyres would remain oriented E-W and N-S
Rotation of an Off-center Figure • Figure 22, page 29, W. W. Moorhouse, The Study of Rocks in Thin Section
Off-Center Orientation Diagram • The melatope lies outside the field of view • The vibration direction of the ordinary ray is tangential to the isochromes • The vibration direction of the extraordinary ray is radial from the melatope
Photomicrographs of Off-Center Figures • Thick Quartz – Left 15º off center; Right 30º off center
Positive Off-Center Figure • For an optically positive crystal, all NE and SW quadrants will turn blue and the NW and SE quadrants will turn yellow, both colors replacing the 1ogray color present before insertion of the compensator
Negative Off-Center Figure • For an optically negative crystal, all NE and SW quadrants will turn yellow and all NW and SE quadrants will turn blue, both colors replacing the 1ogray color present before insertion of the compensator
Flash Figure • A mineral grain is oriented with it's optic axis horizontal • This orientation exhibits the maximum birefringence, for this mineral in the thin section, and produces a flash figure
Flash Figure II • The flash figure results because the vibration directions, of the indicatrix, within the field of view are nearly parallel to polarization directions of the microscope • extraordinary rays vibrate parallel to optic axis • ordinary rays vibrate perpendicular to optic axis
Flash Figure III • With the grain at extinction, the optic axis is oriented either EW or NS in the resulting interference figure • The interference figure produced occupies most if not all of the field of view and consists of a very broad, fuzzy isogyres cross • Upon rotating the stage, < 5° rotation, the isogyres will split and move out of the field of view in opposite quadrants
Flash Figure Diagram • Diagram showing flash figure orientation, and a flash figure image