Before We Begin…
This comprehensive guide outlines essential drill and marching procedures for flight commanders and members during formation activities. It covers techniques such as coordinated arm swings, step measurements, pivoting, and maintaining attention. Key commands like "Fall-In," "Open Ranks," and "Present Arms" are detailed to ensure proper execution during inspections. Emphasis is placed on arm positioning, alignment, and overall posture, fostering discipline and cohesion within the flight. Perfect for training personnel in military or organizational settings.
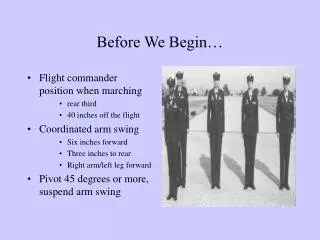

Before We Begin…
E N D
Presentation Transcript
Before We Begin… • Flight commander position when marching • rear third • 40 inches off the flight • Coordinated arm swing • Six inches forward • Three inches to rear • Right arm/left leg forward • Pivot 45 degrees or more, suspend arm swing
Before We Begin… • Half step • 12 inch step, measured from heel to heel • Do not stomp • Maintain arm swing (6 to the front, 3 to the rear) • Heel beat (no stomping) • Pivots • opposite foot your turning (turn left on the right foot) • Always take one additional step after command of execution before executing
(1) Fall-In (Line Formation) • Upon hearing the command, move quickly (with a sense of urgency) no running, no talking • Guide needs to center the formation 3 paces from the commander • Guide/Element Leaders take their positions quickly so the rest of the flight members can fill in from there, by executing an immediate dress right dress until you feel shoulder contact against your finger tips • Squaring-Off (automatic) • Fill in from the forth element to the first (rear forward) • Sizing • Right Face • Taller tap • Right Face • Taller tap • Left face • Taller tap • Count Off
Open Ranks Preparing for inspection Align flight Flt/CC steps off in a 45 degree angle to the left 1st element 3 paces (# of people behind you) automatic dress right dress left arm parallel to ground 2nd element 2 paces automatic dress right dress left arm parallel to ground 3rd element 1 pace automatic dress right dress left arm parallel to ground 4th element stand fast automatic dress right dress left arm parallel to ground (2) Open Ranks, March
Procedures to Align Flight Maintain the position of attention Step to the right/left if necessary don’t lean return center Step and pivot to the next element and repeat the same procedure Remember your aligning chests/name tags not toes After 4th element right face proceed 3 paces beyond guide stop, left face Ready Front *Move forward & center yourself on the flight * if you were to inspect at this point, you would put the 2-4 elements at Parade Rest Open Ranks, March (cont.)
(3) Ready Front • All element return left arm to their side smartly without causing any commotion. • Cup hand as it passes your waist • Return to center of flight • Give close ranks, march
(4) Close Ranks • 1st Element • stand fast • 2nd Element • 1 pace • 3rd Element • 2 paces • 4th Element • 3 paces
(5) Present Arms • Raise the right hand smartly in front of body, while at the same time extending and joining fingers • Keep the palm flat facing the body • Place the thumb along the forefingers, keeping the palm flat and forming a straight line between the fingertips and elbow • Tilt the palm slightly toward the face. • Hold upper arm horizontal slightly forward of the body and parallel to the ground • Ensure the tip of the middle finger touches the right front corner of the headdress, or • If wearing a non-billed cap, ensure the middle finger touches the right front corner of the right eyebrow or • The front corner of your glasses
(6) Order Arms • Bring arm smoothly and smartly downward retracing the path used to raise the arm • Cup the hand as it passes the waist, while maintaining the position of attention.
(7) Parade Rest • Raise left foot from the hip just enough to clear the ground • Move it smartly to the left so heels are 12 inches apart, legs straight • As left foot moves bring arms fully extended to back of body, uncupping the hands in the process • Fingers extended and joined pointing towards the ground • Palms face outward • Right hand in palm of left, right thumb over left forming an X • Remain silent and immobile
(8) Attention • Bring heels together smartly on line • Body erect • Feet- 45 degree angle • Legs straight without stiffening • Chest lifted, back arched, hips level • Shoulders square and even • Arms hang straight down without stiffness
Wrist are straight with the forearm • Hands are cupped (no fist) with thumbs along seam of trousers • Head is erect, chin drawn slightly so axis of the head and neck is vertical • Eyes are to the front with line of sight parallel to the ground
(9) Left Face • Raise the left toe and right heel slightly and pivot 90 degrees to the left on the ball of the right toe and left heel • Keep legs straight but not stiff • Upper body remains at position of attention • Bring right foot smartly forward ensuring heels are together and on line • Feet should be at a 45 degree angle
(10) About Face • Lift the right foot from the hip enough to clear the ground • Without bending the knees place the ball of the right foot approximately half a shoe length behind and slightly to the left of the left heel • Keep upper body erect, pivot 180 degrees to the right on the ball of the right foot and heel of the left foot with a twisting motion from the hips, keeping arms suspended to your sides. • Heels should be together on line forming a 45 degree angle, still maintaining the Position of Attention.